|
|
Post by ira on May 23, 2011 13:07:05 GMT -6
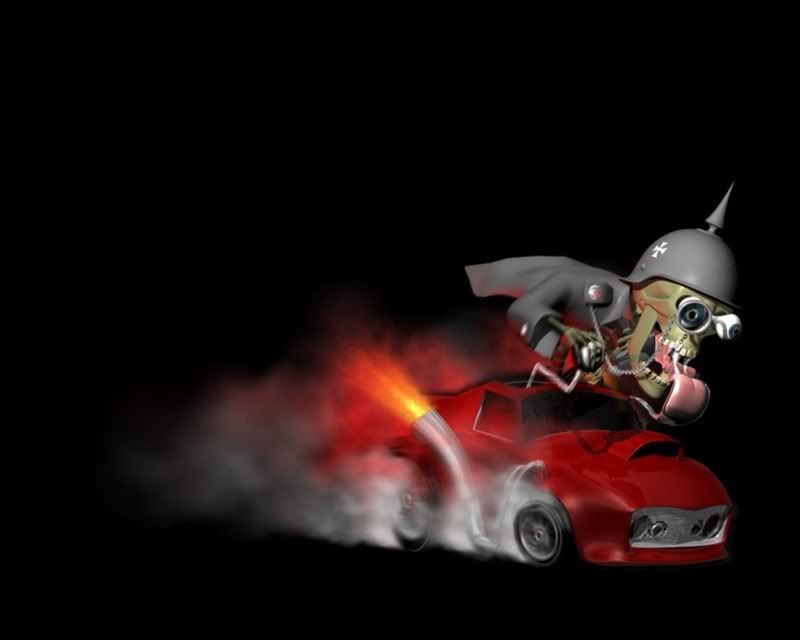
Here is a few tips on making your own Deals Wheels Truck. I picked the AMT 53 Ford Flipnose, because I had 3 of them and the cab, fenders & bed were all separate parts. Having the front fenders & hood separate allows you to easily reduce the width of these parts by different amounts,  Here is what I did... Reduced the width of the cab by 1/2", reduced the width of the front flipnose 1/4", shortened the cab by 1/4" & cut off the pickup bed ends to meet the fenders. Glued the cab back together, then measured the width of the cowl and then marked the hood at the same width and then cut off that part of the hood.  Fit the cab in place so that the cowl and the hood line up, then attached with glue. Next the front fenders were shortened and then filled in with sheet plastic. The rear fenders were made wider with a strip of plastic. The back of the bed was replaced with sheet plastic. If you have any questions let me know! |
|
|
|
Post by customcruiserroy on May 23, 2011 13:24:42 GMT -6
[If you have any questions let me know!]
What's the meaning of life?
I have some scrap '50 Chevy trucks. Since they are headed to the scraper, I might as well give it a try. Thanks for the info!
RSS
|
|
|
|
Post by ira on May 23, 2011 13:30:45 GMT -6
[If you have any questions let me know!] What's the meaning of life? I have some scrap '50 Chevy trucks. Since they are headed to the scraper, I might as well give it a try. Thanks for the info! RSS [glow=red,2,300]GOOD QUESTION![/glow] |
|
|
|
Post by jim on May 24, 2011 10:00:01 GMT -6
been trying to get a roadrunner shrunk to deals wheel proportions this might help, my next try was some crazy medicine man
|
|
|
|
Post by ira on May 24, 2011 11:02:25 GMT -6
been trying to get a roadrunner shrunk to deals wheel proportions this might help, my next try was some crazy medicine man Check out Trey Wright's websight, there is a Roadrunner & several other styles! treswright.vervehosting.com/ |
|
|
|
Post by davekapp on May 24, 2011 14:53:35 GMT -6
Man what a great idea! Nice work, Ira.
|
|
|
|
Post by 4speed on May 24, 2011 17:40:42 GMT -6
Thanks Ira!! I'll have to try this!!! ;D
|
|
|
|
Post by modelcitizen on May 26, 2011 1:17:54 GMT -6
Talk about the right "flavour"!!! You're nailing it Ira!!! That's finger kickin' good!!!
Keep at it man!!!
"Paulie"
|
|
|
|
Post by Wardster on May 26, 2011 1:50:19 GMT -6
Awesome little truck; with (as I've mentioned before) perfect 'toon proportions and outlines!
Dumb question, Ira: have you ever used heat to weld plastic; instead of using glues, etc.?
I ask because I know you've been building models for quite some time -- I just picked up the March 1972 issue of Car Model, and saw you cut-and-paste two kits together, there -- and I have used the technique myself, and I really liked it ... but it's not the kind of thing anyone is going to talk much about in today's magazines. I'm sort of a book / magazine junkie, and am expanding my automotive modeling library, here and there ... and would definitely move old back issues or whatever way up on my Want List, if I knew there'd be "plastic welding" info.
-- Ward Shrake --
|
|
|
|
Post by treswright on May 26, 2011 15:29:51 GMT -6
Nice work Ira!! Ironically for years I've wanted to do do this exact same project (well, a '56 F100) and even built a driver's head for it many years ago (dude with a big ol' handlebar mustache and a 10-gallon hat). Still have the head around somewhere. The proportions on the truck look fantastic, very close to what I had pictured doing. I can't wait to see how this one turns out!
|
|
|
|
Post by ira on May 26, 2011 18:40:36 GMT -6
Awesome little truck; with (as I've mentioned before) perfect 'toon proportions and outlines! Dumb question, Ira: have you ever used heat to weld plastic; instead of using glues, etc.? I ask because I know you've been building models for quite some time -- I just picked up the March 1972 issue of Car Model, and saw you cut-and-paste two kits together, there -- and I have used the technique myself, and I really liked it ... but it's not the kind of thing anyone is going to talk much about in today's magazines. I'm sort of a book / magazine junkie, and am expanding my automotive modeling library, here and there ... and would definitely move old back issues or whatever way up on my Want List, if I knew there'd be "plastic welding" info. -- Ward Shrake -- I never tried any type of plastic welding that worked very well for me. I used a solder gun and melted scrap from the plastic trees on to the joints, but I didn't like the results. I also tried some solvents which held for a few months then failed. I find that Testors glue, Zap-A-Gap & putty work pretty good. I also back most joints with a strip of plastic for extra strength. |
|
|
|
Post by ira on May 26, 2011 18:45:00 GMT -6
Nice work Ira!! Ironically for years I've wanted to do do this exact same project (well, a '56 F100) and even built a driver's head for it many years ago (dude with a big ol' handlebar mustache and a 10-gallon hat). Still have the head around somewhere. The proportions on the truck look fantastic, very close to what I had pictured doing. I can't wait to see how this one turns out! Thanks Tres! Why don't you go ahead & finish up that '56 F100 for the contest? By the way.. Great Website!!! |
|
|
|
Post by Wardster on May 26, 2011 21:39:42 GMT -6
Why don't you go ahead & finish up that '56 F100 for the contest? Yeah, what Ira said! The more the merrier! ;D |
|
|
|
Post by Wardster on May 26, 2011 21:51:23 GMT -6
I never tried any type of plastic welding that worked very well for me. I used a solder gun and melted scrap from the plastic trees on to the joints, but I didn't like the results. I also tried some solvents which held for a few months then failed. I find that Testors glue, Zap-A-Gap & putty work pretty good. I also back most joints with a strip of plastic for extra strength. Okay, great -- thanks for the info, sir! All good stuff to know. (Now, back to this mega-cool 'toon thread; already in progress!) |
|
|
|
Post by treswright on May 26, 2011 23:20:51 GMT -6
Ira, thanks! I actually have a half-completed GSX that I'm hoping to finish for the contest, I started it maybe 2 years ago and need to get back to it before I lose all the parts  It's pretty far along, all the chopping and rejoining is done, it's in primer and ready to paint. I still need to make the decals for it too. The truck project never made it out of my head aside from sculpting the driver, so I'll live vicariously through you on that one, LOL! |
|
|
|
Post by customcruiserroy on May 29, 2011 13:13:31 GMT -6
What I don't get (since I don't have an artist's eye I guess) is how you figure the "puffiness" on the cars. What I see is a small ass, small grill and "puffy" middle. That's the whole secret to doing a good Deal-esque car. Ideas would be much appreciated!
Take care,
RSS
|
|
|
|
Post by ira on May 29, 2011 13:41:33 GMT -6
What I don't get (since I don't have an artist's eye I guess) is how you figure the "puffiness" on the cars. What I see is a small ass, small grill and "puffy" middle. That's the whole secret to doing a good Deal-esque car. Ideas would be much appreciated! Take care, RSS This is the first Deals Wheels design that I have tried. I suggest looking at Dave Deals artwork to figure out how to do your own. You can look him up on Google. All the designs are different and they all seem to be very short. |
|
|
|
Post by customcruiserroy on May 29, 2011 17:23:59 GMT -6
Thanks for the inspiration! I will try making one. And because of you, I went and found Sculpey (49 cents each) to try and make a head. Keep us posted!
RSS
|
|
|
|
Post by Wardster on Jun 1, 2011 14:00:02 GMT -6
Here's a really stupid question for ya, Mr. Ira, sir: although I've gotten pretty decent at some rather obscure techniques that only a few folks ever try, I must admit that I'm (really) weak at doing some things that other folks probably consider to be "Kindergarten Stuff".
Cutting lines and having them come out straight, for instance.
I'm sure you'd have a lot of great tips along those lines, considering all of the kit-bashes you've built (and published pics of) over the last several decades. Care to enlighten newbies like me, on the idea of how to make good cuts? (And no, I'm not kidding! Impatience and being able to weld plastic and make repairs that way has probably encouraged me to make far too many non-straight cuts! I think I've gotten worse, over time; not better!? But it would be awesome to just have most of my cuts come out straight and "good," in the first place!)
-- Ward Shrake --
|
|
|
|
Post by ira on Jun 1, 2011 21:15:50 GMT -6
Here's a really stupid question for ya, Mr. Ira, sir: although I've gotten pretty decent at some rather obscure techniques that only a few folks ever try, I must admit that I'm (really) weak at doing some things that other folks probably consider to be "Kindergarten Stuff". Cutting lines and having them come out straight, for instance. I'm sure you'd have a lot of great tips along those lines, considering all of the kit-bashes you've built (and published pics of) over the last several decades. Care to enlighten newbies like me, on the idea of how to make good cuts? (And no, I'm not kidding! Impatience and being able to weld plastic and make repairs that way has probably encouraged me to make far too many non-straight cuts! I think I've gotten worse, over time; not better!? But it would be awesome to just have most of my cuts come out straight and "good," in the first place!) -- Ward Shrake -- I measured twice and used 1/4" & 1/2" masking tape for most of these cuts. Lay the tape along the cutting section and mark along the outside edges of the tape with a fine marker. Remove the tape. Cut inside the line, don't cut over the line, you can always cut more later! I cut with a Razor saw or a "Cut-Off" wheel in the Dremel tool. After making the cuts, lay the cut sections of body flat on a sheet of 80 grade sandpaper and slide them back & forth untill the cut surfaces are all flat. You can then drop to a 220 grade sandpaper for cleaner lines. Don't go over your lines and keep the sandpaper flat! So you don't have to "cut" it straight , you can clean it up and straighten it out later with sandpaper. I try to make the joints fit so close there is no need for putty. How to cut the curved line on the hood:I use the cowl as a template and traced the cowl line on the hood. Then I used a grinder to get close to the line and then sandpaper to clean it up. I fit the cab back in and sanded, over and over untill it fit right. This "DW" Style truck conversion seen here, took me about 4 hours one night. It goes pretty quick with a little inspiration and some Zap-A-Gap glue! Hope this is helps with some of those crooked lines! |
|
|
|
Post by Wardster on Jun 2, 2011 12:59:55 GMT -6
This "DW" Style truck conversion seen here, took me about 4 hours one night. It goes pretty quick with a little inspiration and some Zap-A-Gap glue! Hope this is helps with some of those crooked lines! I'm sure it will be of help, Ira. Thanks for posting it! (I'll end up adding it to my collection of "saved online articles and tips"!) Assuming that you won't mind further questions and comments: You got me thinking about glues, too. Earlier, when you said you used Testors glue, I imagine you meant their liquid (bottled) glue? The one that I've heard takes longer to set than some of the ultra-fast welding-via-chemistry glues; but is often stronger as far as the resulting bond? You mentioned strength of joints, and having used various glues; hence requesting confirmation or clarification. (Why not pick your brain, given your long history of all the cool-looking kit-bashes you've been making for so long?!) And as far as super glues go: do you use both thick and thin types? Perhaps one of those types, more often than the other? I noticed you had some baking soda visible, in some of your in-progress pics. A few years back, I had learned how to dye talc and baking soda (or a mix of both powders) ... which I felt was a major improvement in that particular process, at that time ... and in thinking about all of those experiments I did back in 2007, it occured to me that a pair of lengthy articles were still online, over at Internet Modeler: so, over in this forum's "Tips and Tricks" sub-section, I posted some links to those articles. (Any comments? Assuming you take a look at those articles, at some future point.) coffincorner.proboards.com/index.cgi?action=display&board=tips&thread=15431Forgive me, Ira, if I'm being a pest! I'm sort of an information addict, in a way ... and I can't resist the urge to 'dig deeper'. One last question, in regards to your truck's surgery: I think it would be of benefit (both to myself and to other readers) if you would take the time to just mark off the cuts, as it were, on one of your other kits. Any chance you can lay out the thicknesses of tape that you used, where you had eye-balled your "sections" and/or other cuts? So that, at a glance, others could get a good visual idea of how much you removed; and where you did it? I think a picture or three would explain a huge amount, that way. It wouldn't be necessary to make each cut, again: just to lay out the tape you used; so it's more obvious what was removed. Normally, I wouldn't bug a person this much ... but, to my eye, your quickly cut-and-pasted 'real life' truck is better-proportioned and more pleasing to the eye (and also to the funny bone!) than some of the kits that ended up being included in the official Deal's Wheels kit line. Some of the official kits, I dearly love ... and some of the others, I've always personally had some issues with. (No insult or harm meant: it's just that Revell's managment used the logic of the time, in their thinking; and sort of micro-managed the artist's work, in a sense: taking Deal's drawings, I mean, and ignoring things like the huge 'toon engine for the Zzzzz-28; and including parts in the kit that looked nothing like the drawings.) Not trying to start a flame war, or anything: Just saying that, to my eye, your little truck is a very worthy extension of the official kit line. Had you started with a Revell or Monogram kit, I'd maybe suggest having Revell laser-scan your model, as a "maybe later" addition to the Deal's Wheels line. I've shown the pics to some local friends of mine, and they said it was "the cutest thing, ever" and that it was the best-looking 'toon model I'd shown them. -- Ward Shrake -- |
|
|
|
Post by Wardster on Jun 2, 2011 13:03:29 GMT -6
What I don't get (since I don't have an artist's eye I guess) is how you figure the "puffiness" on the cars. What I see is a small ass, small grill and "puffy" middle. That's the whole secret to doing a good Deal-esque car. Ideas would be much appreciated! Just a suggestion: there's a great book out, that might help. It's available, cheaply and easily, at Amazon and other places. (If the link below doesn't work, look for Thom Taylor's "How to Draw Crazy Cars and Mad Monsters Like a Pro".) www.amazon.com/Draw-Crazy-Monsters-Motorbooks-Studio/dp/0760324719/ref=sr_1_1?ie=UTF8&s=books&qid=1307041290&sr=8-1Know that Mr. Taylor included a few more-recent Big Deal car drawings, in there; and lots of other artist's work is seen there. -- Ward Shrake -- |
|
|
|
Post by ira on Jun 3, 2011 12:05:27 GMT -6
This "DW" Style truck conversion seen here, took me about 4 hours one night. It goes pretty quick with a little inspiration and some Zap-A-Gap glue! Hope this is helps with some of those crooked lines! I'm sure it will be of help, Ira. Thanks for posting it! (I'll end up adding it to my collection of "saved online articles and tips"!) Assuming that you won't mind further questions and comments: You got me thinking about glues, too. Earlier, when you said you used Testors glue, I imagine you meant their liquid (bottled) glue? The one that I've heard takes longer to set than some of the ultra-fast welding-via-chemistry glues; but is often stronger as far as the resulting bond? You mentioned strength of joints, and having used various glues; hence requesting confirmation or clarification. (Why not pick your brain, given your long history of all the cool-looking kit-bashes you've been making for so long?!) And as far as super glues go: do you use both thick and thin types? Perhaps one of those types, more often than the other? I noticed you had some baking soda visible, in some of your in-progress pics. A few years back, I had learned how to dye talc and baking soda (or a mix of both powders) ... which I felt was a major improvement in that particular process, at that time ... and in thinking about all of those experiments I did back in 2007, it occured to me that a pair of lengthy articles were still online, over at Internet Modeler: so, over in this forum's "Tips and Tricks" sub-section, I posted some links to those articles. (Any comments? Assuming you take a look at those articles, at some future point.) coffincorner.proboards.com/index.cgi?action=display&board=tips&thread=15431Forgive me, Ira, if I'm being a pest! I'm sort of an information addict, in a way ... and I can't resist the urge to 'dig deeper'. One last question, in regards to your truck's surgery: I think it would be of benefit (both to myself and to other readers) if you would take the time to just mark off the cuts, as it were, on one of your other kits. Any chance you can lay out the thicknesses of tape that you used, where you had eye-balled your "sections" and/or other cuts? So that, at a glance, others could get a good visual idea of how much you removed; and where you did it? I think a picture or three would explain a huge amount, that way. It wouldn't be necessary to make each cut, again: just to lay out the tape you used; so it's more obvious what was removed. Normally, I wouldn't bug a person this much ... but, to my eye, your quickly cut-and-pasted 'real life' truck is better-proportioned and more pleasing to the eye (and also to the funny bone!) than some of the kits that ended up being included in the official Deal's Wheels kit line. Some of the official kits, I dearly love ... and some of the others, I've always personally had some issues with. (No insult or harm meant: it's just that Revell's managment used the logic of the time, in their thinking; and sort of micro-managed the artist's work, in a sense: taking Deal's drawings, I mean, and ignoring things like the huge 'toon engine for the Zzzzz-28; and including parts in the kit that looked nothing like the drawings.) Not trying to start a flame war, or anything: Just saying that, to my eye, your little truck is a very worthy extension of the official kit line. Had you started with a Revell or Monogram kit, I'd maybe suggest having Revell laser-scan your model, as a "maybe later" addition to the Deal's Wheels line. I've shown the pics to some local friends of mine, and they said it was "the cutest thing, ever" and that it was the best-looking 'toon model I'd shown them. -- Ward Shrake -- [glow=red,2,300]WOW!!![/glow] Thanks for the kind words, Ward. You can think up questions much faster than I think up answers. I will have to take them one at a time, here is the first one... I use Zap-A-Gap Green Label (Medium) and Testors Red Label in the tube for most body joints. I use the Zap-A-Gap, sprinkled with baking soda, to hold the pieces together quickly. The powder dries the glue quickly so I don't get it on my fingers. Then I use Testors Red Label on the inside of the joint. Sometimes I glue a piece of plastic on the inside of the joint for added strength. Later, Ira |
|
|
|
Post by Wardster on Jun 3, 2011 23:23:53 GMT -6
[glow=red,2,300]WOW!!![/glow] Thanks for the kind words, Ward. You can think up questions much faster than I think up answers. Ha! Sorry, man! For whatever it's worth: take it as a compliment... 'cause it's definitely meant that way.  -- Ward Shrake -- |
|
|
|
Post by ira on Jun 5, 2011 16:57:53 GMT -6
One last question, in regards to your truck's surgery: I think it would be of benefit (both to myself and to other readers) if you would take the time to just mark off the cuts, as it were, on one of your other kits. Any chance you can lay out the thicknesses of tape that you used, where you had eye-balled your "sections" and/or other cuts? So that, at a glance, others could get a good visual idea of how much you removed; and where you did it? I think a picture or three would explain a huge amount, that way. It wouldn't be necessary to make each cut, again: just to lay out the tape you used; so it's more obvious what was removed.
-- Ward Shrake --[/quote][/i]
Why just tape and take photos, I'll go ahead and make another little DW Truck.
I would be happy to do some cutting on another truck to show the process better. Instead of another '53 I found a '56 Ford F100 that I can use for the second Deals Wheels truck.
I'll start the "56 F100 after the "53 is finished. It shouldn't be much longer...
|
|
|
|
Post by Wardster on Jun 8, 2011 13:51:18 GMT -6
Why just tape and take photos, I'll go ahead and make another little DW Truck. I would be happy to do some cutting on another truck to show the process better. Instead of another '53 I found a '56 Ford F100 that I can use for the second Deals Wheels truck. I'll start the "56 F100 after the "53 is finished. It shouldn't be much longer... Just a thought or suggestion for you to consider, Mr. Ira Sir, but if you're already willing to do what amounts to writing up a step-by-step how-to article on how to eyeball up some pleasing, cartoon proportions, with photos demonstrating the steps, visually ... why not consider submitting it, as an article (rather than a message thread) to some place like "Internet Modeler"? (That's assuming one of your other, usual places to submit stuff for publication didn't already have dibs on such an article?) Or maybe do it up in PDF form; to be hosted on your web site? I mention it 'cause I'm starting to get back into the habit of sending stuff to them, and from what I've seen in the past, they were always wanting more automotive how-to articles, over at Internet Modeler -- and they've run 'toon car articles by me, in the past. (I scratchbuilt a slightly 'tooned body for a Cadillac STS. I forgot all about that article, until just recently! Whoops! Guess I'm more of a "submit it and forget it" writer than I had thought?!) I'm not knocking doing things in message thread format; it's just that, as a reader, I prefer the semi-permanence of knowing that a digital publication often keeps things online, for years; and it's just nice to be able to go to some specific place, and download an entire article; and to save it on a person's computer and/or do a printout of it. Certain types of storage just make that easier to do -- and message threads tend to "go away" too soon for my tastes; or are sometimes hard to relocate, for re-reading later. Anyway ... just a thought; and some encouragement that if you are going to do up a how-to type of an article, anyway, that it be done in a form that makes it easier for 'toon vehicle addicts like me to better feed our habits, as it were; over the longer term. As a writer: for myself, I have to admit that sometimes my articles end up being sort of a brain dump of where I'm at, tricks-wise, with some new-to-me technique I'm trying to refine. Looking back: if I hadn't written up and photographed the earliest stages of what I had done with my old Cartoon Caddy project, from 2007 or so: I'd have totally forgotten that I had used Silly Putty to distort some 2D tracings of Real Life car photos; to work out the most pleasing visual proportions for that project. So, flashing forward a few years: it's almost like reading someone else's article; and seeing some tip or trick I'd have never thought of! www.internetmodeler.com/2007/october/autos/cartoon_car.phpSo, for me: writing stuff down is a huge help in not forgetting "old tricks" -- and it has the side benefit, once something's in print, of letting others in on the gag, as it were. With your stuff, I think you already have a ready audience for your articles; and since the truck you just did was your first 'toon proportions one, and it came out so well; I for one would love to see those steps written down and photographed and explained, in an "archive-able" way. (That is: something more permanent, and less prone to "loss".) Not that you need an extra push, but I'm sure you'd be helping the plastic's industry, in making others want to cut up existing kits ... heehee! ... so, for that and other reasons: I hope you let your fans (me among them) in one the overall process you've used, to creatively cut-and-paste an existing kit into 'toon form. ;D -- Ward Shrake -- |
|
|
|
Post by ira on Jun 9, 2011 14:25:21 GMT -6
Why just tape and take photos, I'll go ahead and make another little DW Truck. I would be happy to do some cutting on another truck to show the process better. Instead of another '53 I found a '56 Ford F100 that I can use for the second Deals Wheels truck. I'll start the "56 F100 after the "53 is finished. It shouldn't be much longer... Just a thought or suggestion for you to consider, Mr. Ira Sir, but if you're already willing to do what amounts to writing up a step-by-step how-to article on how to eyeball up some pleasing, cartoon proportions, with photos demonstrating the steps, visually ... why not consider submitting it, as an article (rather than a message thread) to some place like "Internet Modeler"? (That's assuming one of your other, usual places to submit stuff for publication didn't already have dibs on such an article?) Or maybe do it up in PDF form; to be hosted on your web site? I mention it 'cause I'm starting to get back into the habit of sending stuff to them, and from what I've seen in the past, they were always wanting more automotive how-to articles, over at Internet Modeler -- and they've run 'toon car articles by me, in the past. (I scratchbuilt a slightly 'tooned body for a Cadillac STS. I forgot all about that article, until just recently! Whoops! Guess I'm more of a "submit it and forget it" writer than I had thought?!) I'm not knocking doing things in message thread format; it's just that, as a reader, I prefer the semi-permanence of knowing that a digital publication often keeps things online, for years; and it's just nice to be able to go to some specific place, and download an entire article; and to save it on a person's computer and/or do a printout of it. Certain types of storage just make that easier to do -- and message threads tend to "go away" too soon for my tastes; or are sometimes hard to relocate, for re-reading later. Anyway ... just a thought; and some encouragement that if you are going to do up a how-to type of an article, anyway, that it be done in a form that makes it easier for 'toon vehicle addicts like me to better feed our habits, as it were; over the longer term. As a writer: for myself, I have to admit that sometimes my articles end up being sort of a brain dump of where I'm at, tricks-wise, with some new-to-me technique I'm trying to refine. Looking back: if I hadn't written up and photographed the earliest stages of what I had done with my old Cartoon Caddy project, from 2007 or so: I'd have totally forgotten that I had used Silly Putty to distort some 2D tracings of Real Life car photos; to work out the most pleasing visual proportions for that project. So, flashing forward a few years: it's almost like reading someone else's article; and seeing some tip or trick I'd have never thought of! www.internetmodeler.com/2007/october/autos/cartoon_car.phpSo, for me: writing stuff down is a huge help in not forgetting "old tricks" -- and it has the side benefit, once something's in print, of letting others in on the gag, as it were. With your stuff, I think you already have a ready audience for your articles; and since the truck you just did was your first 'toon proportions one, and it came out so well; I for one would love to see those steps written down and photographed and explained, in an "archive-able" way. (That is: something more permanent, and less prone to "loss".) Not that you need an extra push, but I'm sure you'd be helping the plastic's industry, in making others want to cut up existing kits ... heehee! ... so, for that and other reasons: I hope you let your fans (me among them) in one the overall process you've used, to creatively cut-and-paste an existing kit into 'toon form. ;D -- Ward Shrake -- Thanks for the suggestions Ward! I wrote for the Goodguys Goodtimes Gazette for about 4 years, and now I am taking a break from writing and just enjoying building. Unfortunately, I am not able to access my website since I switched to a new Dell computer. I was using a very old version of Pagemill on an old Mac to make the site and I haven't found a new (easy) web program that I can use on the Dell yet. I really want to add the "PANIC" dragster to the site too! Anyway, I was planning a very simple, easy, "How To" on the '56 Ford, not big article. Thanks again for all the kind words, Ira |
|
|
|
Post by Brandon on Jun 14, 2011 16:27:34 GMT -6
Great work, Ira,the truck is on the money....
|
|
|
|
Post by Brandon on Jun 14, 2011 23:00:01 GMT -6
This was the kick in the pants I needed today... I was inspired by your fender opening treatment and dug my mock up out and made an incredible amount of progress on it tonight...
Thanks!
|
|
|
|
Post by Wardster on Jun 17, 2011 12:06:46 GMT -6
Unfortunately, I am not able to access my website since I switched to a new Dell computer. I was using a very old version of Pagemill on an old Mac to make the site and I haven't found a new (easy) web program that I can use on the Dell yet. I really want to add the "PANIC" dragster to the site too! For those reading over Ira's shoulder, and mine, on the topic above ... some days ago, I used a program called WebCopier to copy the "internet version" of Ira's site onto my PC; and then burned a CD-ROM with his site on it; and sent the disc to Ira, via snail mail. So ... "Lord willin' and the creek don't rise," Ira will soon be back in the web site updating business; since he and I have now apparently gotten past the first part of the "need a local copy on my PC; so I can make changes to it; and then upload it to the web" problem. The second part of that problem still mostly remains; so, if anyone knows of an easy-to-use web site editing program, which Ira could use to modify his existing site (to make updates, as time goes on), I'm sure a Private Message to him about it would be a good thing. (I mostly only hand-edit HTML code; and am rusty on doing even that, since it's been years since I did things like act as the webmaster for a now-defunct IPMS chapter; so, while I could help Ira in other ways, I'm afraid I wasn't much help in the "do you know of any good site editing / uploading programs" department.) Now, all that said ... back to the "building a cool DW truck" thread! (Apologies, folks; as I didn't want to push things off-topic ... but I also didn't want Ira's cool web site to end up being a static, no-updates-possible display, either! Hence the brief and temporary interruption...) -- Ward Shrake -- |
|


 It's pretty far along, all the chopping and rejoining is done, it's in primer and ready to paint. I still need to make the decals for it too. The truck project never made it out of my head aside from sculpting the driver, so I'll live vicariously through you on that one, LOL!
