Post by Wardster on May 30, 2011 18:24:58 GMT -6
Hi all. I've started a couple of in-progress projects threads, which involve the so-old-it's-new technique of welding plastic pieces together; and/or of doing various other kit-modifications (such as altering the contours of an as-supplied piece) -- and it occurs to me that the best way for me to discuss that technique, in more detail, would be for me to simply quote myself, from a lengthy article that was printed in the 17th issue of "Sci-Fi & Fantasy Modeller". So ... here's the back half of that article's text. (Keep in mind that I'm the author of that article, and as far as I know, the copyrights for submissions to SF&FM revert back to the author after publication -- so, because of that and the article now being a year old: I'm posting the back half of that lengthy article, so that other model car fans can take advantage of the info.) If anyone wants to see the original article -- which involved me doing a restoration on a robot kit, which my dog had chewed! -- then here's the place to go, to obtain a copy of issue #17:
www.scififantasymodeller.co.uk/English/welcome.php
(Start of article fragment -- reprinted on Coffin Corner web forums, with original author's permission.)
MARTIAN VOO-DOO
I use the term "Martian Voo-Doo" to describe a trick that's so far outside the normal realm of acceptance, in certain circles, that it may take more than one mental leap to be able to properly grasp what's being said. In other words, what's being described may be seen by some readers as not only being akin to practicing an obscure form of wizardry, but to using magic originating on some other planet.
I tend to focus on experimentation and finding ways to maximize the efficiency of repetitive tasks, over finishing many scale modeling projects. Shortly after I sent off the final photos for issue #14's SHADO Jet article, I put a special tool on order. I've since spent six months, on and off, practicing with that tool. This is the sixth plastic model kit I experimented on. Confidence grew with each one - as did my list of things to avoid or be careful with!
Right now, I'm at the point where I feel I've become almost too comfortable with plastic-welding tricks. I may soon begin to forget some of the earliest stuff I stumbled past, as I extend what I already know. So, before this Martian Voo-Doo becomes so routine that I can't easily describe the do's and don'ts to others, I had better write some nerdy notes! Do a brain dump of where I am now, with this set of uncommon techniques ... much as I did on the Internet Modeler web site in Nov and Dec 2007 with my 40-page two-part'er, documenting all the tricks I had learned to do using baking soda and/or talc, which I dyed with inkjet printer ink for use in combination with thin liquid super glue. Or check out IM's Feb 2008 issue for an explanation of the home-made vacu-forming rig seen here.
What follows, then, are entries from Dr. Wardenstein's journals. It may be a little heavy on theory this time around, but I expect it'll balance out in the end. Future articles may simply refer to this article: adding only the newest tricks I acquire as I continue experimenting.
MOULDING
As an avid reader, I realize there's a fine line between inspiration and intimidation. Explaining background info may be a good idea, before we go much farther.
Injection-moulded kit parts begin their life as many small plastic pellets. Those pellets are poured into a hopper or container - sort of the mouth of a big machine - along with perhaps some dyes or colorants, and maybe small amounts of something like rubber.
The latter is added so that otherwise-brittle polystyrene becomes more forgiving for modellers to work with. Think of it like mixing two kinds of metal, in precise amounts, to create an alloy that's carefully engineered for a specific task. It's my understanding (from reading "The Modelmaker's Handbook") that clear parts are generally more brittle than opaque parts from the same kit because adding rubber to clear polystyrene isn't possible, while retaining optical clarity. I've noticed that opaque plastic isn't all alike, either. Some formulas are softer than others, or slightly more flexible than others. For this project, I chose to use sprues from three recent Revell kits: two Deal's Wheels car kits (the orange and yellow sprues) and an X-15 aircraft. Their formulas were fairly soft, and thus easier to sand.
Other components of the same industrial machinery have the purpose of heating the plastic pellets and other ingredients, in a controlled fashion: just enough that the mixture temporarily acts like a liquid instead of a solid.
Pressure is applied to that warm mixture: squeezing the mix of liquid ingredients into confined spaces such as sprue 'tunnels' and from there into various precisely-shaped 'caves' or 'negative spaces'. These mould cavities were carefully shaped by either crafts-people or computers. The 'cave walls' define the shape of each part in a kit.
A certain amount of cooling-down time happens, after the temporarily-liquid plastic has been forced into the mould's cavities. This allows the plastic to change states again: from liquid back to solid. The metal mould's halves are separated, and many small rods push the now-solid-again plastic parts out of the mould cavities ... and the process is then repeated, to mould someone else's kit.
HOT TOOL
If what I'm doing here seems intimidating, it's likely only because many modellers have never seen a plastic kit in any form but solid. Because we've never seen raw parts any other way, it's hard to imagine them any other way.
The basic idea behind what I'm doing can be thought of this way: I'm studying various kit parts closely, and I'm deciding that the factory forgot to put one additional plastic pellet, into one specific place. I'm adding the pellets they forgot, one at a time. And then I'm sanding down any excess, after those new pellets cool down.
How am I doing this? I'm using a very specific tool, which anyone can buy. It has been around for decades ... and as far as I know, it's the exact same design as the original. No, I'm not talking about the common soldering iron. I've soldered electronic parts for years, and I own many irons made for that purpose. I've tried them. They're all poor choices for this work. Even my temperature-controlled soldering station works poorly for 'adding pellets'. Soldering irons 'recover' far too quickly after heat has been transferred out of their tips. Even if they didn't have too much heat capacity, soldering irons are heavier and longer (farther from the work) as compared to the incredibly light, just-right-length Hot Tool decorative wood-burning device. Take my word for it: you only want the Hot Tool device, as made by the M.M. Newman Corporation.
products.mmnewman.com/category/hot-tools?
I recommend the WB-1 woodburning tool (which comes with a standard tip); their needle tip; and at least one blank tip. Their ST-1 stand is also useful and recommended.
WELDING PRACTICE
Once you've acquired this great tool, I suggest you get the hang of using it by taking lengths of ordinary sprue, and welding two sprues together. All you have to do is heat the end of one sprue, then press the two sprues together.
Using heat on only one sprue should be enough. You don't have to heat both sprues, to get them to stick together reasonably well. Practicing this one simple exercise will teach you how hot is too hot; and what's not hot enough. If you can easily snap your welded sprues apart after the joint has cooled you either didn't apply heat for long enough, or you applied enough heat but then waited too long to press them together - allowing the warm plastic to cool. If you use too much heat, you'll end up with a huge blob in the middle. Some blobbing is normal. For added insurance and for looks I let it cool a bit, first; and then sort of wipe the blobby area with the hot tip, to smooth it.
Basically, what I'm doing as seen in these photos is that same exercise - except that I'm adding sprue to kit parts.
I'm only adding a 'pellet' of plastic smaller than a BB, at any one time. Once you're used to the idea that plastic can temporarily be a liquid, or it can be a solid, then you'll have more patience and will do less damage to kit parts.
I get the plastic I am adding just hot enough to tack it into place, first. Then I let that (and the kit part it is sticking to!) cool back down, or mostly cool down. As a second step, I later wipe across the added blob, to get it closer to the shape I want; and to help it stick better.
One trick I learned over time is that plastic won't stick well to metal. I use that knowledge in several ways. Laying a sheet of brass on a work surface, and welding plastic pieces together on top of it, forces the bottom of the hot plastic to conform to the flatness of the brass sheet.
I've found that wrapping common household aluminium foil around something like Dymo labeling tape (sticky-backed plastic sheet, basically) allows 'moulding in place' with hot plastic pellets. You can sort of pre-shape portions of what you're adding, by limiting where the hot plastic can go. I used that trick along certain raised edges, etc.
SAFETY FIRST
One thing I want to make clear is that when you're heating plastic up, it will create some very nasty fumes. And what does hot air do? It rises - in this case, right up into your face, since you're hunched over a workbench as you work on whatever it is you're Frankenstein'ing. Not good!
Personally, because I sand MDF (a man-made wood) and auto body products and other non-healthy substances all the time, and because I spray lacquer-based paints often, I always have a dual-cartridge organic vapor respirator near my working areas. With spare filters on hand. I wear that mask whenever I'm welding plastic. No exceptions! Same sort of safety consciousness as when I'm doing those other non-healthy hobby chores. Other folks may want to buy and use a custom-made fume extractor; similar to the ones used in the electronics industry for soldering. Or perhaps use a paint booth, if you already have one of those handy. Whatever you do, please take the time to do things safely! Thank you.
TEMPERATURE CONTROL
Credit where due: welding plastic didn't originate with me. I'm not so much a Scale Modeling Master as an over-eager under-study of anyone I can learn from. I first read about using this specific tool to do all sorts of crazy tricks, in the Mar/Apr 1986 issue of "Fine Scale Modeler" magazine. (Unfortunately no longer available via Kalmbach's web site. I completed my FSM collection via eBay.) The author, Bob Santos, did an excellent job of intimidating me. Err, I mean, explaining the wide variety of possibilities! And he must have had a similar effect on others: FSM never did a follow-up article that I'm aware of. (In fairness, it was simply a case of too few pages for in-depth discussion. I quickly invoked the "Yeah, but you're special" rule, and avoided trying any of those tricks for over a decade.)
The only other scale modeler I've run across who used the Hot Tool device (or something akin to it) was Bob Paeth of automotive modeling fame. Shortly before he passed away, he offered to sell me the temperature control rheostat he had purchased many years ago. (I didn't know him well. I just followed up in e-mail, to public postings he had made on the Coffin Corner 2 web forums.) One major reason I didn't take him up on the offer was that he said he had quit using it shortly after he got it. He felt it wasn't necessary. Which was the impression I got from the FSM article, too: that the amount of heat can be controlled by varying the amount of time the tool's tip is in contact with plastic.
Another way to control heat involves the size or mass of the piece you're trying to heat up. A piece of stretched sprue takes no time at all to get up to temperature; while the end of a piece of sprue right out of a kit's box will take significantly longer. I experimented enough to see an advantage in stretching sprue to about half that diameter, for certain 'filling' tasks - but the time it took me to stretch many sprues to about 1/16th of an inch thick felt like it took most of the advantage away, time-wise.
One thing I experimented with and liked was using the Hot Tool almost like a paintbrush: to pick up and apply finely ground bits of plastic, to build up an area in layers. I just saved the bits that got all over my workbench, when I used a small moto-tool to grind down excess. I put them in a small pile, inside a pie tin. (A huge thanks goes to Tom and Lisa Thompson for that great gift! I had my doubts that a moto-tool with that little torque would be useful, but boy was I wrong! I use that small tool with a sanding drum, all the time now! It grinds plastic down - not melts it, as any moto-tool with more torque tends to do.)
CUSTOM-GROUND TIP
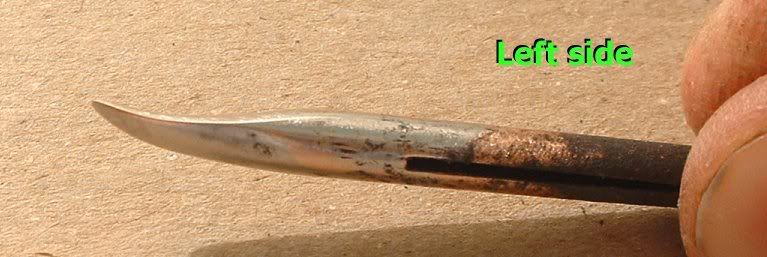
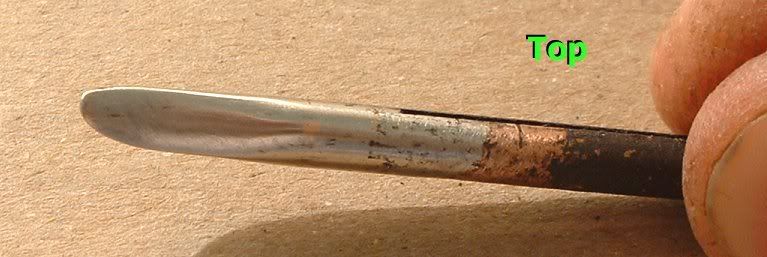
Last but not least: my best trick. The standard tip that comes with the Hot Tool could have been used to do most of the adding and blending I did on this project, but it wouldn't have been ideal. After I gained a solid baseline idea of the Hot Tool's strengths and weaknesses - by using both the standard and needle tips for a few weeks each - I had a firm idea of what I wanted. I wanted several different functions on one replaceable tip. I carefully ground a blank tip, using a sanding drum in my big moto-tool, so that it has different uses in different 'zones'.
Be careful when you custom-grind tips. Do not grind any tip while it's on the Hot Tool! The heating element is just millimeters under the surface, and not far from the tool's tip! I scribed a "don't grind behind this line" area, and only ground forward of the inner heating element.
I ground a convex shape into the bottom zone; and a gentle concave dip along the top. I put a thin cutting blade of sorts up front. (Rounded, as seen from above.) The left side's edge is a narrow and sharp "V" shape. The right side is a teardrop of sorts. This custom tip works wonders! I can cut or scoop with the tip and with one side; and I can use the bottom and one side to wipe over areas, and smooth them out. I may end up improving on this design later, but I doubt it. For now I'm extremely happy with it!
(End of Ward Shrake's SF&FM #17 article fragment)
www.scififantasymodeller.co.uk/English/welcome.php
(Start of article fragment -- reprinted on Coffin Corner web forums, with original author's permission.)
MARTIAN VOO-DOO
I use the term "Martian Voo-Doo" to describe a trick that's so far outside the normal realm of acceptance, in certain circles, that it may take more than one mental leap to be able to properly grasp what's being said. In other words, what's being described may be seen by some readers as not only being akin to practicing an obscure form of wizardry, but to using magic originating on some other planet.
I tend to focus on experimentation and finding ways to maximize the efficiency of repetitive tasks, over finishing many scale modeling projects. Shortly after I sent off the final photos for issue #14's SHADO Jet article, I put a special tool on order. I've since spent six months, on and off, practicing with that tool. This is the sixth plastic model kit I experimented on. Confidence grew with each one - as did my list of things to avoid or be careful with!
Right now, I'm at the point where I feel I've become almost too comfortable with plastic-welding tricks. I may soon begin to forget some of the earliest stuff I stumbled past, as I extend what I already know. So, before this Martian Voo-Doo becomes so routine that I can't easily describe the do's and don'ts to others, I had better write some nerdy notes! Do a brain dump of where I am now, with this set of uncommon techniques ... much as I did on the Internet Modeler web site in Nov and Dec 2007 with my 40-page two-part'er, documenting all the tricks I had learned to do using baking soda and/or talc, which I dyed with inkjet printer ink for use in combination with thin liquid super glue. Or check out IM's Feb 2008 issue for an explanation of the home-made vacu-forming rig seen here.
What follows, then, are entries from Dr. Wardenstein's journals. It may be a little heavy on theory this time around, but I expect it'll balance out in the end. Future articles may simply refer to this article: adding only the newest tricks I acquire as I continue experimenting.
MOULDING
As an avid reader, I realize there's a fine line between inspiration and intimidation. Explaining background info may be a good idea, before we go much farther.
Injection-moulded kit parts begin their life as many small plastic pellets. Those pellets are poured into a hopper or container - sort of the mouth of a big machine - along with perhaps some dyes or colorants, and maybe small amounts of something like rubber.
The latter is added so that otherwise-brittle polystyrene becomes more forgiving for modellers to work with. Think of it like mixing two kinds of metal, in precise amounts, to create an alloy that's carefully engineered for a specific task. It's my understanding (from reading "The Modelmaker's Handbook") that clear parts are generally more brittle than opaque parts from the same kit because adding rubber to clear polystyrene isn't possible, while retaining optical clarity. I've noticed that opaque plastic isn't all alike, either. Some formulas are softer than others, or slightly more flexible than others. For this project, I chose to use sprues from three recent Revell kits: two Deal's Wheels car kits (the orange and yellow sprues) and an X-15 aircraft. Their formulas were fairly soft, and thus easier to sand.
Other components of the same industrial machinery have the purpose of heating the plastic pellets and other ingredients, in a controlled fashion: just enough that the mixture temporarily acts like a liquid instead of a solid.
Pressure is applied to that warm mixture: squeezing the mix of liquid ingredients into confined spaces such as sprue 'tunnels' and from there into various precisely-shaped 'caves' or 'negative spaces'. These mould cavities were carefully shaped by either crafts-people or computers. The 'cave walls' define the shape of each part in a kit.
A certain amount of cooling-down time happens, after the temporarily-liquid plastic has been forced into the mould's cavities. This allows the plastic to change states again: from liquid back to solid. The metal mould's halves are separated, and many small rods push the now-solid-again plastic parts out of the mould cavities ... and the process is then repeated, to mould someone else's kit.
HOT TOOL
If what I'm doing here seems intimidating, it's likely only because many modellers have never seen a plastic kit in any form but solid. Because we've never seen raw parts any other way, it's hard to imagine them any other way.
The basic idea behind what I'm doing can be thought of this way: I'm studying various kit parts closely, and I'm deciding that the factory forgot to put one additional plastic pellet, into one specific place. I'm adding the pellets they forgot, one at a time. And then I'm sanding down any excess, after those new pellets cool down.
How am I doing this? I'm using a very specific tool, which anyone can buy. It has been around for decades ... and as far as I know, it's the exact same design as the original. No, I'm not talking about the common soldering iron. I've soldered electronic parts for years, and I own many irons made for that purpose. I've tried them. They're all poor choices for this work. Even my temperature-controlled soldering station works poorly for 'adding pellets'. Soldering irons 'recover' far too quickly after heat has been transferred out of their tips. Even if they didn't have too much heat capacity, soldering irons are heavier and longer (farther from the work) as compared to the incredibly light, just-right-length Hot Tool decorative wood-burning device. Take my word for it: you only want the Hot Tool device, as made by the M.M. Newman Corporation.
products.mmnewman.com/category/hot-tools?
I recommend the WB-1 woodburning tool (which comes with a standard tip); their needle tip; and at least one blank tip. Their ST-1 stand is also useful and recommended.
WELDING PRACTICE
Once you've acquired this great tool, I suggest you get the hang of using it by taking lengths of ordinary sprue, and welding two sprues together. All you have to do is heat the end of one sprue, then press the two sprues together.
Using heat on only one sprue should be enough. You don't have to heat both sprues, to get them to stick together reasonably well. Practicing this one simple exercise will teach you how hot is too hot; and what's not hot enough. If you can easily snap your welded sprues apart after the joint has cooled you either didn't apply heat for long enough, or you applied enough heat but then waited too long to press them together - allowing the warm plastic to cool. If you use too much heat, you'll end up with a huge blob in the middle. Some blobbing is normal. For added insurance and for looks I let it cool a bit, first; and then sort of wipe the blobby area with the hot tip, to smooth it.
Basically, what I'm doing as seen in these photos is that same exercise - except that I'm adding sprue to kit parts.
I'm only adding a 'pellet' of plastic smaller than a BB, at any one time. Once you're used to the idea that plastic can temporarily be a liquid, or it can be a solid, then you'll have more patience and will do less damage to kit parts.
I get the plastic I am adding just hot enough to tack it into place, first. Then I let that (and the kit part it is sticking to!) cool back down, or mostly cool down. As a second step, I later wipe across the added blob, to get it closer to the shape I want; and to help it stick better.
One trick I learned over time is that plastic won't stick well to metal. I use that knowledge in several ways. Laying a sheet of brass on a work surface, and welding plastic pieces together on top of it, forces the bottom of the hot plastic to conform to the flatness of the brass sheet.
I've found that wrapping common household aluminium foil around something like Dymo labeling tape (sticky-backed plastic sheet, basically) allows 'moulding in place' with hot plastic pellets. You can sort of pre-shape portions of what you're adding, by limiting where the hot plastic can go. I used that trick along certain raised edges, etc.
SAFETY FIRST
One thing I want to make clear is that when you're heating plastic up, it will create some very nasty fumes. And what does hot air do? It rises - in this case, right up into your face, since you're hunched over a workbench as you work on whatever it is you're Frankenstein'ing. Not good!
Personally, because I sand MDF (a man-made wood) and auto body products and other non-healthy substances all the time, and because I spray lacquer-based paints often, I always have a dual-cartridge organic vapor respirator near my working areas. With spare filters on hand. I wear that mask whenever I'm welding plastic. No exceptions! Same sort of safety consciousness as when I'm doing those other non-healthy hobby chores. Other folks may want to buy and use a custom-made fume extractor; similar to the ones used in the electronics industry for soldering. Or perhaps use a paint booth, if you already have one of those handy. Whatever you do, please take the time to do things safely! Thank you.
TEMPERATURE CONTROL
Credit where due: welding plastic didn't originate with me. I'm not so much a Scale Modeling Master as an over-eager under-study of anyone I can learn from. I first read about using this specific tool to do all sorts of crazy tricks, in the Mar/Apr 1986 issue of "Fine Scale Modeler" magazine. (Unfortunately no longer available via Kalmbach's web site. I completed my FSM collection via eBay.) The author, Bob Santos, did an excellent job of intimidating me. Err, I mean, explaining the wide variety of possibilities! And he must have had a similar effect on others: FSM never did a follow-up article that I'm aware of. (In fairness, it was simply a case of too few pages for in-depth discussion. I quickly invoked the "Yeah, but you're special" rule, and avoided trying any of those tricks for over a decade.)
The only other scale modeler I've run across who used the Hot Tool device (or something akin to it) was Bob Paeth of automotive modeling fame. Shortly before he passed away, he offered to sell me the temperature control rheostat he had purchased many years ago. (I didn't know him well. I just followed up in e-mail, to public postings he had made on the Coffin Corner 2 web forums.) One major reason I didn't take him up on the offer was that he said he had quit using it shortly after he got it. He felt it wasn't necessary. Which was the impression I got from the FSM article, too: that the amount of heat can be controlled by varying the amount of time the tool's tip is in contact with plastic.
Another way to control heat involves the size or mass of the piece you're trying to heat up. A piece of stretched sprue takes no time at all to get up to temperature; while the end of a piece of sprue right out of a kit's box will take significantly longer. I experimented enough to see an advantage in stretching sprue to about half that diameter, for certain 'filling' tasks - but the time it took me to stretch many sprues to about 1/16th of an inch thick felt like it took most of the advantage away, time-wise.
One thing I experimented with and liked was using the Hot Tool almost like a paintbrush: to pick up and apply finely ground bits of plastic, to build up an area in layers. I just saved the bits that got all over my workbench, when I used a small moto-tool to grind down excess. I put them in a small pile, inside a pie tin. (A huge thanks goes to Tom and Lisa Thompson for that great gift! I had my doubts that a moto-tool with that little torque would be useful, but boy was I wrong! I use that small tool with a sanding drum, all the time now! It grinds plastic down - not melts it, as any moto-tool with more torque tends to do.)
CUSTOM-GROUND TIP
Last but not least: my best trick. The standard tip that comes with the Hot Tool could have been used to do most of the adding and blending I did on this project, but it wouldn't have been ideal. After I gained a solid baseline idea of the Hot Tool's strengths and weaknesses - by using both the standard and needle tips for a few weeks each - I had a firm idea of what I wanted. I wanted several different functions on one replaceable tip. I carefully ground a blank tip, using a sanding drum in my big moto-tool, so that it has different uses in different 'zones'.
Be careful when you custom-grind tips. Do not grind any tip while it's on the Hot Tool! The heating element is just millimeters under the surface, and not far from the tool's tip! I scribed a "don't grind behind this line" area, and only ground forward of the inner heating element.
I ground a convex shape into the bottom zone; and a gentle concave dip along the top. I put a thin cutting blade of sorts up front. (Rounded, as seen from above.) The left side's edge is a narrow and sharp "V" shape. The right side is a teardrop of sorts. This custom tip works wonders! I can cut or scoop with the tip and with one side; and I can use the bottom and one side to wipe over areas, and smooth them out. I may end up improving on this design later, but I doubt it. For now I'm extremely happy with it!
(End of Ward Shrake's SF&FM #17 article fragment)