|
|
Post by ira on Nov 30, 2012 22:01:34 GMT -6
[glow=red,2,300]STILETTO!!![/glow] Stiletto is a High Speed - Jet Powered Flying Car! I always wanted a Flying Car... I am using parts from AMT's X-Wing Fighter and Monogram's Seaquest Stinger Kits to make the Stiletto.  The first thing I did was to cut off the rounded bottom of the Stinger and replace it with Flat Sheet Plastic.  Next I cut off the Tail Section and removed a Pie-Shaped section from the cut. Then I turned the Tail Up-Side Down and glued it back. This caused the angle of the Tail Section to changed in a downward direction.  Next I cut the bottom edge of the body as shown...  I cut the front off the X-Wing Fighter and carved it to fit the Stinger Body, Up-Side Down. Then I glued it in place...  More Coming...  |
|
|
|
Post by Steve-o on Dec 1, 2012 8:34:48 GMT -6
Another cool project Ira !!
Your one busy beaver !!"LOL" ;D
|
|
|
|
Post by Dennis M on Dec 1, 2012 11:45:23 GMT -6
Hi Ira' Looks like another good one. Please keep us posted. Have a great day. Dennis
|
|
|
|
Post by ira on Dec 1, 2012 13:40:15 GMT -6
[glow=red,2,300]STILETTO GETS SOME BACK!!![/glow] I turned the back half of the X-Wing Body up-side down and sliced it to match the Stinger's Rear Body Line...  I glued it in place on the Stinger as shown.  Here is a shot of the Stiletto showing the progress...  |
|
|
|
Post by ira on Dec 1, 2012 14:04:47 GMT -6
[glow=red,2,300]ADDING SOME UNDERSIDE SHAPE!!![/glow] I cut the top front off of the X-Wing Fighter Body...  I did some Cutting and Fitting to make for tight fit. Then I glued it in place.  Here is another view!  |
|
|
|
Post by ira on Dec 1, 2012 16:01:43 GMT -6
[glow=red,2,300]ENGINE MOUNTS!!![/glow] I am making Engine Mounts with 1/2" Plastruc "L" Strip.  I cut the strips so that they filled the Slots in the X-Wing Body.  I also trimmed the front so that it extends to the point shown. This will allow me to slide the Engines Forward!  |
|
|
|
Post by ira on Dec 1, 2012 16:07:18 GMT -6
Another cool project Ira !!
Your one busy beaver !!"LOL" ;D [glow=red,2,300]THANKS STEVE-O![/glow] I was inspired by Mykturks 4 Wheel "Alien" and Hobby Bobbys 3 Wheel Stinger, both based on the Stinger. I was planning on mixing an Indy Car with the Stinger, untill I saw the X-Wing Fighter... |
|
|
|
Post by badroadahead on Dec 1, 2012 16:54:12 GMT -6
I'm still trying to figure out where you are going with this......but I'm liking it so far.
You have a way of blending different pieces together.
Can't wait to see more.
Dave
|
|
|
|
Post by ira on Dec 2, 2012 8:59:02 GMT -6
Hi Ira' Looks like another good one. Please keep us posted. Have a great day. Dennis Thanks Dennis! |
|
|
|
Post by ira on Dec 2, 2012 10:24:19 GMT -6
[glow=red,2,300]WE'VE GOT POWER!!![/glow] I sliced off the ends of the X-Wings and then I glued them together.  Then I turned the X-Wing Assemblies around so that the Wings face the Engine Mounts. Next I spread the Wings and glued them on to the Engine Mounts. Here they are in place...  |
|
|
|
Post by ira on Dec 3, 2012 10:10:44 GMT -6
I'm still trying to figure out where you are going with this......but I'm liking it so far. You have a way of blending different pieces together. Can't wait to see more. Dave [glow=red,2,300]THANKS DAVE!!![/glow] The Plan is for Stiletto to be a Star Wars Type Transport Vehicle... |
|
|
|
Post by ira on Dec 3, 2012 10:53:29 GMT -6
[glow=red,2,300]THE FIN IS IN!!![/glow] I cut the Front and Rear Sections from the Interior and Shaved a little off the Bottom too.  I cut a piece of sheet plastic to cover the front area removed from the Interior, and glued it in place...  Next I Cut Off the Back Section of the Bubbletop and glued it in place as shown. Then I Sanded the area smooth.  I cut the BiG Fin from sheet plastic, sanded the edges down nice and sharp, and glued it in place!  |
|
|
|
Post by gearbuster on Dec 3, 2012 13:26:10 GMT -6
That is definitely different Ira.
Coming out really awesome.
|
|
|
|
Post by ira on Dec 4, 2012 9:19:58 GMT -6
That is definitely different Ira. Coming out really awesome. [glow=red,2,300]THANKS!!![/glow] |
|
|
|
Post by badroadahead on Dec 4, 2012 10:14:52 GMT -6
A big fin!!!!!
Now you really have my attention Ira!
Dave
|
|
|
|
Post by ira on Dec 4, 2012 14:11:03 GMT -6
[glow=red,2,300]MORE ENGINES & FINS!!![/glow] I couldn't decide weather to have more Engine Details or more Fins...then I found these parts! These are the Engine "Backs" for the X-Wing. I added strips of plastic on the edge and then sanded the strips down to a sharp edge.  I also cut 2 pieces of plastic tubing, flattened them a bit and glued them on as shown...  Here are the New Engines & Fins in place!  Rear View...  |
|
|
|
Post by ira on Dec 4, 2012 19:39:55 GMT -6
A big fin!!!!! Now you really have my attention Ira! Dave [glow=red,2,300]THANKS DAVE!!![/glow] |
|
|
|
Post by ira on Dec 6, 2012 9:54:03 GMT -6
[glow=red,2,300]VIDEO GAMES!!![/glow] I used the Canopy from the X-Wing Fighter to make a Monitor Cover for the TV Screen. Perfect for Navagation and playing Video Games!  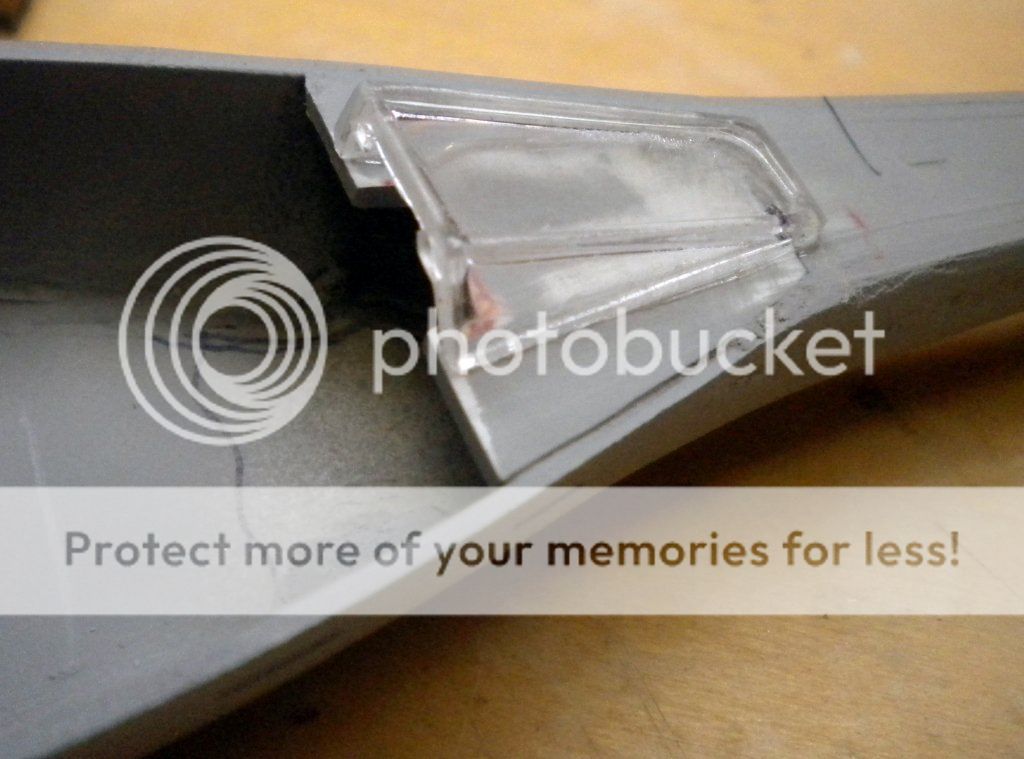 |
|
|
|
Post by ira on Dec 7, 2012 9:59:49 GMT -6
[glow=red,2,300]GOT PRIMER!!![/glow] Here is a mock up showing the progress up till now...  |
|
|
|
Post by ira on Dec 9, 2012 18:18:29 GMT -6
[glow=red,2,300]WINGS UP FRONT!!![/glow] I cut 2 Wings out of sheet plastic and Filed down the edges, Nice & Sharp! 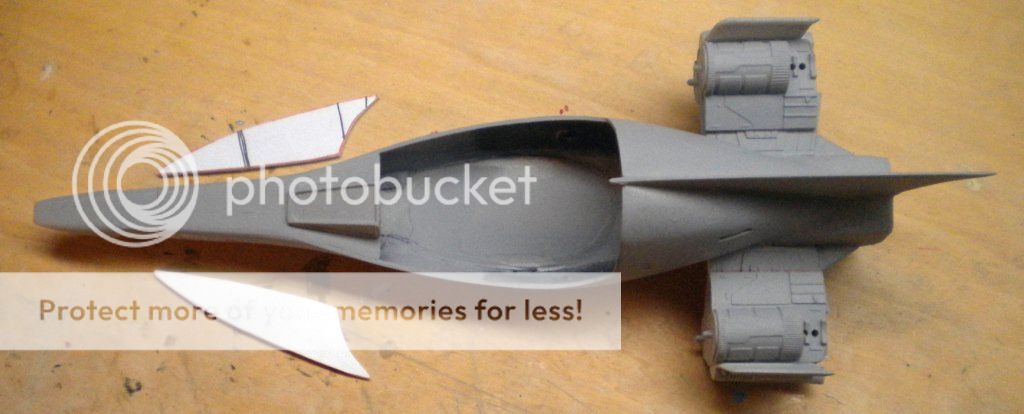 I used Foam Sanding Boards and Sanded the Mounting Edges of the Wings Flat and made a Flat Spot on the Body. Then I glued the Wings in place with Zap-A-Gap, Green Label Glue.  Here they are in place! 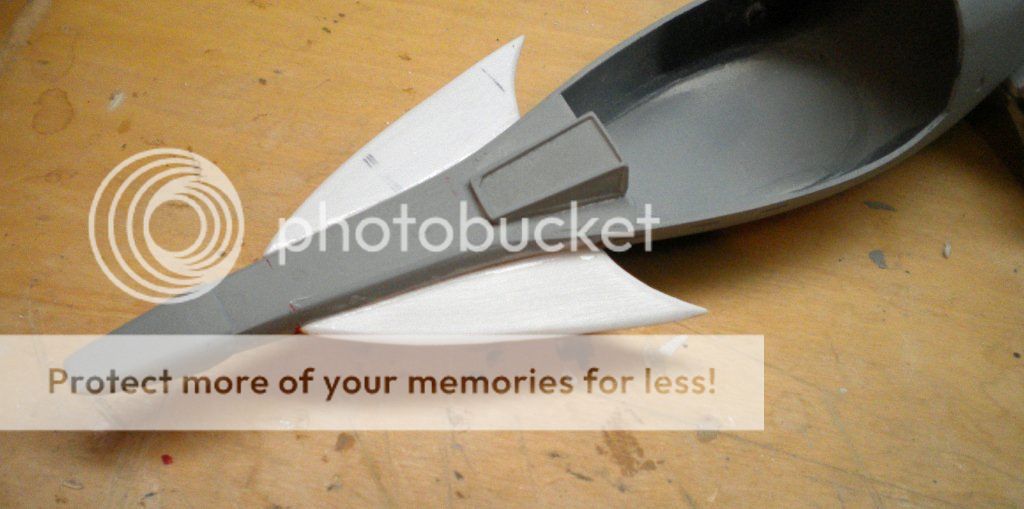 Over all View...  |
|
|
|
Post by ira on Dec 9, 2012 18:38:02 GMT -6
[glow=red,2,300]CUTTIN' THE BUBBLE!!![/glow] I wanted to cut off the front of the Bubble Top and make that piece , part of the body. I used a strip of Blue Tape as a guide and, Carefully cut off the front of the bubble with a Kona Razer Saw.  Here are the 2 sections of the Bubble...  I glued the front piece of the Bubble in place on the body. The Bubble Top was used to position the piece.  More Coming... |
|
|
|
Post by ira on Dec 10, 2012 19:28:16 GMT -6
[glow=red,2,300]NOSE JOB!!![/glow] I cut a strip of plastic to fit between the body and the front piece from the Bubbletop. When glued in place this Piece will make the Nose a little more Streamlined..  Here is the Piece glued in place. I also cut 2 triangular shaped pieces of plastic that were glued between the Piece and the Body. 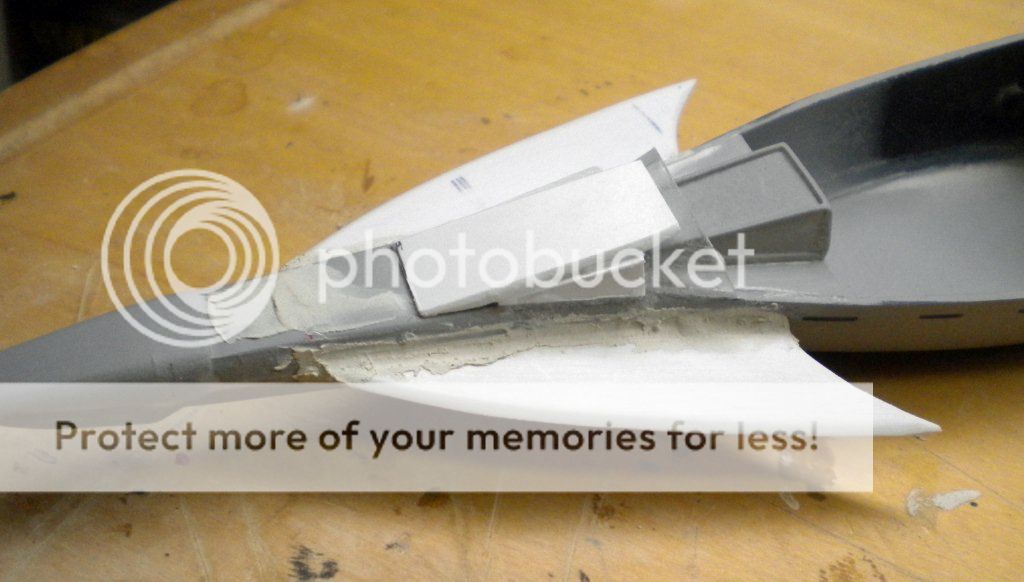 After adding putty and doing a little sanding the Nose looks like this...  Here is the Body with some primer sprayed on the area!  |
|
|
|
Post by koffinbuilder64 on Dec 11, 2012 3:41:39 GMT -6
WOW!! Thats lookin' real good Ira!!
|
|
|
|
Post by ira on Dec 11, 2012 16:00:35 GMT -6
[glow=red,2,300]WINGS OUT BACK!!![/glow] I made Paper Wing Templates and then cut 2 pieces of plastic for Rear Wings. I sanded down the outside edges Nice & Sharp.  I also cut out 2 pieces of plastic to fit in front of the Engines and glued them in place. 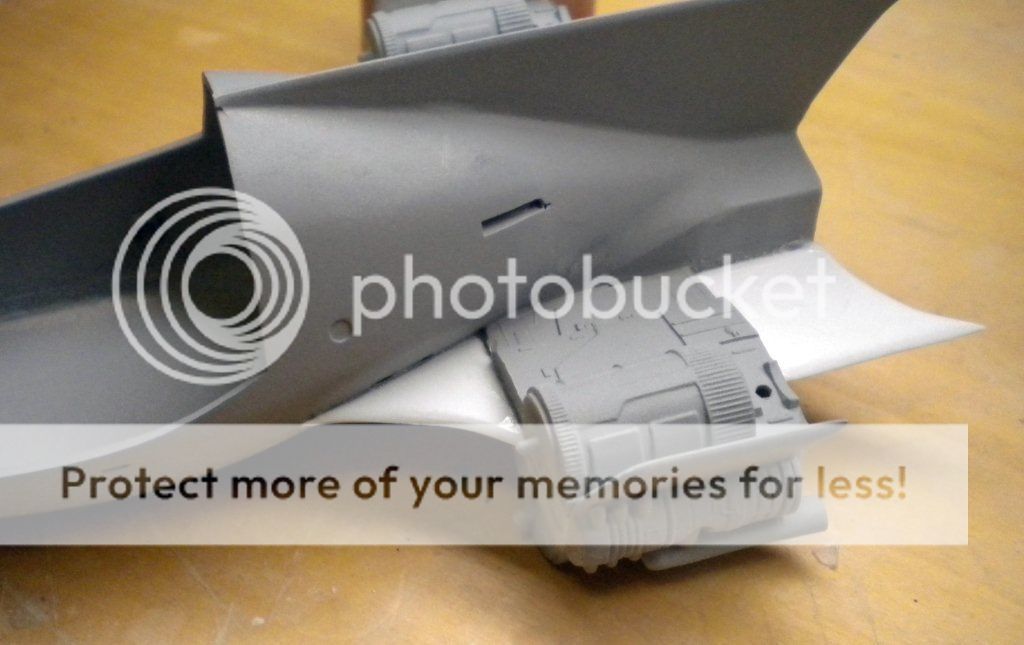 Here how they look from the top side...  More Coming... |
|
|
|
Post by itsonlyakit on Dec 11, 2012 19:35:44 GMT -6
Really enjoying your photos of engineering/imagination at work. Noticed that one kit box says 1:20 scale and a pilot included, will we be seeing that pilot or sumthin' else  Cheers Eh! |
|
|
|
Post by mykturk on Dec 11, 2012 20:45:58 GMT -6
Looks very Flash Gordon-ish!
|
|
|
|
Post by ira on Dec 12, 2012 13:39:29 GMT -6
WOW!! Thats lookin' real good Ira!! [glow=red,2,300]THANKS!!![/glow] Glad you like it... |
|
|
|
Post by ira on Dec 12, 2012 14:05:08 GMT -6
[glow=red,2,300]PROGRESS CHECK!!![/glow] I sprayed some DupliColor Filler/Primer on the rear of the body... 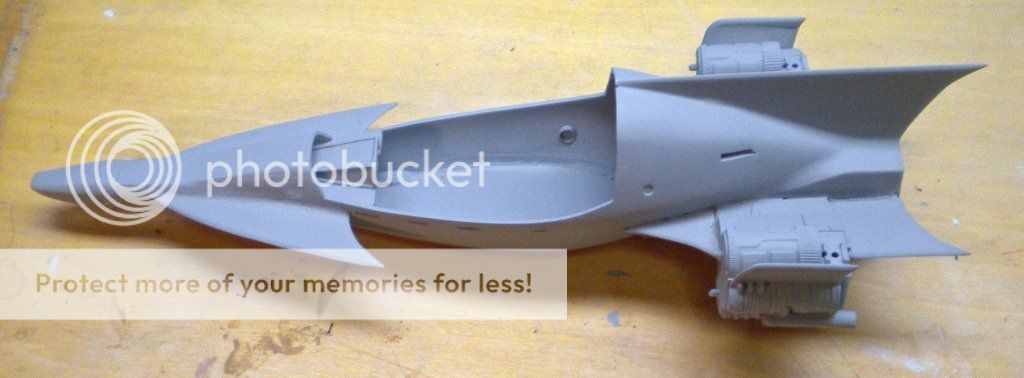 I think most of the body work is done now...  What Next???  |
|
|
|
Post by ira on Dec 13, 2012 9:20:28 GMT -6
Really enjoying your photos of engineering/imagination at work. Noticed that one kit box says 1:20 scale and a pilot included, will we be seeing that pilot or sumthin' else Cheers Eh! [glow=red,2,300]THANKS!!![/glow] Yes there will be a Bearded Pilot driving this one... |
|
|
|
Post by ira on Dec 16, 2012 9:38:47 GMT -6
Looks very Flash Gordon-ish! [glow=red,2,300]THANKS MICHAEL!!![/glow] |
|


