|
|
Post by Wardster on Jun 24, 2013 14:33:21 GMT -6
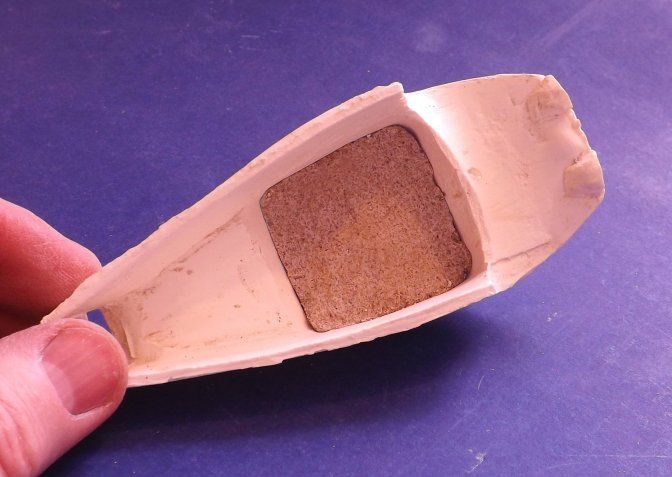
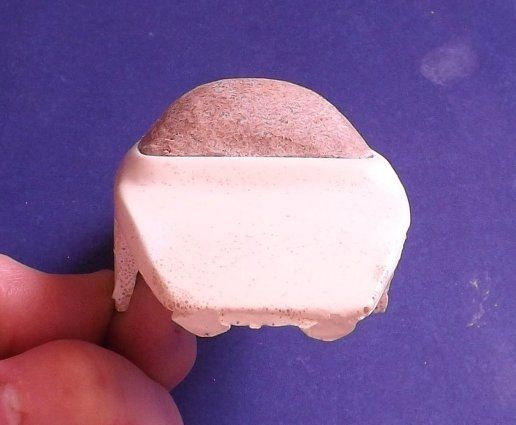
As I'm sure readers of this forum will agree: the world needs more bubbletops. What follows is one way to go about quickly and easily making a solid custom shape, which is in scale with your model car, and will blend well with it's styling. So we can all see where we're going with this process, here's one example of a clear custom-made bubble, as seen sitting on an (in-progress) custom car body. (A modified version of the raw body seen in the background -- which are both resin car body castings I obtained from the "Spritz by Fritz" web store.) 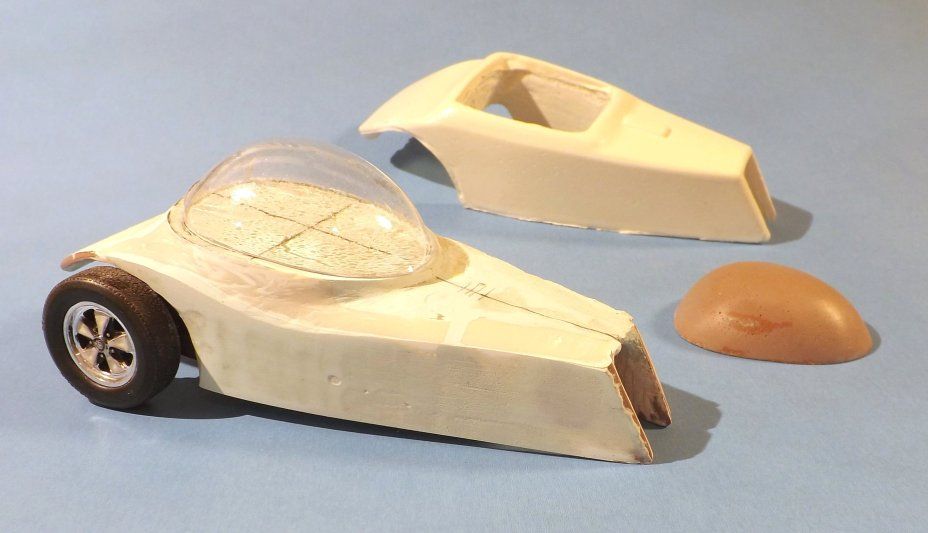 I'm sure you'll note the clear bubble shape, above. Please also note the solid bubble shape that is sitting in the background, in the photo above. Some clear plastic sheet (obtained from WarmPlastic.com) was vacu-formed over that solid shape, to make the clear bubble seen above ... but I'll discuss vacu-forming sheet plastic, separately (probably in a completely different thread on these forums) at some later time. For now I just want to talk about making the shape, in its solid form. I'm just using the photo above to show one possibility, or one way to do things -- but the modified car body above is just being shown as an example; 'cause I had the bubble already in it's clear form. That bubble took a lot longer to make, since I'd never used the materials before, and I didn't know the most efficient way to do things. So, since I've since come up with better methods, I'll used the unmodified "GlobeHopper" body in the background, for the step-by-step examples. (In other words, I won't continue showing that modified body, in this thread. I have a long ways to go with the modded body's styling: which is another project.) Here's a close-up of the bottom of the solid shape, as seen above. I'll demo this how-to process, however, start-to-finish, with a completely different shape. 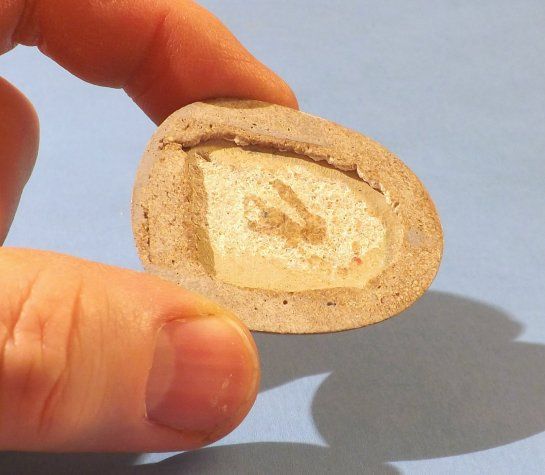 Not that although there's standard auto body products on the main surface of that part, that you can see from the bottom side of the part that what I used to get the main shape formed quickly and easily isn't something "normal" in scale modeling circles. What you're seeing in the image above is a mixture of (in simplified terms, anyway) plaster and vermiculite. That's right: the stuff that Ed Roth used to use to make custom car bodies, back in the day. I substituted a much finer grade of vermiculite for the coarser stuff Ed would have used; but otherwise, that part of things is as he would have used it. Instead of using Plaster of Paris, or drywall "mud" in powder form, I used a plaster-like powder by Dap, called "Presto Patch" ... but basically, I'm using what Ed used. ("Shoulders of Giants," etc.) For a great video tutorial about using that mix of plaster and vermiculite to do things like making a custom fiberglass body for a 1:1 scale custom showrod project, see the great DVD series by "Spritz by Fritz". I basically just took what Fritz was doing, and scaled it down a bit by using a less coarse type of vermiculite; but it's the same basic idea in both cases. www.spritzbyfritz.com/I highly recommend any of Fritz's DVDs, but bubbletop fans will especially love his "How to build a fiberglass body at home" DVD set. spritzbyfritz.bigcartel.com/Intro and shameless plugs aside: to paraphrase one of Fritz's favorite sayings, let's "get into the shop and build something"! |
|
|
|
Post by Wardster on Jun 24, 2013 14:49:03 GMT -6
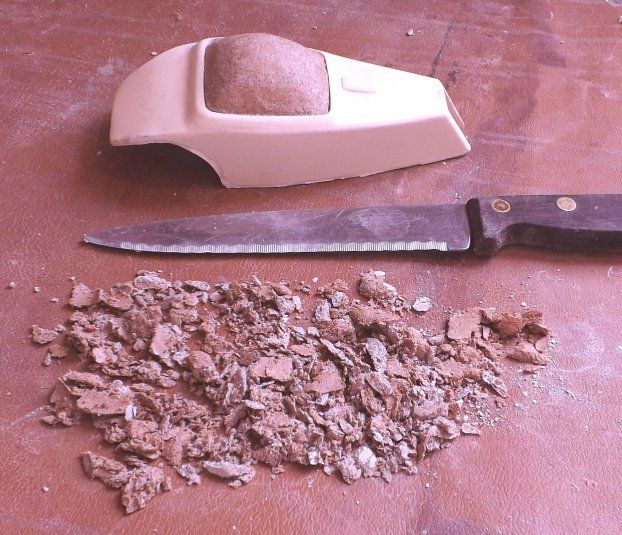
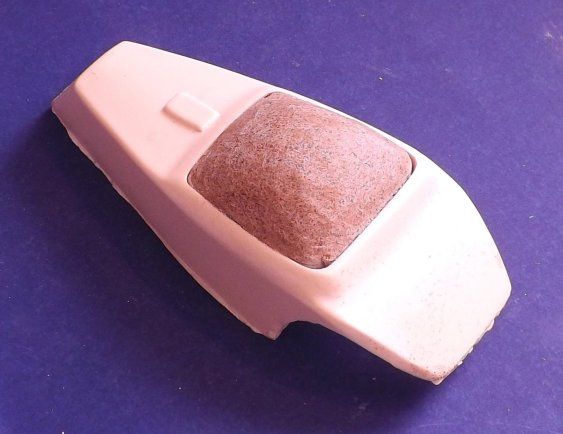
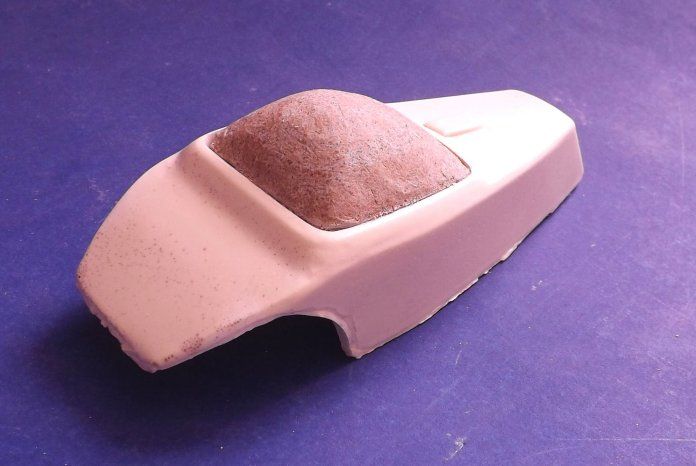
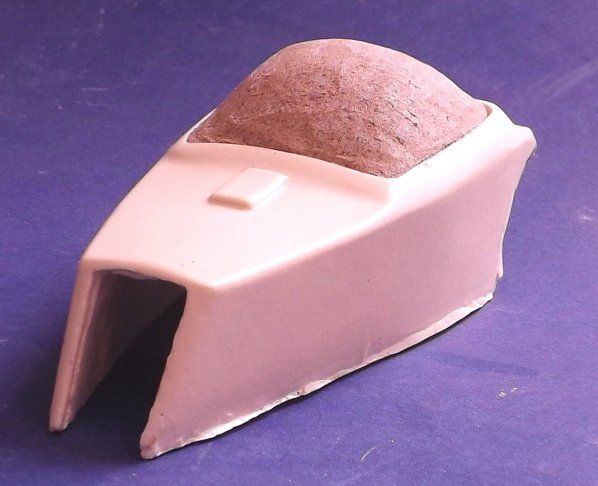
To make the bubble shape, as seen above, I tried a bunch of new-to-me tricks ... some of which worked great, and some "not so much" (efficiency-wise). Here's the brainstorm I came up with after making that first bubbletop's shape, which allowed the early steps to go super quick; and be super easy: 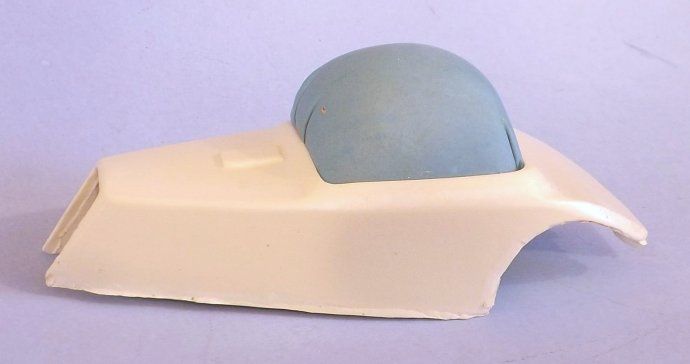 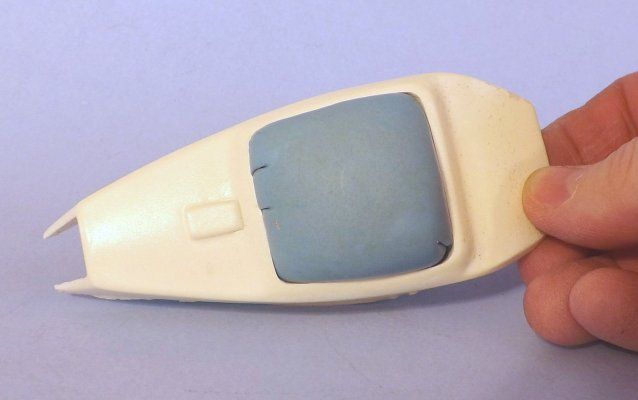 What you're seeing above probably makes little or no sense, by itself: so here's what it all looks like from below: 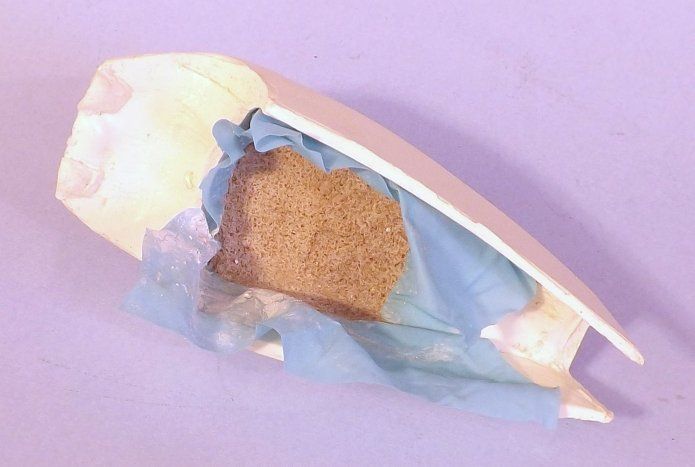 What's the blue stuff, you ask? A section of a rubber glove! (I really wanted an over-sized water balloon, to cut up and use -- but didn't have one handy. So, I did what many impatient people often do: use the closest thing that's right in front of me, instead.) Here's the initial shape of the half-hardened "plaster and vermiculite" mixture; once I had cut away the rubber glove material: 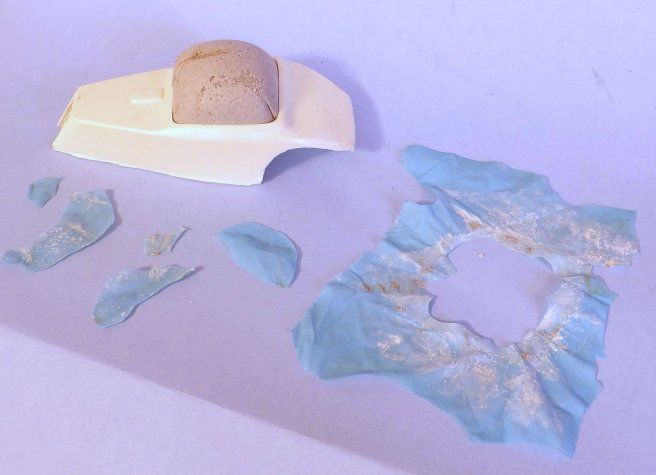 After having had the brainstorm of containing the just-mixed Plaster-and-Vermiculite (or P&V, for short) using a thin, stretchy sheet of something, and pushing the mix upwards through the bubble's flange or "people hole" area, I found I was having a hard time getting the relatively gooey stuff to spread itself evenly through the hole. Pressing it with a finger, from underneath, only half worked. The stuff was hardening up, fairly quickly, so (once again) I looked around and saw what was handy within easy reaching distance. What I came up with was a plastic supermarket bag. Wadding that up, and shoving it in (relatively gently) from underneath, worked just fine! I didn't take a photo of that part of the process, (due to my fingers being way too stickified and dirty to want to touch the camera at that point!), but here's a shot of the unwadded-up plastic bag, sitting in a sink, after the P&V mixture had set up hard enough to work with. Basically, I gave the P&V about two hours to set up to a "firm enough to work with" stage ... and then removed the plastic bag. 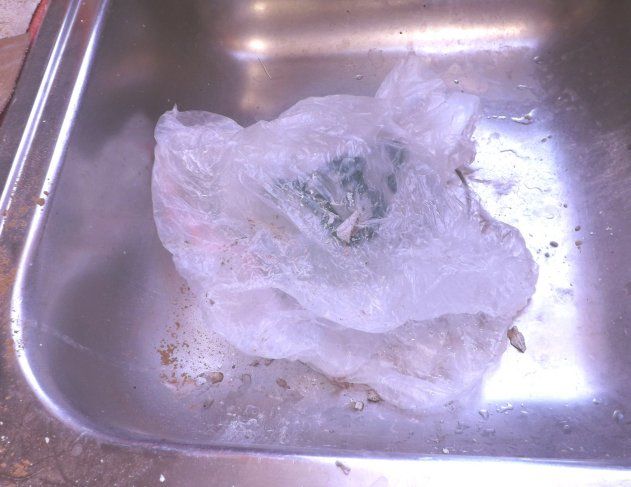 Next up: shaping the half-hardened material, to get the final bubble shape we want ... |
|
|
|
Post by Wardster on Jun 24, 2013 14:55:34 GMT -6
|
|
|
|
Post by magnum4342 on Jun 24, 2013 15:09:07 GMT -6
I agree...more bubbletops!
|
|
|
|
Post by Wardster on Jun 24, 2013 15:22:14 GMT -6
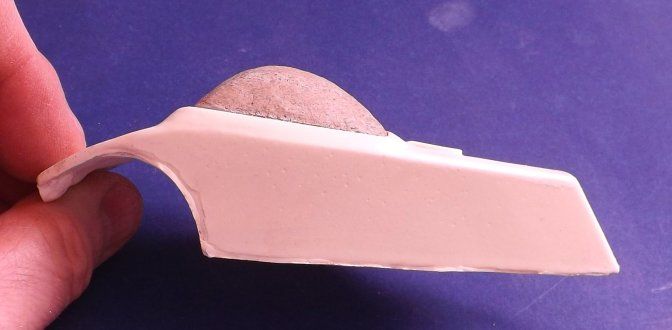
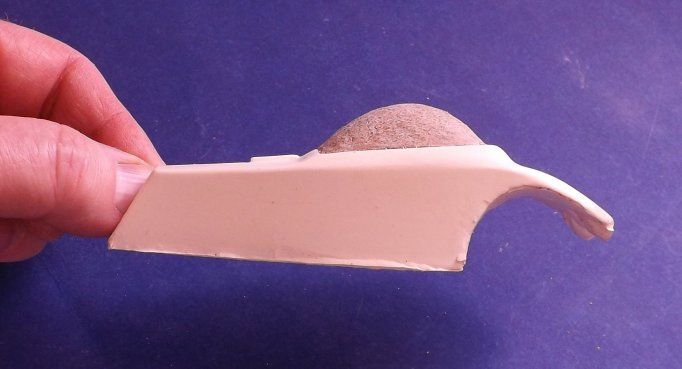
After letting the P&V harden up for a few more hours, I refined the shape a bit more, using things like sanding sticks: 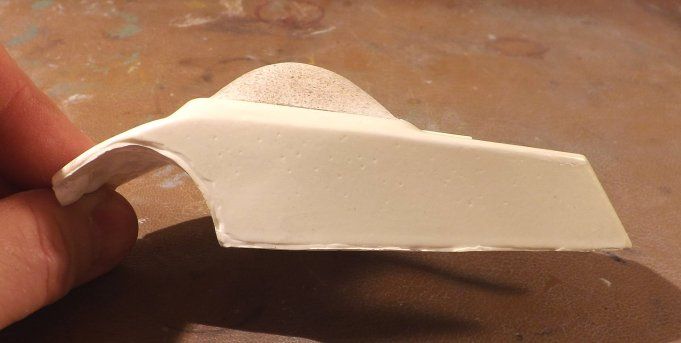 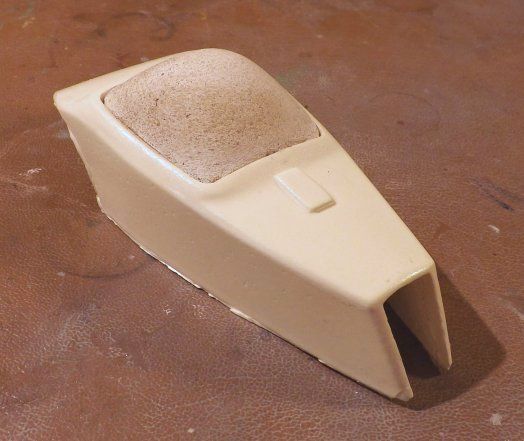 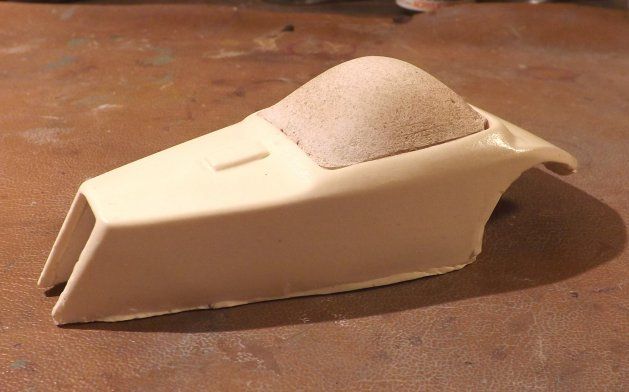 That gave me most of what I wanted, in terms of the raw shape. Keep in mind that everything seen above was all done, here or there, in one day's work -- while doing other things, whilst things took time to harden up or whatever. I forgot to take pics of the next (few, small) stages of that first day's work, but even so, it's still halfway easy to figure out what I did, from studying these next few pics. (Basically, I mixed up a small additional amount of the P&V, and smoothed it into the corners of the almost-square flange area. You can see the added material, 'cause it's a bit darker than the surrounding areas.) 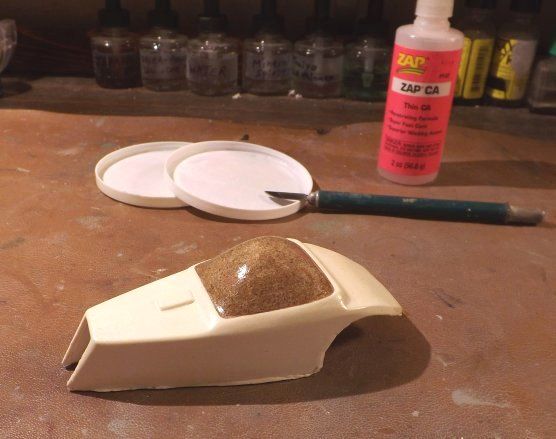 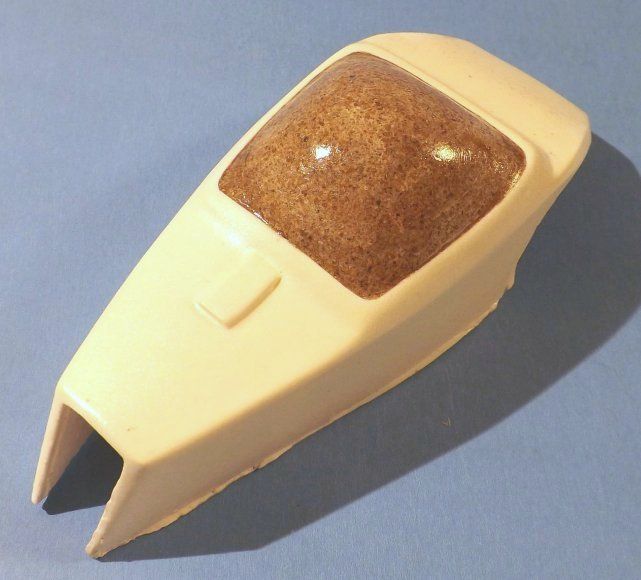 The two pics above show a few things -- but mainly what I'm showing here is that you can "skin" the hardened (or even mostly hardened) P&V mixture, to make it both strong and smooth. What I did was to use a rounded-blade (#10 X-acto, if memory serves) knife to pick up small drops of the water-thin style of super glue (I love the pink-label stuff by Zap) and apply it to the "final" surface. It soaks in, and activates itself within seconds, due to the water molecules that are still present in the mixed P&V. (In other words, you don't need a separate accelerator product of any kind.) The two pics above show that I hardened most of the work I had done, after sanding it fairly smooth; and had then sanded that "skinned" surface, just a bit, to smooth it out a bit more. I had then mixed and applied the small amount of P&V that I had applied to the corners. Those being thinner (in terms of depth) they appear darker, probably due to the super glue not being able to "sink in" much deeper than the already-skinned surfaces immediately beneath them. More later ... but that's basically the gist of things! |
|
|
|
Post by Wardster on Jun 24, 2013 16:35:09 GMT -6
I agree...more bubbletops! Definitely!  And since the shape of one is super easy to make, maybe we'll get more of them from time to time, around here!? I sure hope so! (A lot easier to do up a model car with a bubbletop, than doing one in 1:1 scale!) |
|
|
|
Post by Wardster on Jun 24, 2013 16:46:29 GMT -6
I was going to wait, and do a separate write-up on doing the vacu-forming steps of making a clear, hollow bubbletop piece for your scale models. Then I remembered that I'd already written something up, about some tips and tricks related to vacu-forming (in general) ... so, here's a link to that stage of this process: www.internetmodeler.com/2008/february/how-to/vacformer.php(I'll still try to get something written up, specific to making clear bubbletops ... but that may be quite a while; so in the meantime, I offer the link above as a temporary fill-in; and will just add that, when I wrote that online article up, it was early 2008. I quit using a "camp stove" type of "open flame" source of heat, to warm the sheet plastic up. I get better and easier and safer results, these days, by using a cheap old toaster oven. Toaster ovens will work perfectly fine, as a substitute for a full-sized kitchen oven.) |
|
|
|
Post by magnum4342 on Jun 24, 2013 19:15:35 GMT -6
Holy exclamation point! It never would have occurred to me that I could use the toaster oven. Too cool. Keep this going.
|
|
|
|
Post by "ScratchFever" on Jun 24, 2013 23:23:28 GMT -6
Kool tip thanx for sharing.......I could definitely use this tip.....down the road.......sweet!!!!!
|
|
|
|
Post by Wardster on Jun 25, 2013 2:34:45 GMT -6
Thanks for the encouragement, folks! Much appreciated, and then some! More or less by request, here's a pic of the old toaster oven I bought at a thrift store, some years ago. 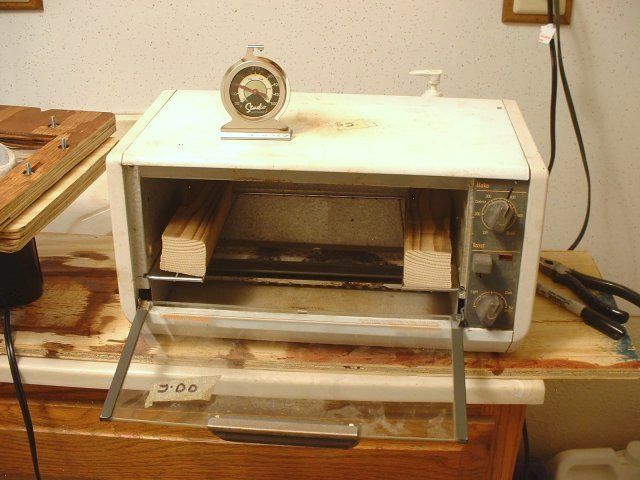 (Note the "$5" price tag sticker that's hand scribbled onto masking tape, on top -- and the revised "$2" tape on the glass! Hadda leave those, just 'cause they make me smile! Heehee.) I didn't want to hack up a new / good one, and I have some training in electronics, so it was well worth it to me to pick it up for the $2 I paid for it. (That is, if the idea didn't work, I was only out two bucks.) I figured that if the pre-printed temperature settings or whatever were way off, it wouldn't matter much since this was gonna be dedicated just to vacu-forming purposes. I only needed to know where one temperature was, on the pre-printed face of the toaster oven. I used a precise little thermostat to find right where the plastic's recommended temperature was gonna be (that is, ignoring the oven's markings, and watching the thermostat's) and then marked the knob's "just right" position on the face of the oven; using a Sharpie Marker. It's probably hard to read what's on the thermometer, but just know that it's not a cheapie cooking one. It's a very good one, with a wide-but-precise range of temperature markings. It is made specifically for uses like when figure sculptors need to bake the "Super Sculpey" sculpting material (without over-doing it). It's sold through artist's supply places that carry Super Sculpey. Other than marking the ideal temperature on the old toaster oven, the only real modification I made to the toaster oven itself was to hack up the little wire tray (cutting most of the center of the tray out -- leaving the rear wire intact, all around; but cutting a big chunk of the front wire off; and removing most of the other wires in that center portion -- and to add some "lifter upper's" that are nothing more than short chunks of split-in-half, scrap 2-by-4 wood. The purpose of those mods being to raise the plastic sheet up, and to give it plenty of room to sag way down, without hitting anything. (That is: if I should feel so inclined: it's not super necessary to get toooo ridiculous, but once in a while, if I'm doing something really goofy, it's helpful to have extra "sagging down" room.) Anyway ... enough about the heat source! Next pic: my vacu-forming source for creating a vaccum -- as mentioned in that old Internet Modeler article. The blue stuff is "Kleen Klay" -- used as a quickee sealant where the plywood (bottom) edges of the cheapie, homemade vacu-forming "bed" thingie rest on top of the air mattress deflating device. 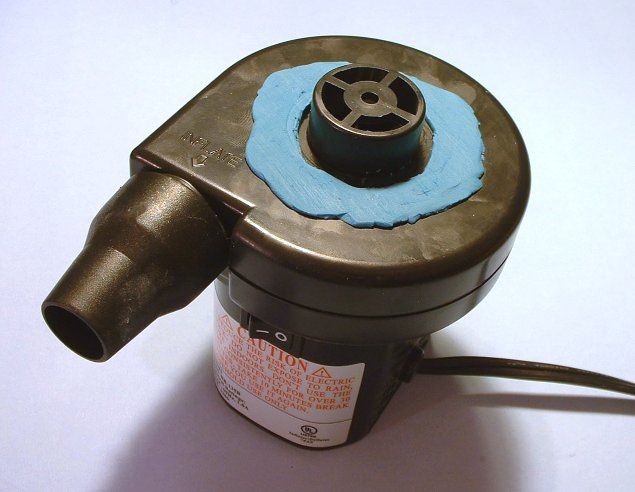 Next: a custom "female mold" I made (using various grades of "Milliput") for another bubbletop project, a couple of years ago: 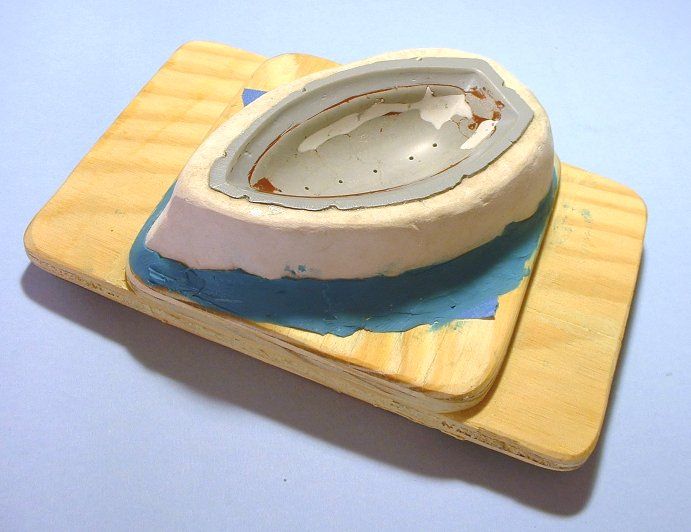 There's a bit more over-kill there than may be necessary, and some experimentation too -- so I'll mainly just show the pic, for now. (I'll probably throw in more details about using female molds, later ... and may show how to make one ... so for now it feels like enough just to show what it looked like; and to note that the vacuum source is "sucking" from underneath; and that there is a row of five tiny holes in the mold's bottom, so the warm clear plastic can be sucked down into the shaped-and-smoothed mold surface, and held there a while as the plastic cools.) Next up: an idea of what the clear plastic looked like, as held securely in a pair of plywood scraps that are just big enough (along the outer edges) to fit into the toaster oven. (Any larger, and the door wouldn't be able to close.) This many screw-downs is likely a bit much, in the overkill department ... but hey, at the time I figured "why not?" and went ballistic, clamping them together. One big thing I've found out, by doing a bit of vacu-forming here and there, is that the thicker the plastic is that you're using, the more it will stay between your two clamping "frames" without any fuss. Over-clamping plastic sheet is mainly if you're using super thin stuff. I was actually using some fairly thick stuff -- (0.030 inches, I think it was) -- so this many clamping screws may be over-doing it. On other projects, I used some black ABS or whatever that was nearly 0.125 inches thick ... and got away with threading wire bread ties through four holes; and just twisting them! 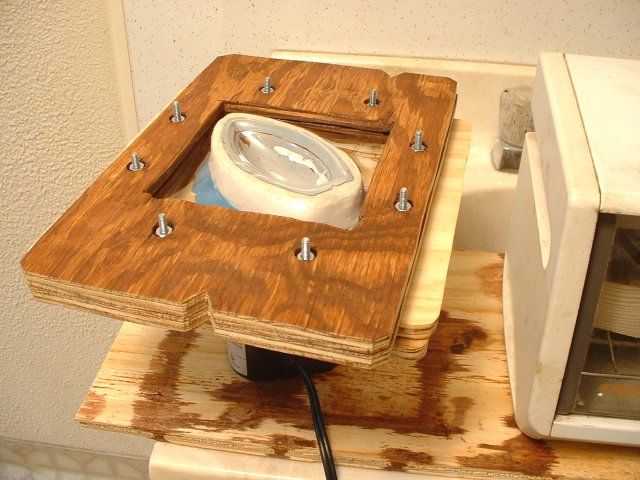 And the next pic is pretty much like the one above. You can barely tell, but the newly shaped clear bubbletop is there, inside the clamping frame. A bit of trimming along the edges, and it'll be usable as the final part. 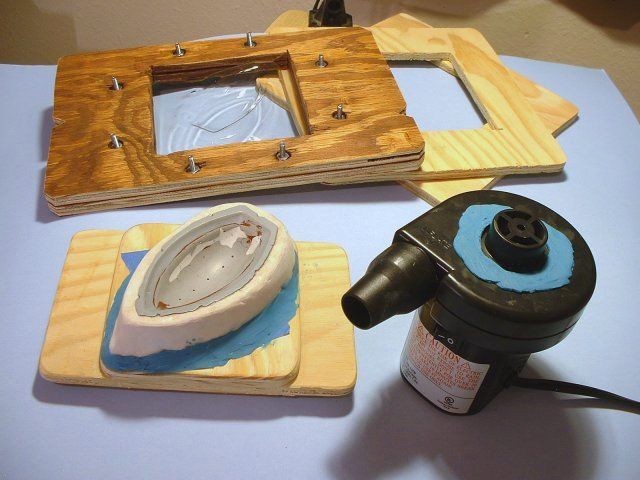 And last but not least, here's what this particular bubbletop was sitting on. (A replica of a model, as seen in the "Fireball XL-5" English 1960's kid's show.)  So I guess that it's not just the world that needs more bubbles ... outer space vehicles need their share of bubbletops, too!  |
|
|
|
Post by ira on Jun 25, 2013 10:19:06 GMT -6
GREAT ARTICLE WARD!!!Thanks for sharing this Wonderful Info...  Any chance you could share some info on how you made that Cool Looking Spaceship?
|
|
|
|
Post by Wardster on Jun 25, 2013 14:16:23 GMT -6
GREAT ARTICLE WARD!!!Thanks for sharing this Wonderful Info...  Any chance you could share some info on how you made that Cool Looking Spaceship? Thanks right back, Mr. Ira, sir!   On that spaceship: I might do something different than you suggest, Ira, down the road -- and if so, I do plan to do it here. What I'm thinking about is a future re-paint, to make it more of a pure "hot rod" in space ... but as far as the "how to" info on making that actual model goes, I'm not even sure how I'd summarize that. I think the "revamp" would interest folks here, more ... but also, (and Ira may already know or suspect this?) I have already written up all of the how-to stuff about that model, around the fall of 2011. I love sharing how-to info; but sometimes there's too much of it for the web. In this case, there's an official "in print" article about that model ... which is roughly four times the length of most scale modeling articles. (Fourteen pages, instead of the usual 3 or 4.) So the how-to stuff is already out there, as it were. It can be found in "Volume One" of the "21st Century Modeller" special issue, by the publishers of the English "Sci-Fi & Fantasy Modeller" series from England. Here's a link to their web site, if anyone's interested: www.scififantasymodeller.co.uk/English/welcome.phpFrom there, just click on "shop" and then scroll down, to see the first volume of that special issue. (They have other issues of that special issue out, too. I contributed what amounts to a stretched, flying, space-going VW Beetle to their second volume. That article is also fourteen pages long or so -- and anyone interested in how to weld plastic pieces together, using heat, may want to read it.) (Edit -- adding a paragraph here.) One other reason for the "Okay, but it'll have to be later" answer in regards to the spacecraft seen here is that I can't find all of the photos! I still have them, "somewhere" -- stored on one (of several) computers / flash drives / CD-ROMs / whatever ... but, I kept running out of space to store stuff, on pretty much every computer I had access to ... so, while I am sure I still have copies of all those older photos, "somewhere," it will probably take me several months to get it all "in one place" (put it all on one high-capacity storage device) ... and then to start sifting through the resulting mess; to make it "more organizee". That being the case, I'm thinking that older how-to pics, with newer "sanded the old paint off, and am starting over with that" would be a cool future thread, here on the Corners. But for now ... I'm lucky I can lay my hands on a few more of the final "beauty shots"! Ira already knows this, but for other's sakes: for the record, I won't make any money off of it, if anyone buys a back issue. (I mainly write for SF&FM for the fun of it, with a token payment thrown in, on publication) -- so I'm not trying to be a jerk or anything by withholding info about the "LP-22" spacecraft. (It's just that I can't imagine how I'd summarize fourteen pages of text and photos, in a short space; and have the summary be anywhere as close to informative as the full article.) That series of books is basically two guys from England, investing a lot of their own time and money to get those publications out, so I try to be more than fair to them when I can. To give them more or less an exclusive on such builds, as long as is reasonably possible, I usually wait about two years after stuff is in print, to even mention those builds online ... but it's almost that long now; and hey, the world (and outer space!) needs more bubbletops, so I'll bend my own rule a bit. Here's two more pics of that model, to show what it looks like from other angles. (Oh, and it's not my original design. I basically just studied screengrabs from the old kid's show, to duplicate their model.)  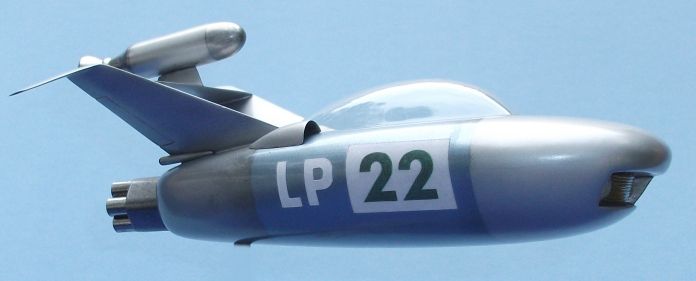 Excuse my paranoia on this, folks, but what I'm absolutely NOT trying to do is intimidate anyone, or show off, by mentioning that these shots above were part of a published article or whatever. There's lots of people here who could kick my butt in a variety of ways! Lots of talent and skill and patience, in all sorts of message threads, around here -- and it's been that way for all kinds of years, too. What I am trying to do is to point out how cool bubbletops look, on a variety of models ... and point out that more of 'em is good! I'm also trying to get more people to "give it a try" ... and hope that by showing what a bunch of junk my vacu-forming equipment looks like, that folks may be less intimidated or whatever, by the equipment that's needed. (Anything that results in more bubbles, is good!) What I'm partly doing, by showing the lame-looking vacu-forming tools I use, and the fairly cool model bits that can result, is to point out that (other than in how-to threads) no one will ever see the equipment you used -- they will just see the end results. And even a $2 toaster oven from a thrift stores does the job! If there's one piece of inspirational info I can throw at forum readers, about vacu-forming, it's that it is not as difficult as most hobby articles make it seem! The limitations most magazines or books have, on how many pages they can talk about any one thing, means that most articles have to basically lobotomize (cut out) most of the helpful "don't worry if this happens; here's the work-around" sort of info. I've tossed a few things like that into the write-up, above ... and when I get around to making the actual clear bubble for the GlobeHopper car model's body, I'm sure I'll take a bunch of pics and such; and will throw out as many other tips as I can. For now, though ... hopefully the pics and info above get you cats shopping for some plaster and vermiculite ... and maybe eyeballing a toaster oven!?! |
|
|
|
Post by eshaver on Jun 25, 2013 16:03:17 GMT -6
I guess I need to get working on a replacement rear top for a Monogram Futuresta .................. Thank you for sharing this meanwhile !
|
|
|
|
Post by Wardster on Jun 26, 2013 2:59:05 GMT -6
I guess I need to get working on a replacement rear top for a Monogram Futuresta .................. Thank you for sharing this meanwhile ! Thank you guys, for all that you do! I've loved these boards for years now; and summers, especially, always seemed to be kinda magical around here. Seems to me that it doesn't take much to get a bunch of hyper-creativity going, around here. A few small-but-good inspirational nudges, acting as sort of a chain reaction's kickstarter, and they're off! The whole place goes ballistic!  |
|
|
|
Post by darquewanderer on Jul 17, 2013 5:01:16 GMT -6
This is excellent. Thanks for sharing.
|
|
|
|
Post by Wardster on Jul 24, 2013 11:51:08 GMT -6
This is excellent. Thanks for sharing. Thanks much!  For what it's worth, I haven't forgotten about updating this thread. Just spending time away from the bench, trying to "get organizee" on stuff like finding those older photos, and getting them into one place and so on, so I can maybe use photos from other projects (here or in some other how-to / "tip" thread?) as examples of how to do some other weird-but-cool stuff. That's gonna take me a while, though; but it's definitely on my "to do" list. |
|
|
|
Post by Wardster on Aug 8, 2013 18:31:01 GMT -6
Sales!!!
If you have a local Kmart store, this is the time to hit them up; looking for one of those deflating tools. They're on sale right now, at my local store; and I presume that means they're on sale all over the US. (And likely not just in Kmart, but maybe in other stores.)
At least as my local Kmart store, and every year as far as I can tell, those deflating devices that work great for homemade vacuum-forming end up first sitting for a while (at full price) in the aisles that are set aside for (summer) closeout items ... and then, all of a sudden, they drop about 20% or so to start with (give or take) and stay there for a while ... and then, in my experience, they keep dropping and dropping in price, in sudden / big chunks over time (I've seen the $20 ones going for as low as $4 each, right at the end) ... but the catch is: if ya wait too long, ya end up waitin' till next year, 'cause other people who also know that this is a seasonal item that will go very cheap, will beat'cha to the one you want. So, they're dropping ... and keep en eye on 'em!
|
|
|
|
Post by Wardster on Aug 25, 2013 13:58:43 GMT -6
Just a heads-up: my local Kmart dropped the price on those deflating devices (which are great for vacu-forming uses) a second time. The current price is just over half of what they usually go for. If you want one, now's the time to check your local Kmart store!
|
|
|
|
Post by Dennis M on Jan 15, 2014 20:48:07 GMT -6
Thank you Ward.
|
|
|
|
Post by Wardster on Feb 3, 2014 18:35:46 GMT -6
Welcome! :-) Since I'm apparently "on strike," model-wise, right now, here's someone else's cool video on the process of doing vacu-forming. Same basic thing I'm doing; but it's always better seeing stuff "done live". www.foncocreative.net/vacuumformer.html |
|
|
|
Post by Wardster on Sept 22, 2014 15:50:53 GMT -6
Just another (annual-style) heads-up, in regards to those deflating devices that I use for vacu-forming.
Right now, at my local Kmart, they're down in price to something like 25% of their usual cost. (50% off of the already 50% off, or in that ballpark.) I just picked up some extra deflators for $5 each: even though that particular unit usually sells for closer to $20 each. The larger, higher-powered unit, which usually goes for closer to $30 each, was also on a "clearance to the clearance" sale: at only $6.50 each.
|
|
|
|
Post by Treehugger Dave on Sept 29, 2014 13:26:06 GMT -6
Back in the day when we were doing "Bubble Tops", we used air pressure to "Blow" heated thin plexi-glass to the shape we wanted through a cut-out in thin plywood. No marks from the mold on the plastic, like when you do vacuum forming. Just my two cents worth -  |
|
|
|
Post by Wardster on Oct 5, 2014 22:19:55 GMT -6
The beauty of those inflator / deflator devices is that they can be used in either direction -- (that is, they can either suck air out; or blow air in) -- although I'm betting that in the latter case, with any sort of a scale model's bubbletop, it would likely just "pop" or explode the warmed plastic sheets.
|
|


