|
|
Post by Pegleg (Hotwheels Bob) on Jan 20, 2008 9:30:45 GMT -6
Any ideas on making a good wood grain look?
|
|
|
|
Post by gwangiboy on Jan 20, 2008 9:37:27 GMT -6
I use a painting technique, which I'll change a little for each project, but basically:
1. First paint is one color, a wood tan or along that line.
2. 2nd 'coat' is a wash made of mostly flat yellow (I use Tamiya) with some brown or red/brown added in (not very much)
3. 3rd I drybrush a dark brown over that for the wood grain look.
Try it out, or at least experiment, see what you think!
|
|
|
|
Post by fredmellini on Jan 20, 2008 10:16:11 GMT -6
Well there is two thoughts/methods on woodgraining. 1) old dry wood (sounds more like a disease ;D)--Must use flat paints, glossy paints will just let the washes or dry-brushing roll right off, won't "bite" into anything. I first paint the part flat black. I then lightly bry-brush brown, tans, working up to lighter colors and then alittle grey and just a touch of white. Seal with dull coat.  2) For newer finished woodgrain.--I start with a flat light brown or tan base just kinda brushed over the piece allowing streaks to show. After this dries, I then go over it with "The Detailer" brown wash, again allowing streaks to show to give it a woodgrain look. Sometimes after that has dried I may hit it with "The Detailer" black wash very lightly.  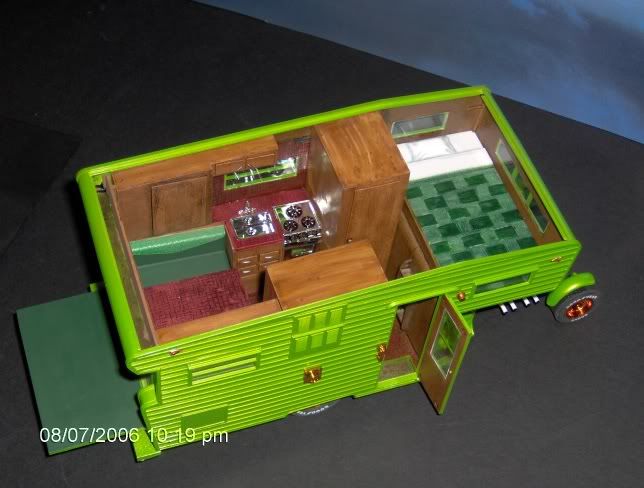  |
|
|
|
Post by scurvy on Jan 20, 2008 10:46:51 GMT -6
Just a finishing tip, but for glossy, finished wood, drybrushing either turn-signal amber or a clear orange over the top adds some real depth to the wood.
|
|
|
|
Post by robriley on Jan 21, 2008 7:30:44 GMT -6
i used vinyl wood grain shelf paper...and it looks like real wood. it's a vinyl decal that comes in a huge roll you can get at menards for like $5.00. it's VERY sticky on the adhesive side and since it's vinyl, it's very easy to work with...and it looks like real wood. for me, it was much easier than painting. the technique of painting wood grain is really cool, and i could never do it.... i admire the guys who can do it.  |
|
|
|
Post by Pegleg (Hotwheels Bob) on Jan 22, 2008 6:13:41 GMT -6
Thanks for the ideas, will post the rod if job turns out not to embassing....
|
|
|
|
Post by fredmellini on Jan 22, 2008 7:17:55 GMT -6
Hey Rob, First I got to tell you, I love that dragster!!!(It caught my Eye from the contest!! ;D ;D)..........and until you said you used self sticking shelf paper, I never noticed that!!!........you applied that shelf paper so well that I just now noticed the slightest little fold at the corner in the front!! I thought maybe you used a water slide decal for the woodgrain, but not self sticking shelf paper..............great job and it looks awesome!!! ;D ;D ;D and thanks for the tip!!!  |
|
|
|
Post by donculley on Jan 22, 2008 8:34:46 GMT -6
Man Fred, the wood on that Boot hill came out great !! If I didn't know better, I'd swear it was real wood
|
|
|
|
Post by robriley on Jan 22, 2008 10:56:24 GMT -6
Hey Rob, First I got to tell you, I love that dragster!!!(It caught my Eye from the contest!! ;D ;D)..........and until you said you used self sticking shelf paper, I never noticed that!!!........you applied that shelf paper so well that I just now noticed the slightest little fold at the corner in the front!! I thought maybe you used a water slide decal for the woodgrain, but not self sticking shelf paper..............great job and it looks awesome!!! ;D ;D ;D and thanks for the tip!!! thanks fred. yeah, that little fold gives it away. i tried several times on this, and i always got the fold on the corner. this was the best i could get it. my first thought was to use actual wood laminate, but it was expensive, and you have to use heat to activate the glue...not good when applying it to plastic. plus, the wood laminate was thick, and not very flexible. i think it was like $20.00 for a small amount of it. the shelf paper on the other hand, was $5.00 for a huge roll...and it's vinyl, and very flexible. and it sticks like crazy. it's real easy to work with too. |
|
|
|
Post by hammerz on Jan 25, 2008 16:33:57 GMT -6
I tried some ideas on my AMT Lil' Red Express truck on the bed floor. A surface with molded in texture. I used all Tamiya acrylics, all applied with a standard Testors round brush. May post a shot or two later, just waiting for it to dry and shrink up. So the texture will show. Base; XF-66 Light Grey. Some streaks and wash; XF-1 Flat Black, thinned with water. Two coats; X-26 Clear Orange. It was a little bright so one coat; X-19 Smoke. The flash makes it look brown but you can see the colors in person. I did throw this together as a quicky, to try these tips out. Freds work looks great BTW.   I love my Transparent colors, always finding more things I can use them for. Here's the list of those. X-19 Smoke. X-21 Flat Base. X-22 Clear. X-23 Clear Blue. X-24 Clear Yellow. X-25 Clear Green. X-26 Clear Orange. X-27 Clear Red. I use the X-22 to thin out the colors with, and the X-21 for a flat finish. |
|