|
|
Post by RatRod on Jan 22, 2008 11:54:57 GMT -6
Yes, another bike... ;D This one I committed myself to build to display with my other bikes at the local Harley dealer here. I will try to do daily updates, and show some of my "secrets"  On this build, I'm going to use several ideas from a real bike built by Felony Flyers HotRod Bikes in Seattle WA.The end of day one.... On this build, I'm going to use several ideas from a real bike built by Felony Flyers HotRod Bikes in Seattle WA.The end of day one....
|
|
|
|
Post by BigDave on Jan 22, 2008 11:59:56 GMT -6
Secrets will be a lot of help. I have something I want to build, but not sure how to do some of the frame mods and I really don't want to experiment and end up ruining a good frame.
|
|
|
|
Post by fredmellini on Jan 22, 2008 12:30:38 GMT -6
The "Two Wheeled Master" is at it again!!!! ;D
|
|
|
|
Post by RatRod on Jan 22, 2008 12:30:41 GMT -6
Dave, just ask any questions you have, and I'll try to help out. Here are some of the most important tools you'll need to do most modifications.....Razor saws, sanding sticks, drill bits and hand drills, some good jewler files, and a good ruler & pencil. Since I have been doing this hobby for soooooo many years I have a good selection of tools, if your a younger, or newer builder, getting all the tools you can will be a big help in years to come!!! Try Micro Mark, or your LHS for all the tools you need.
|
|
|
|
Post by barten on Jan 22, 2008 13:20:34 GMT -6
Now that is my kind-a-tools. . .and a big pile of them! ! ! ! ! hehehehe
Now do something a bit wild with it! ! ! ! ! ! OFF THE WALL!
GB
barten
|
|
|
|
Post by hammerz on Jan 22, 2008 14:42:37 GMT -6
I am guessing, that some kind of metal rod is used to hold the joints with, if you use metal rods? Do you buy the plastic rod that you use or is it the kit sprues? I know the backbone you can lap joint that, as I did that for that tank mod I did. I had to cut that to slide the fork in place. I also want to know more about the forks, like how you build them up?
|
|
|
|
Post by RatRod on Jan 22, 2008 18:21:38 GMT -6
Day two is winding down, so here goes.....Today I cleaned up the frame a little, moved the center down tube, hung the upper motor mount, and radiused the rear fender. I also finished the fork process (will be in the following post for Hammerz, or anybody else)After day two....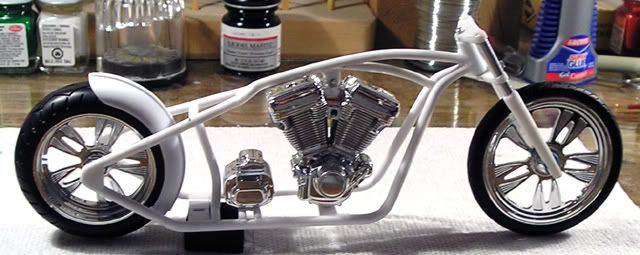 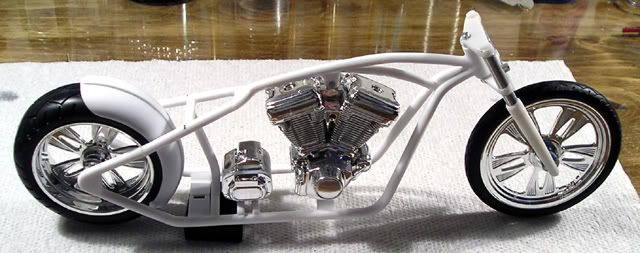
|
|
|
|
Post by RatRod on Jan 22, 2008 18:57:01 GMT -6
Ok, here's a few step by step instructions as requested by Hammerz. Oh, and to answer your question about pinning, yes, I either use metal, or plastic pins in all my joints for strength, and yes I keep just about every size plastic tube and rod made, along with brass & aluminum!!! Forks.....Step 1 assemble your frame halves, when the cement cures, clean and drill a 1/8" hole in the goose neck, then insert a piece of 1/8" aluminum rod inside Next, cut the plastic pin off the back of the triple tree (the one that goes in the goose neck) Measure centers, then drill a 3/32" hole down through both parts of the triple tree (do this step before cutting the forks apart, and measure everything carefully) my pics are from afterwords Next, cut the plastic pin off the back of the triple tree (the one that goes in the goose neck) Measure centers, then drill a 3/32" hole down through both parts of the triple tree (do this step before cutting the forks apart, and measure everything carefully) my pics are from afterwords   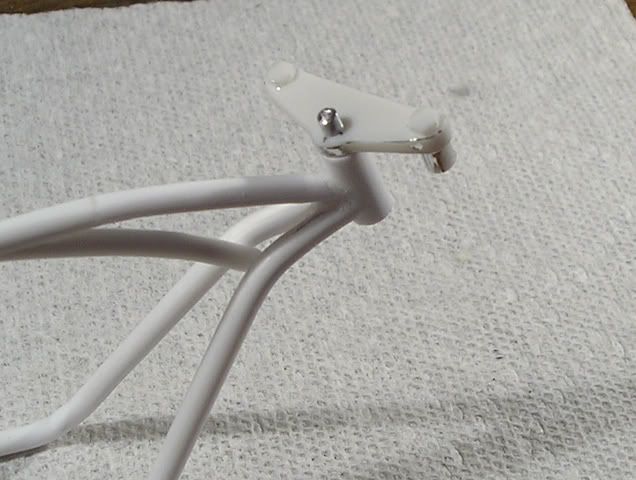 Next step is to measure the upper fork tubes (between the triple trees) cut two pieces of 5/32" aluminum tubing to fit. You will also need to determine what length your lower fork tubes will be, and cut them. After cutting the forks apart, you will have to file all the pins (old fork tubes) to fit inside the tubing Next step is to measure the upper fork tubes (between the triple trees) cut two pieces of 5/32" aluminum tubing to fit. You will also need to determine what length your lower fork tubes will be, and cut them. After cutting the forks apart, you will have to file all the pins (old fork tubes) to fit inside the tubing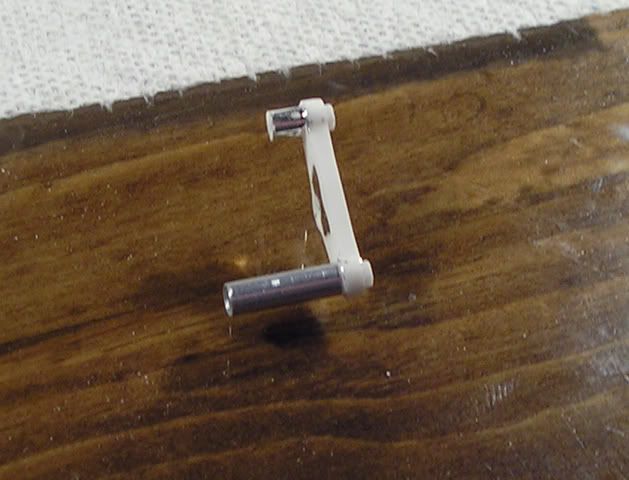 So, with all that done you will have something like this..... So, with all that done you will have something like this.....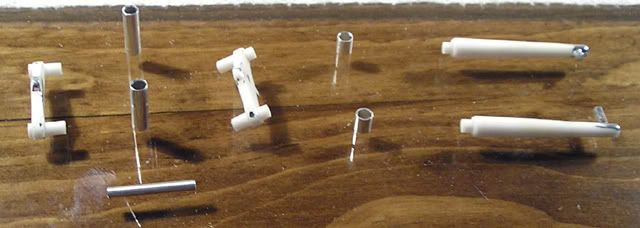  When finished, I will have polished the tubing, and painted the plastic parts, and assembled evrything with 5 minute epoxy!!! When finished, I will have polished the tubing, and painted the plastic parts, and assembled evrything with 5 minute epoxy!!!
|
|
|
|
Post by Smilie™ (madmodifier) on Jan 22, 2008 19:49:06 GMT -6
looks cool
I finally got a kit for an all out 70's show chopper
ya know extended springer fork, sissy bar, and everything else
getting started on the coffin tank soon ;D
|
|
|
|
Post by BigDave on Jan 22, 2008 20:59:54 GMT -6
Ok, that answered one question. Now how do you get the tubing to hold its shape after you bend it. And how tight of a bend can you make.
thanks
|
|
|
|
Post by Tim Nolan on Jan 22, 2008 21:01:45 GMT -6
Glad your doing this John. Beautiful workmanship,and I'm taking notes dude.......  |
|
|
|
Post by hammerz on Jan 23, 2008 6:55:36 GMT -6
Thanks for the writeup, nice work. I may use a few ideas for my next bike. I was interested in the fork as I may try my hand at scratch building that on it. Dave, you think alot like I am here. At first I was going with a coffin tank, but I may just do a diamond shape tank. Need to find a way to do twisted square rod. Alot to be said about those 70's customs.
|
|
|
|
Post by rocketeer on Jan 23, 2008 7:50:43 GMT -6
Plastruct offers twisted clear acrylic rod, but the smallest size is 3/8 inch.
|
|
|
|
Post by RatRod on Jan 23, 2008 9:30:51 GMT -6
BigDave, As far as getting the tubing on the frame to stay where you want it......The frame rails on this bike are all solid rod, so all the parts were just heated under hot tap water, and bent, if you work it a little at a time you can get it as tight of a bend without breaking. Once I have it where I want it, I glue it all together with a small amount of liquid cement, and hold it for awhile. Sometimes the use of a hairdryer helps evaporate the chemicals, then I will flow a drop or two of CA around all joints, let capillary action do it's thing, then a couple drops of accelerator, and it's together. As far as using tubing goes, if it needs bending, I will insert aluminum or brass rod inside. The bike below has brass rod inside the handlebars, and on the exhaust system there is aluminum rod inserted inside the bends only.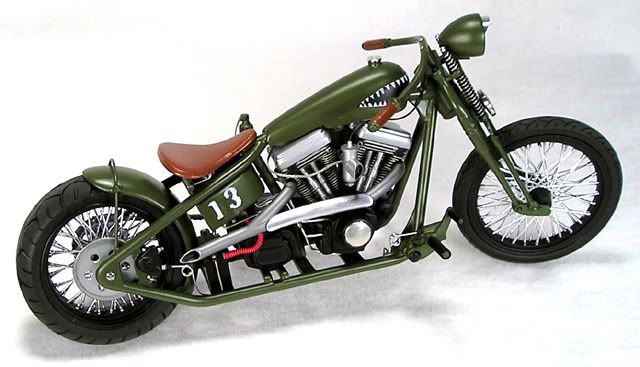
|
|
|
|
Post by Pegleg (Hotwheels Bob) on Jan 23, 2008 11:35:12 GMT -6
Maybe you should apply for a design job at OCC with Paul Sr.
|
|
|
|
Post by RatRod on Jan 25, 2008 13:09:11 GMT -6
Well, let me see, where was I? Oh yeah......Gas tank, seat, handlebars.....I wanted a peanut tank on this bike, so I decided to just make one using sheet plastic. After making cardboard templates, I started with the center two pieces matching the frame backbone, then started stacking thick sheet plastic cut from the template on both sides 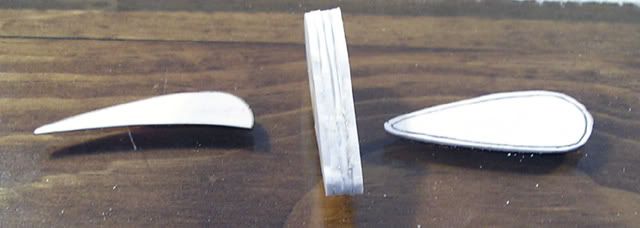 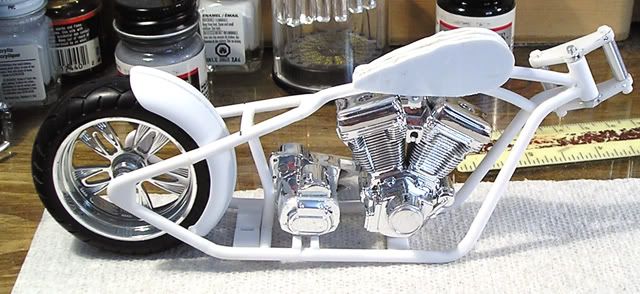 After some shaping.. After some shaping.. The bars were made from 3/32 plastic tubing, and 1/16 aluminum rod inserted inside, and shaped. I wanted a tuck-n-roll seat, so I just cut a piece of sheet plastic to match another template, then glued strips of half round side by side.. The bars were made from 3/32 plastic tubing, and 1/16 aluminum rod inserted inside, and shaped. I wanted a tuck-n-roll seat, so I just cut a piece of sheet plastic to match another template, then glued strips of half round side by side..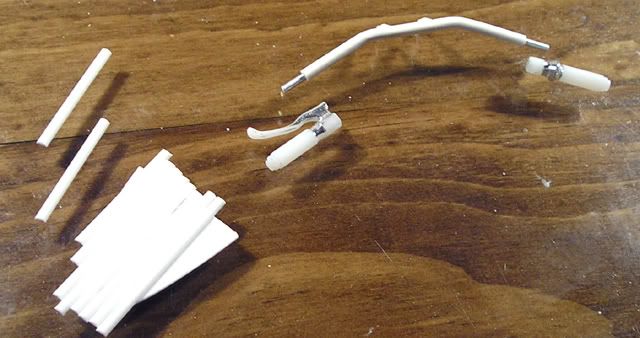 With this done, here's were we're at. I need to mock up the exhaust, make the seat mount, scratch build an oval oil tank, and come up with all new foot pegs, shifter & brake pedals, which will be mounted mid frame on this one. Stay tuned!!! With this done, here's were we're at. I need to mock up the exhaust, make the seat mount, scratch build an oval oil tank, and come up with all new foot pegs, shifter & brake pedals, which will be mounted mid frame on this one. Stay tuned!!!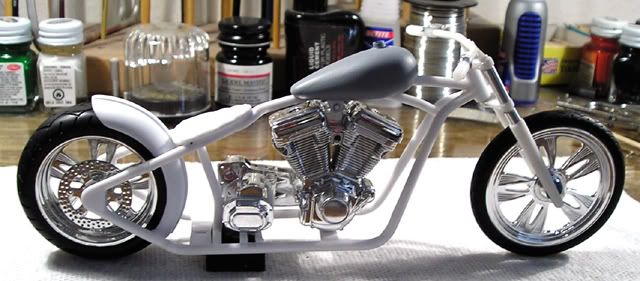 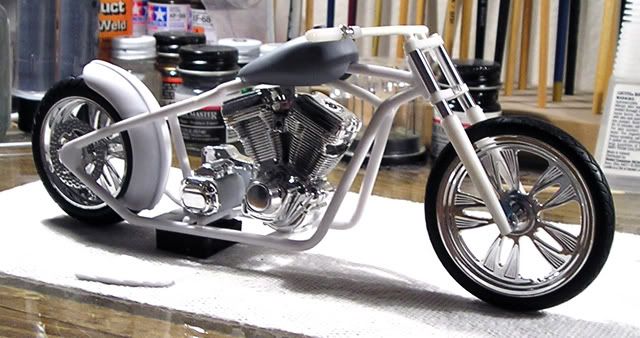 And....keep asking questions!!! And....keep asking questions!!!
|
|
|
|
Post by hobbybobby on Jan 25, 2008 20:08:21 GMT -6
Look`s good to me, RatRod! Great tips & tricks! You are "The amaizing bike builder"! ;D ;D ;D |
|
|
|
Post by RatRod on Jan 26, 2008 0:59:15 GMT -6
Thanks Bobby, and every one else.
|
|
|
|
Post by hammerz on Jan 26, 2008 8:25:37 GMT -6
I am interested in this build. killer idea with the tank.
|
|
|
|
Post by detroithammer on Jan 26, 2008 10:25:27 GMT -6
Damn Rat
They made these bike kits just for you. You keep turning out the meanest looking bikes I've seen built from this kit. You are the master. This one is going to be very cool. Looking foreword to the finish..BOOM
|
|
|
|
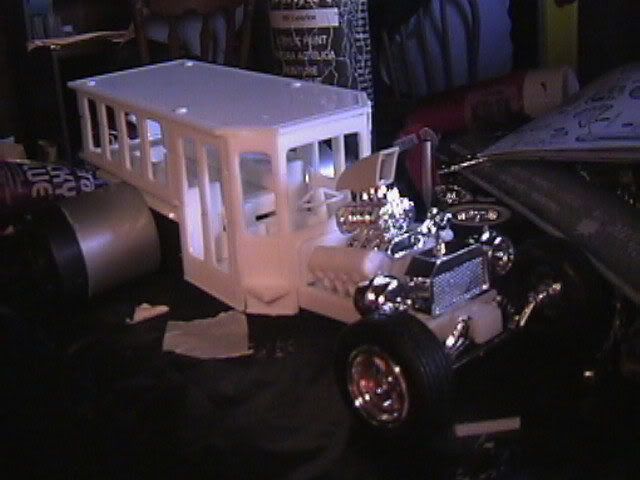
Post by RatRod on Jan 29, 2008 19:51:26 GMT -6
Thanks Paul!!! Your right, they did make these kits for ME.... I guess it's time for a small update. I can't show everything at this point, because my wonderful daughter decided to mess with my camera the other day, and lost the pics that were on it...Grrrrrrr. So, I do have a couple pics of the seat, and the mounts I made...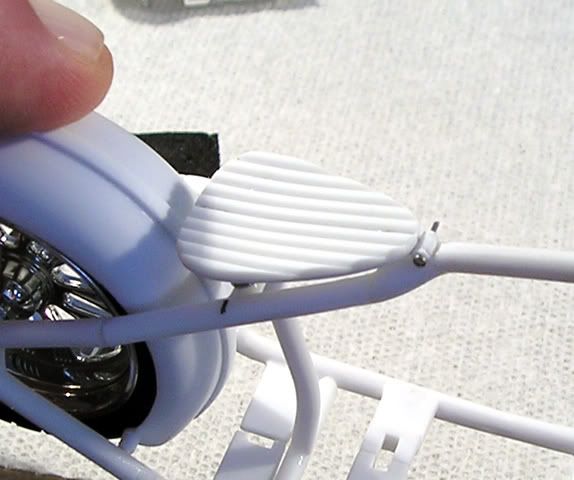  I also got the oval oil tank made, those were the lost photos, so if anyone wants an idea how to do it just ask. I also finished the rear fender with new mounts in place, and I did the headlight eyebrow a little different this time, here's where it's at, at this point.... I also got the oval oil tank made, those were the lost photos, so if anyone wants an idea how to do it just ask. I also finished the rear fender with new mounts in place, and I did the headlight eyebrow a little different this time, here's where it's at, at this point....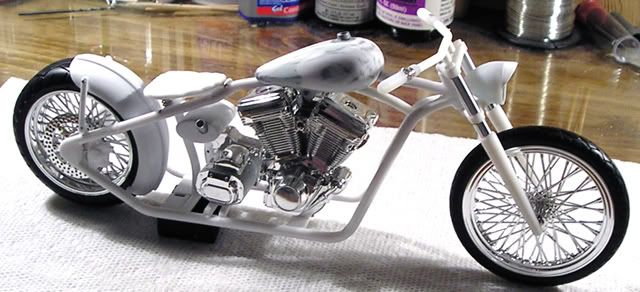 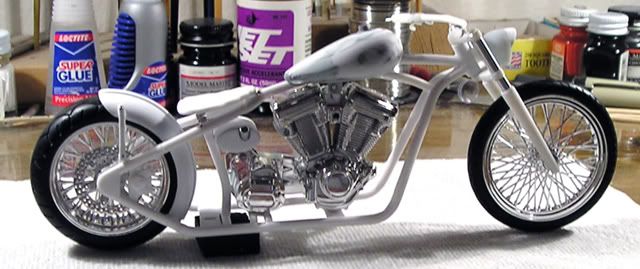
|
|
|
|
Post by Tim Nolan on Jan 30, 2008 8:24:48 GMT -6
Man that is slick. I like the spoked rims better I think too. Your bodywork is meticulous and right on. Boom's right, these things have your name written all over them!
|
|
|
|
Post by RatRod on Jan 30, 2008 9:01:47 GMT -6
Thanks Tim!!! Yeah, I had always planned to use wire wheels on this from the start, just used the others for mock up. I have the colors picked out, and will hopefully be painting next week. Still need to figure out the pegs & pedals, and scratch build a clutch. I have three visions for the exhaust systems, mild to wild, just need to decide which one to make....  Oh, I think you'll be kicking your own arse when it's done, as it could have been added to the Nolan collection..... ;D Oh, I think you'll be kicking your own arse when it's done, as it could have been added to the Nolan collection..... ;D
|
|
|
|
Post by BigDave on Jan 30, 2008 9:33:41 GMT -6
Ok, I have to ask. How did you make the oil tank? I'm taking notes so speak slowly  |
|
|
|
Post by Tim Nolan on Jan 30, 2008 14:48:32 GMT -6
Yeh, I wanna' hear the details on that too.
I'm amazed at the work quality, using simple plastic and aluminum. Your an artist man.
|
|
|
|
Post by fredmellini on Jan 30, 2008 15:39:20 GMT -6
Hands down you are the plastic motorcycle building GOD!!!! or for the dyslexic(I probably spelled that wrong) "DOG"!!!!! ;D ;D ;D ;D ;D ;D ;D As soon as I finish typing here I am going to burn the last revell motorcycle kit I have as a sacrificial offering to you!!!! ;D ;D ;D ;D.........I know when I am outa my league ;D ;D ;D ;D Keep building these things as they are just a marvel to look at!!!!! |
|
|
|
Post by RatRod on Jan 31, 2008 12:15:43 GMT -6
LOL!!! You crack me up Fred!! I'm just a builder like everyone else here...  Ok, I wanted an open belt on this bike, so I need a clutch. I have seen people add all kinds of things over the pullys, but I wanted a more realistic looking clutch, so after looking through several bike magazines I did the following.First step, I cut out a circle a tad bigger than the inside diameter of the rear pulley, found a center, then drilled a 1/16" hole, and mounted it to Dremel tool bit, then using a file, turned it perfectly round. Ok, I wanted an open belt on this bike, so I need a clutch. I have seen people add all kinds of things over the pullys, but I wanted a more realistic looking clutch, so after looking through several bike magazines I did the following.First step, I cut out a circle a tad bigger than the inside diameter of the rear pulley, found a center, then drilled a 1/16" hole, and mounted it to Dremel tool bit, then using a file, turned it perfectly round. I kept checking along the way getting it to fit inside the pully. NOTE: Always remember that primer & paint add to the size of the parts, so make things like this a little smaller than need be so that when everything is painted, it still fits, it will save your sanity when final assembly takes place!!! I kept checking along the way getting it to fit inside the pully. NOTE: Always remember that primer & paint add to the size of the parts, so make things like this a little smaller than need be so that when everything is painted, it still fits, it will save your sanity when final assembly takes place!!! Next, I measured 8 equal sections, then using a circle template, I added a smaller ring to get equal centers. Once all centers were established, I first drilled small pilot holes, then I drilled them half way through with a 1/16 bit ( I will add 8 bolt heads made from ground down pin heads when finished) Next, I measured 8 equal sections, then using a circle template, I added a smaller ring to get equal centers. Once all centers were established, I first drilled small pilot holes, then I drilled them half way through with a 1/16 bit ( I will add 8 bolt heads made from ground down pin heads when finished)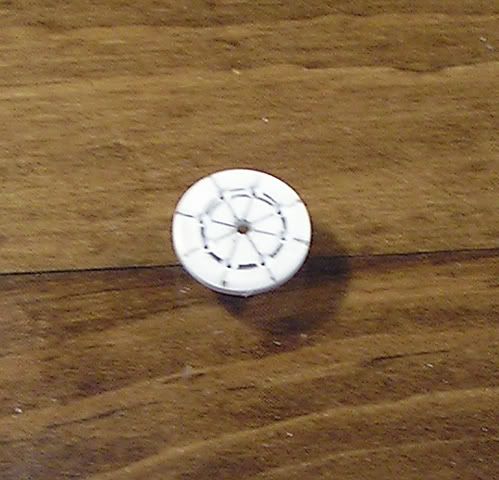 Since the clutch sits outward inside the pulley, I made spacers for it to sit on Since the clutch sits outward inside the pulley, I made spacers for it to sit on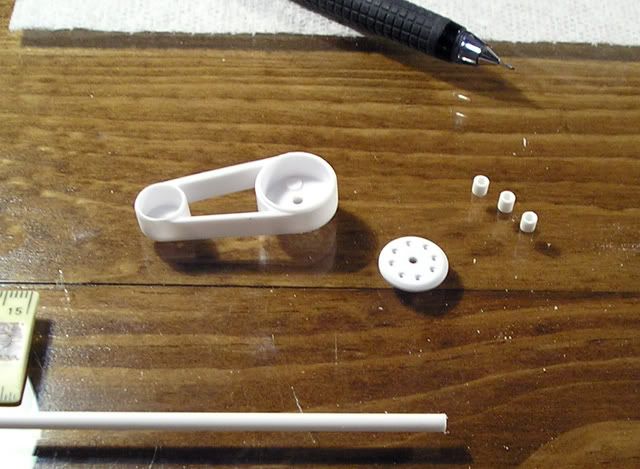 Once the spacers are installed, the clutch face sits where I wanted it to!!! When it's finished & painted steel metalizer, I will paint all the holes flat black, and install bolt heads in each one for a realistic effect!!! Note: I tapered the outside of the clutch face too. Once the spacers are installed, the clutch face sits where I wanted it to!!! When it's finished & painted steel metalizer, I will paint all the holes flat black, and install bolt heads in each one for a realistic effect!!! Note: I tapered the outside of the clutch face too.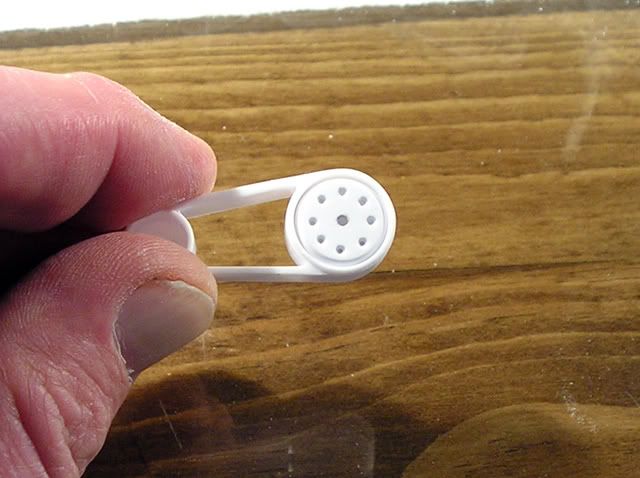
|
|
|
|
Post by RatRod on Jan 31, 2008 13:00:34 GMT -6
Here goes the process of making another non-kit supplied part. I wanted an oval shaped oil tank, so that was going to have to be made as well.First, use a template with several shapes, these can be found at any good office supply store. Not only can an oval be made, but everything else....star, hex, diamond, are not impossible.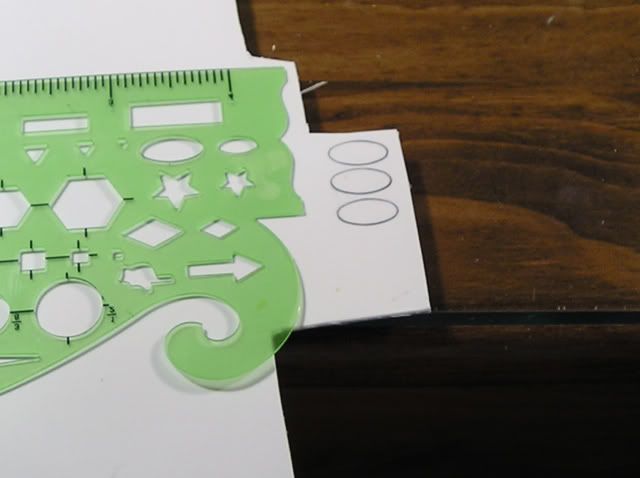 Using a scroll saw, cut outside your marks... I used 1/16" sheet plastic here. Using a scroll saw, cut outside your marks... I used 1/16" sheet plastic here.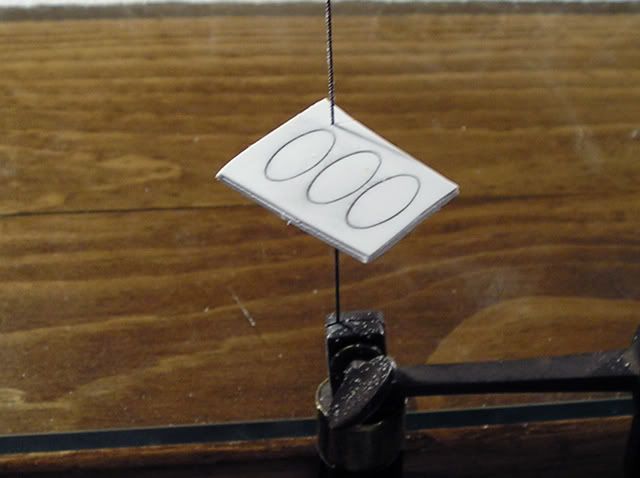 Then sand them all down evenly to the lines... Then sand them all down evenly to the lines...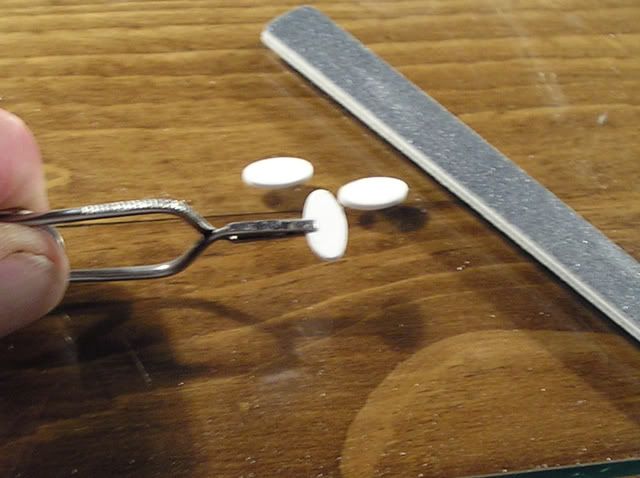 Then figure out the width you want less the thickness of of each inner structure. Cut two (in this case) pieces of plastic tubing to space the ovals to your desired width. I now know what width, so I cut some thin 1/64" thick sheet to size too. Here's all your pieces so far. Then figure out the width you want less the thickness of of each inner structure. Cut two (in this case) pieces of plastic tubing to space the ovals to your desired width. I now know what width, so I cut some thin 1/64" thick sheet to size too. Here's all your pieces so far.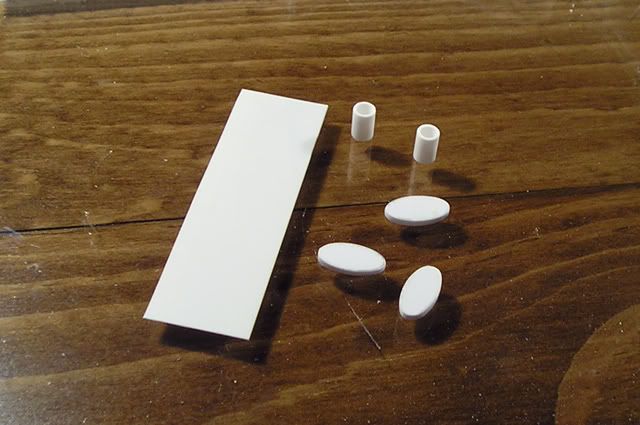 Cement the inner structure together making sure everything lines up in all directions. Cement the inner structure together making sure everything lines up in all directions. Wrap the sheet plastic tightly around the inner structure, and mark the lenght, and cut it to size. Wrap the sheet plastic tightly around the inner structure, and mark the lenght, and cut it to size.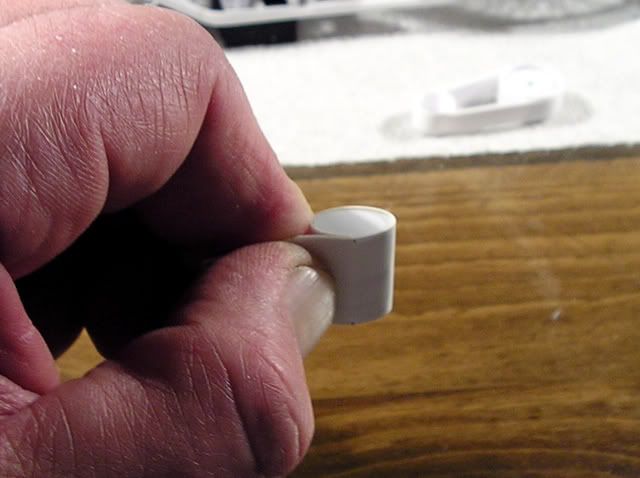 I use Testors liquid cement "sparingly", and cement the sheet to the inner structure, and let set overnight. When everything is cured you'll have something like this. I use Testors liquid cement "sparingly", and cement the sheet to the inner structure, and let set overnight. When everything is cured you'll have something like this.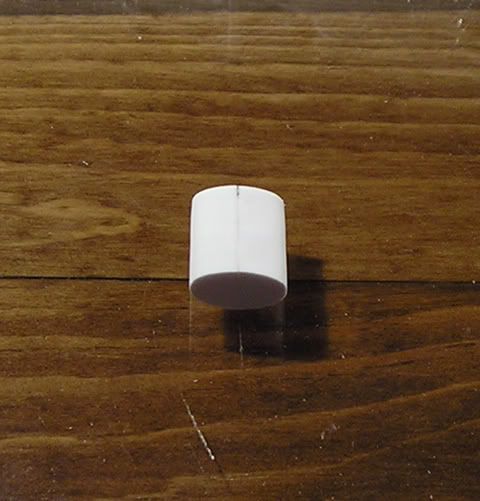 Last step, I use 1/8" aluminum tubing for the fill spout. Find where you want it, drill a pilot hole, then go up gradually starting with 1/16", 5/64, 3/32, etc. until you get to 1/8" ( I do this so just drilling a 1/8" hole doesn't tear things apart) Insert your fill spout, and flow some liquid CA around it, and that will seal it in, and make a nice looking piece when primed & painted!!! Last step, I use 1/8" aluminum tubing for the fill spout. Find where you want it, drill a pilot hole, then go up gradually starting with 1/16", 5/64, 3/32, etc. until you get to 1/8" ( I do this so just drilling a 1/8" hole doesn't tear things apart) Insert your fill spout, and flow some liquid CA around it, and that will seal it in, and make a nice looking piece when primed & painted!!! Wheeeew, with all that done, I'm off to make more goodies.... ;D Wheeeew, with all that done, I'm off to make more goodies.... ;D
|
|
|
|
Post by fredmellini on Jan 31, 2008 15:34:21 GMT -6
I am just sitting here shaking my head!!! ;D ;D ;D ;D
|
|
ron
Showrod Basher

Posts: 74
|
Post by ron on Jan 31, 2008 17:44:47 GMT -6
Great build and how to.
Ron
|
|

 On this build, I'm going to use several ideas from a real bike built by Felony Flyers HotRod Bikes in Seattle WA.


 Oh, I think you'll be kicking your own arse when it's done, as it could have been added to the Nolan collection..... ;D


