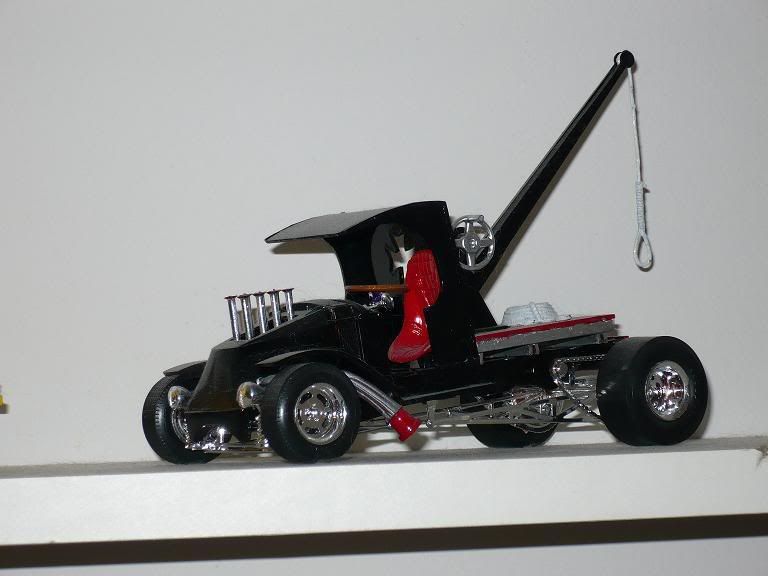
I have a few more shots of the tow truck . I'm still learning . distance / lighting and such ... but this is a start. have to resize and will post them .
thanks for the feedback on these.
Here are a few general digital camera tips --
hope you don't mind!? it's meant as a group thing -- that I gleaned from playing with the older, borrowed Fuji camera I always use for my pics.
Play with the menus, if your camera has that sort of thing. Put the camera in its highest quality mode, and leave it there! You will get fewer total pictures ... but the improvement ain't small!
Investing in a tripod is a very, very good idea.
Look for the "macro" setting on your camera. When you're in that mode, a little icon of a flower may appear on your tiny display. This mode does some internal magic to the camera, so you can get the camera really close; but things are still in focus. (In the days of 35mm film cameras, new lenses were applied.)
See if your camera has a built-in "self-timer" or other delay. Between a tripod; macro mode; and this feature: you're golden! (Because now it is at a fixed distance from the subject, and will be much more steady; it can get close; and it won't shake. All of which helps the auto-focus and auto-flash do their jobs well.)
Good room lighting, from multiple angles, helps cut shadows. (I have some $2.50 or so supermarket "daylight" light bulbs: one on a table stand, and one in a ceiling fan fixture. I pull a chair up at an angle that both lights can "see"; and put a posterboard backing on the chair; held on with a kiddie's plastic C-clamp.)
Try to pick a posterboard that's fairly close to the "value" of your model. What I mean is, the artistic "value": how dark or light it would be, if what you saw was a black-and-white image. The reason for this is, the camera may decide the bright white or deep black background is highly important (partly since there will be a lot more of it than the model, in most cases). The whole image may "wash out" badly ... except for the black background, which will show every speck of dust and lint.
When you're setting things up, watch your angles. Pretend the camera is going to throw a tiny pie out of the lens, at the model. It will hit, right in the center of your little display screen (and you may have something like an aiming square or cross-hairs). Ask yourself if that pie will hit solid, and splat everywhere, equally ... or will it hit one surface and slide off, sideways ... or will the pie be divided into chunks, by all of the different things it will hit?
The "pie" is a signal the camera will send out, to find the distance to the object it is supposed to be taking a picture of. If it hits a solid surface, dead-on, it will bounce back well, and give a very precise reading. If it hits something that is slanting away, the signal either won't come back strongly, or the camera will have to guess at the distance. If it hits several things at once -- like the sides of an open door, plus all of the objects in the interior, as well -- then it will really have to guess! (Same with an engine area.) And if it has to guess, you won't like the results!
It's best, at times, to move the camera back a little ways; let the "frame" be filled with more "negative space" (empty spots) than you want the final picture to have; and to do your best to aim the little crosshairs at the most signal-reflective surface. Try to make that surface be the mid-point, front-to-back, of what you want to be in focus.
Once you've played with all that, here's the final tip, to squeeze out all your set-up is capable of giving you ... don't just take one of each picture. Take three, or even five of each set-up / angle. The reason for that is simple: the camera WILL have to guess a little bit, on the auto-focus and auto-flash settings. Some slop is inevitable on each take. By taking several of each "one" you will have a number of choices, when you download the pics into your computer. Sometimes the results look great on that tiny little screen your camera probably has; but awful, and way out of focus or with unfixable lighting problems, on your 'fuser ( = confuser = computer) screen. Sometimes the difference is a subtle thing; sometimes one picture looks several times better. You won't know until you dump the data onto your computer.
One last thing: if you're using a compressed format like *.JPG, every time you do something to that computerized image, and then save it, it re-compresses the data. You lose more and more of the picture quality, every time that happens. Colors like red look awful, after a few modify / save cycles, on JPG images. If you're going to modify your pics, consider saving them as *.BMP files first -- or any other non-compressed image format -- right away, and while you're playing with it; then make a JPG copy when it is done, and upload that one to the I'net.
Just my two cents! Hope some folks can use some / all of it!? (And again, this is meant as a "for the group" posting / tips!)
And if you're looking for why I'd post all that: (a) I'm a nerd and can't help such things; and (b) I love the models I'm seeing here, and want to see them more clearly and/or closely! ;D


 ? HUH
? HUH