|
|
Post by rocketeer on Oct 3, 2009 10:54:55 GMT -6
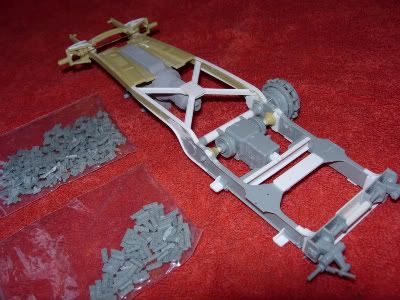
I've mentioned in other Rommel's Rod threads that I'm using the Dragon Sd.Kfz. 7 half-track as a source for track parts, and I though you guys might like to see pictures of the project as it now stands. The Dragon kit is exquisite; lovely crisp moldings, an extremely high level of detail, and the tracks are to die for. Each link is two pieces, the steel link and the rubber wear pad. Each link's pivot pin is captured when you glue the next link together; the result is an articulated track.  It's really really neat, and puts the old "rubber band" vinyl tracks to shame. I had to cut up the half-track's chassis pretty severely to fit it under the Rod; I ended up cutting it into sections, shortening it here and there, and adjusting each section up or down so that the wheels were at about the right places; after that was all dry, I cut the chassis in half lengthwise and widened it to match the Rod's track. I ended up eliminating two sets of roadwheels--the final result is the sprocket, four roadwheels, and a rear idler wheel on each side. So here's a little picture of the chassis and the little bags of track links that come with the Dragon kit:  And here are links to larger pictures: Chassis and assembled track: i193.photobucket.com/albums/z256/hilbyf/Rommels%20Rod%20project/DSCN3102.jpgChassis and baggies again: i193.photobucket.com/albums/z256/hilbyf/Rommels%20Rod%20project/DSCN3103.jpg...and the back of the body, showing where I'm filling the large rectangular holes (what was Revell thinking?) and have built up the folded top with some Milliput: i193.photobucket.com/albums/z256/hilbyf/Rommels%20Rod%20project/DSCN3104.jpg |
|
|
|
Post by RatRod on Oct 3, 2009 11:08:46 GMT -6
Very cool idea Steve!!! Those big holes are where Revell took the original molded in track sections off, and made them separate parts, excellent idea. I'll be watching your Rommel's build!!! 
|
|
|
|
Post by TheMadModeler on Oct 3, 2009 11:30:48 GMT -6
WOW.. This is gonna be sweeeet..
BiLL..
|
|
|
|
Post by flounder on Oct 3, 2009 12:14:27 GMT -6
This is exciting! I'll be watching.
Flounder
|
|
|
|
Post by skulldude on Oct 3, 2009 17:10:06 GMT -6
 GOTTA watch this closely!! TOO Kool!!
|
|
|
|
Post by gfgcollects on Oct 4, 2009 22:26:27 GMT -6
With readily available reissues of this, you guys will be able to really let your imaginations and skill run wild with no inhibitions.  And to think it took Revell/Monogram almost 40 years to figure this might be a worthwile project.  Great work Steve, looking forward to your updates. ;D Gerry G |
|
|
|
Post by ironheadchopper on Oct 5, 2009 5:45:04 GMT -6
Cant wait to see it.
|
|
|
|
Post by snakeplissken81 on Oct 22, 2009 3:32:19 GMT -6
wow! Way cool at detailing the underside.
|
|
|
|
Post by rocketeer on Oct 31, 2009 11:14:17 GMT -6
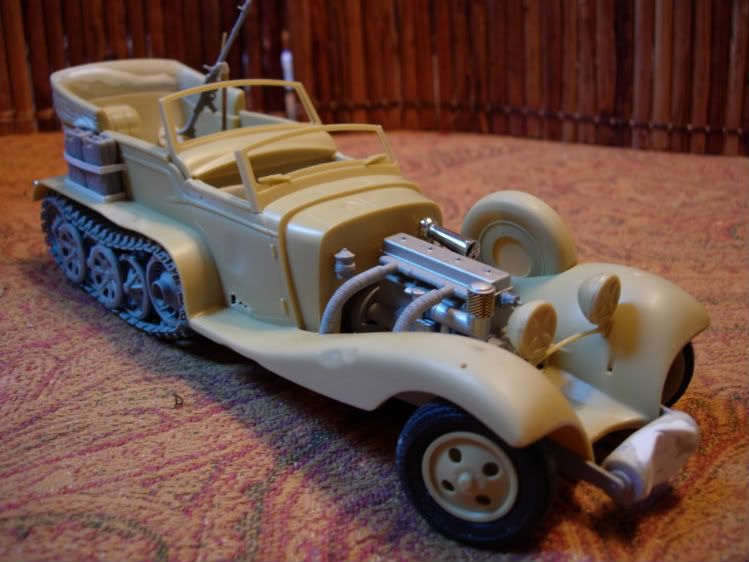
I thought you guys might like to see an update on my Rommel’s Rod project.  So far, I haven’t run out of enthusiasm, and so things are progressing steadily (if slowly). Here’s the chassis, with those lovely Dragon tracks mounted temporarily. The fan belt and fan are parts box items; the muffler is from Monogram’s ’48 Ford pickup. I’ll have to make the forward exhaust pipe, the one that connects to the flex pipes, after the thing is all put together—it’s just too tough getting things pinned down before then. i193.photobucket.com/albums/z256/hilbyf/Rommels%20Rod%20project/DSCN3218.jpgi193.photobucket.com/albums/z256/hilbyf/Rommels%20Rod%20project/DSCN3219.jpgAnd here’s the body mounted. I built my own flexible exhaust pipes, since I wanted more detail than the kit’s smooth ones. The other engine compartment accessories are from the parts box again, except I stumbled across a JoHan Mercedes 540K parts kit in my Pile O’Stuff, so the horn and a few other bits are from there. I’m also having fun adding dents and rust-through spots; I plan to make mine pretty tired and worn out. i193.photobucket.com/albums/z256/hilbyf/Rommels%20Rod%20project/DSCN3220.jpgi193.photobucket.com/albums/z256/hilbyf/Rommels%20Rod%20project/DSCN3223.jpgA couple rear views. The guns and jerrycans are from the 1/24 Hasagawa Kubelwagen kit, which has some really nice detail bits. The post mount for the machine gun is scratched. The left-hand taillight is a resin copy of the Kubelwagen’s convoy light; the right taillight is from the JoHan Mercedes. There are enough spare Dragon tracks to make up the spare sections to hang on the back of the body. i193.photobucket.com/albums/z256/hilbyf/Rommels%20Rod%20project/DSCN3221.jpgi193.photobucket.com/albums/z256/hilbyf/Rommels%20Rod%20project/DSCN3222.jpgI have an amusing idea for a setting, but haven't really started on that yet. chiefsspeedshop has an inkling, though...  I'm also unsure how to paint it; whether to do it all with airbrush and enamels or to use oils and a brush. I did a little beater pickup a while ago with oils, and it turned out really well; it was easy to get paint shade variations and dirt effects. But the Rod's chassis, especially, has a lot of little recesses, and I dread trying to brush that. Well, I'll figure it out.  |
|
|
|
Post by ira on Oct 31, 2009 13:15:36 GMT -6
[glow=red,2,300]Great Chassis!!![/glow]
|
|
|
|
Post by snakeplissken81 on Nov 2, 2009 7:17:33 GMT -6
That is very cool.
|
|
|
|
Post by gfgcollects on Nov 3, 2009 10:23:00 GMT -6
Nice, nice, nice Steve!  Gerry G |
|
Deleted
Deleted Member
Posts: 0
|
Post by Deleted on Nov 3, 2009 18:32:01 GMT -6
Okay, now that is very cool! Love they way you have fixed the weaknesses of this kit. Will be watching.
|
|
|
|
Post by Tory on Nov 4, 2009 15:25:45 GMT -6
You've got my attention.
I'll be checking in periodically on this one, I'm very impressed so far. As for finishes, go airbrushed and lightly weathered, you don't want to overdo it!
|
|
|
|
Post by customcruiserroy on Nov 4, 2009 15:37:21 GMT -6
This thing is looking wicked!! I even bought a 1935 mercedes kit to make mine a bit more detailed. But that's many years from now. You're keeping me way interested in this build. Looks awesome!! Keep posting! I am going crazy wanting more!
|
|
|
|
Post by rocketeer on Nov 15, 2009 18:20:36 GMT -6
Just a quick update: I'm still plugging away on this; today I painted the body. I've decided to brush paint it using oils, just for the heck of it (and because I don't like the hassle of setting up my airbrush and cleaning it afterwards). The only problem is that oils take a long time to dry. I may break down and use the airbrush to put a rusty base coat on the treads; there's a lot of intricate detail there.  No pics, I'm afraid; don't want to be moving stuff around with wet paint on it. But I'll take some as soon as I reasonably can.  |
|
|
|
Post by AL on Nov 15, 2009 18:47:40 GMT -6
|
|
|
|
Post by rocketeer on Nov 15, 2009 19:23:33 GMT -6
Yep, I've seen it; it's great. If you look closely, some of the bodywork isn't all it could be, but the overall concept is marvelous, the detailing is intricate, and the paint is very very nice.
|
|
|
|
Post by Joe Stoy on Nov 15, 2009 20:44:13 GMT -6
wow that is so cool,
great looking build
|
|
|
|
Post by sakke on Nov 17, 2009 2:11:35 GMT -6
You have a great project on bench! Those Dragon kits are bit pricey, buy the detailing is amazing.
|
|
|
|
Post by baddgass on Nov 17, 2009 10:51:26 GMT -6
That some workmen ship!
|
|
|
|
Post by rocketeer on Nov 28, 2009 15:31:36 GMT -6
Thought I'd post some teaser pictures today. Still plugging away; oils are wonderful in lots of ways, but they take a loooooong time to dry. Here's a long shot of various bits drying on top of the famous Rocketeer family furnace. You can see the whip antenna too, and the two skeletons, which received ribcage transplants from Boot Hill (mwooooohahaha) : i193.photobucket.com/albums/z256/hilbyf/Rommels%20Rod%20project/DSCN3261.jpgAnd a close-up of the Rod. I added a bit of half-round strip to the ends of the passenger windshield cowl so the upper body character line would carry through: i193.photobucket.com/albums/z256/hilbyf/Rommels%20Rod%20project/DSCN3263.jpgAnd the world's crookedest exhaust pipe. It snakes from the engine exhaust pipes over the frame rail to connect up to the muffler I stole from a Monogram '48 Ford pickup. In retrospect, perhaps I should've located the muffler a bit further aft.  It's made from solder, which is my favorite material for this sort of thing. You can see Rommel snuck into the picture down at the bottom. I wanted his mouth open, so I cut his jaw loose using the sewing thread trick (which worked great): i193.photobucket.com/albums/z256/hilbyf/Rommels%20Rod%20project/DSCN3264.jpg |
|
|
|
Post by rocketeer on Sept 12, 2018 9:27:24 GMT -6
|
|
|
|
Post by DVS on Sept 12, 2018 9:48:34 GMT -6
So glad you added a link for the pictures. Believe it or not, I was just looking at this thread last night. Just one question. Was the Dragon Sd.Kfz. 7 half-track that you used 1/35 ? Incredible build, love it detail.  |
|
|
|
Post by rocketeer on Sept 12, 2018 12:43:57 GMT -6
...Was the Dragon Sd.Kfz. 7 half-track that you used 1/35 ? ... Yep, 1/35th scale. The whole Rod is kind of confused, scale-wise; the jerrycans and armament seem to be 1/35, although the rest of the model is 1/24th. When I built this one, I substituted 1/24th jerrycans and machine gun. |
|
|
|
Post by kabdriver on Sept 12, 2018 16:54:35 GMT -6
Ohhhhh, kooooool! This is a seriously nice build - I love all the extra detail that has gone into it - especially on the chassis. That's WILD, man!
Those uprated tank tracks are really nice - they look fiddly to assemble? But it's totally worth it. This build is the benchmark for when I build one now, I think! Incredible! The paintwork looks really nice too!
Is Rommel puking over the back after downing all that booze? LOL!
|
|
|
|
Post by kabdriver on Sept 12, 2018 16:57:55 GMT -6
So glad you added a link for the pictures. Believe it or not, I was just looking at this thread last night. That's weird - I was getting excited about the RR reissue and was looking at this thread this morning! Good thing they keep all these years-old threads huh? There's some GOLD to still be found if you go back some! |
|
|
|
Post by rocketeer on Sept 13, 2018 9:22:14 GMT -6
...Those uprated tank tracks are really nice - they look fiddly to assemble? ... Thanks for the compliment! As I remember it, the track links just kinda clicked together. Beautiful piece of molding and design. |
|
|
|
Post by kabdriver on Sept 13, 2018 9:41:39 GMT -6
They really improve the look and detail of this kit, very cool!
|
|

