|
|
Post by Wardster on Nov 10, 2011 2:22:10 GMT -6
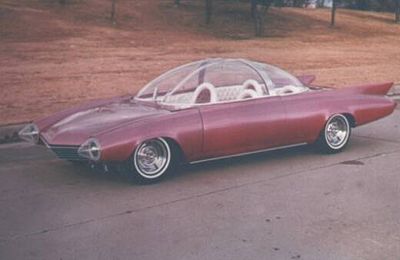
Hi all. Here's one that I started several years ago. I usually break this one out, to "finish" it, around three weeks before Christmas; and then, due to poor time management, it doesn't get done. This time, it's not quite so late in the year ... so, maybe that'll help. (Still have lots of other things going on, including "deadline models" for publication -- but at least this one's back on the bench.) We'll see if I can get this custom body (to go with a Chuck Wagon kit) finished off; and some interior details added along the side walls -- padding, of some sort, I'm thinking -- and anything beyond that is gravy. Know up front that I'm not so much interested in getting the model itself "done," (as a one-of-a-kind custom job, all assembed and painted, I mean) so much as I'd like to get this new body finished off enough to either make some castings of it, myself; or maybe let someone else cast it. For me, it'd just be cool to have a Christmas come and go, with this thing "done" and off of my plate... and if it got cast, then other folks could play around with it, too; and we'd see it painted up. I'm actually thinking it'd be cooler to see others doing that, then me worrying about trying to get the custom body done; and get my copy all painted and so on (before the holidays, anyway). Earlier versions of this custom body were made from vacu-formed plastic sheet. I wasn't liking the flimsiness of the relatively thin sheet plastic, and wanted more practice with using fiberglass, so this version of the body is actually (red-dyed) epoxy resin along with fiberglass cloth. It's not apparent from the photo, but the gray stuff on the outside is just primer; but the stuff seen on the insides is often Milliput (epoxy putty) to smooth out rough areas.  Credit where due: the design's not really mine. I just interpreted the very cool 2D artwork image that used to run, each year, as the main page over on the Dave's Showrod Rally web site. (You still around, Scotty?) |
|
|
|
Post by Dennis M on Nov 10, 2011 5:24:51 GMT -6
Looking good.
|
|
|
|
Post by badroadahead on Nov 10, 2011 6:48:08 GMT -6
What a great concept.
I love the curves.
Did this start as a '32 touring?
Dave
|
|
|
|
Post by Wardster on Nov 10, 2011 13:45:18 GMT -6
Thanks much, guys! Appreciated! Did this start as a '32 touring? It probably could have, but it didn't. Lately, I've been looking at the Munsters Koach from various angles, and thinking that if a person were to chop off the square-ish section that sticks up, the tub's big enough... But actually, this one began as a drawing made by one of the denizens of these boards. I'd stared at it for awhile. Enough to have noticed that a Chuck Wagon kit's main bits (chassis, engines, tires, etc., but not the bodywork, obviously) would mostly work, as a donor kit to "build one". I had only seen that kit in pictures, up to that point, so I bought one of those kits, and did some measuring and thinking, and made a solid block of MDF "wood" in a shape that would fit onto a Chuck Wagon kit chassis. After drawing up a profile view, sized correctly, shaping work went pretty quickly. The hard part has been figuring out a way to get a body to be the outer shape I had defined (easy enough); while also having the insides be hollow; and to have the wall thickness, all around, be fairly consistent; and to also have it be more-or-less scale thickness. But the biggest hold-up wasn't technical problems: it's management of my time. I haven't put the time into this one, that's needed to get it to a point where I feel the body's in good enough shape to cast up copies. While looking for an old link to an article I'd written up, ages ago, on the Internet Modeler web site, I came across this: www.whatifmodelers.com/index.php?topic=18792.0;wap2... and those kind comments made my day! But here's the link I was looking for, to that old vacu-forming article: www.internetmodeler.com/2008/february/how-to/vacformer.phpMore later ... my carpal tunnel's really bugging me, today, so I'm gonna "go lite" on keyboard use; and try to maximize shop time. |
|
|
|
Post by redbaron on Nov 10, 2011 17:21:10 GMT -6
the build looks great so far can you post more pics
|
|
|
|
Post by koffinbuilder64 on Nov 10, 2011 19:50:11 GMT -6
Very kool Wardster!!
|
|
|
|
Post by starbaker on Nov 11, 2011 9:36:21 GMT -6
Wow ~ very nice.
Finish it! I can't wait to see it done! And, Santa's anxious for a kewl ride this year.
|
|
|
|
Post by Wardster on Nov 11, 2011 19:40:20 GMT -6
the build looks great so far can you post more pics There's several early in-progress pics, over on that link I mentioned: showing the wooden shape I started with; and the vacu-formed front half I had made, years ago. Nothing new to show on this (fiberglass) body ... yet ... but I'm taking pics as I go, on any new work I'm doing. |
|
scotty
Showrod Basher
  
Posts: 72
|
Post by scotty on Nov 11, 2011 22:38:37 GMT -6
Credit where due: the design's not really mine. I just interpreted the very cool 2D artwork image that used to run, each year, as the main page over on the Dave's Showrod Rally web site. (You still around, Scotty?) Yep...I'm still drifting around from time to time... Watching this thread with much interest..  Scotty. |
|
|
|
Post by Wardster on Nov 18, 2011 12:58:39 GMT -6
More in-progress pics, in a moment ... but first, here's a larger image of the inspirational artwork, by Scotty Harrod:  ... and here's how the custom body on this thing began: 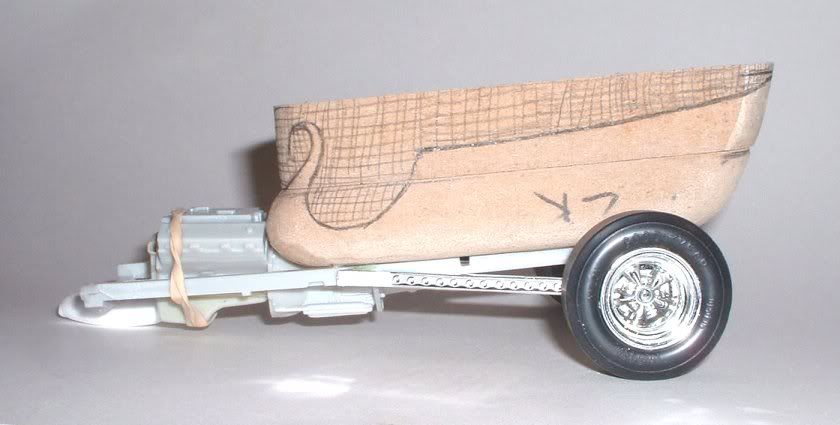 ... and here's the latest pics of the adjustments and refinements I decided to make, to the custom fiberglass body I'm working on: 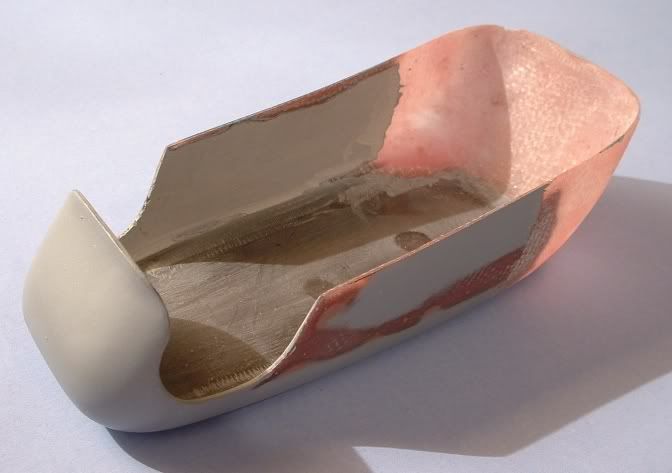 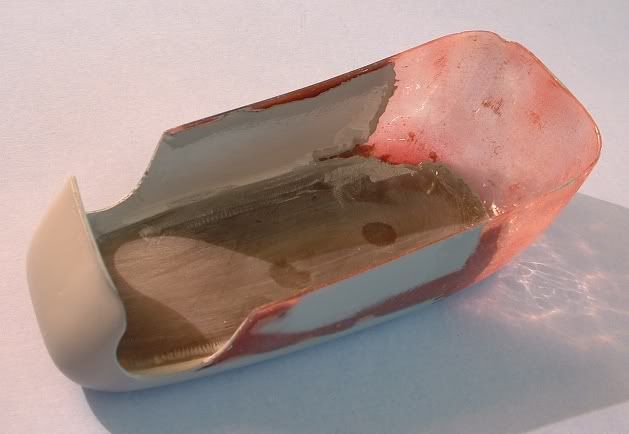  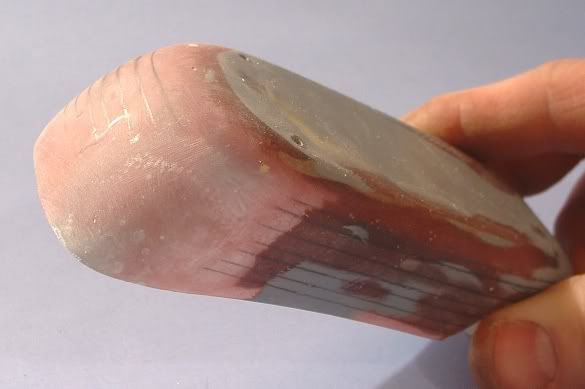  Basically, what's going on in these pics is that I noticed some things I didn't like, about the fiberglass casting I had made. The biggest was that when seen from above, the left rear corner had a slightly different shape than the right rear corner. Also: since the body was one of my first attempts at using fiberglass, other things weren't totally peachy. To address multiple issues at once, I ground down the entire back end: until I'd cut below any body work with putties; and until the body itself was roughly even, as far as thickness goes, at any given point on that back quarter or so. Doing that cut through the epoxy resin I had used, and exposed raw 'glass cloth; so, to temporarily fix that, I finger-painted some epoxy resin onto the ground-down areas. Just added a thin coat. The left rear corner stuck out, too far, on the outside edges: so, I knew I'd have to grind that left rear outer corner way down. I'd end up cutting right through the existing fiberglass cloth, it had looked like; so, over the course of two evenings, I added six layers of cloth to the inside of the body -- three, then let it cure; then three more -- giving me plenty of meat to grind away on. (And as it turned out, yes, I would have ground all of the way through the old glass cloth; so, adding thickness inside worked.) With that (left rear corner) roughed-in well enough, I turned my attention to the right rear corner. That corner, when seen from above, didn't stick up enough; in comparison to its neighbor. But it wasn't too terribly bad of a mismatch. I added two layers of fiberglass cloth to the outside, on that corner; then ground it down (basically to smooth and blend the edges) the next evening. In looking the body over, it looks like the next step will be both of the long sides. There's an unintended inward bow on both sides, that I'd like to flatten out, and then make all that more smooth. -- Ward Shrake -- |
|
|
|
Post by Wardster on Nov 18, 2011 13:09:58 GMT -6
Almost forgot: I recently bought both of the two-DVD sets made by Spritz by Fritz, and loved both of them. While I had started on this fiberglass body a long time ago (year and a half, maybe?) it needed some re-work, that I was half-chicken to attempt, back then. The necessary re-work didn't get started until I watched Fritz's "How to build a fiberglass body at home" DVD. He made it all look so "just go out in the garage, and have some fun getting messy" laid back and casual to be doing this wild stuff, that I thought "why not?" and I dusted off this old custom car body. Both of Fritz's DVD sets are worth every penny; and then some. (And at the price, they'd make pretty cool Christmas gifts, too!) www.spritzbyfritz.com/ |
|
|
|
Post by Wardster on Nov 21, 2011 2:31:19 GMT -6
Today's pics:   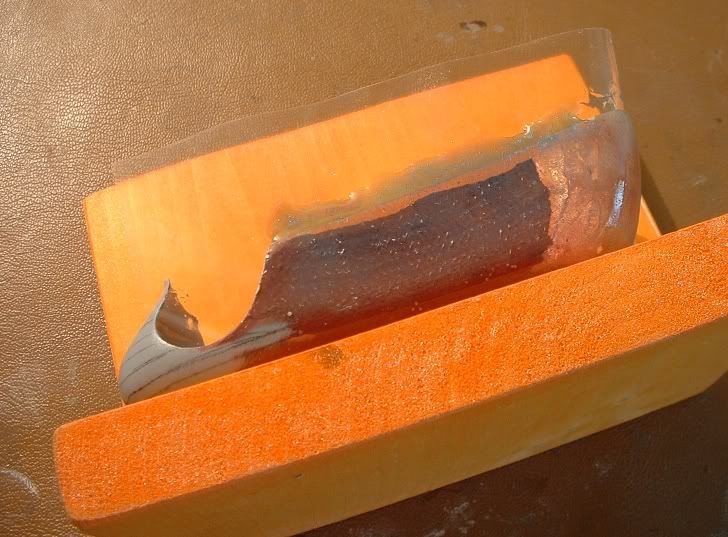 And today's explanation, of the photos above: I'm trying to straighten out an inward bow, on both sides. After a bunch of thought, it seemed that the simplest and most elegant way to deal with that issue was to grind down the sides, until I hit raw glass cloth; then, put a thin pool of resin over that, and just let it harden. (It's only a millimeter or less of warpage.) The details of that idea being: I needed to get the body to stand up, sideways, without falling over or tipping at some odd angle. So, I used two wood scraps I had laying around, to make a 90-degree jig. Just epoxied the pine scraps together; while holding them together, overnight, with two carpentry-type of clamps. It's not relevant to this custom car body, really, but in case anyone is wondering: the almost-iridescent orange color of the pine wood was a result of an experiment I did, to see how ridiculously bright of an orange-tinted wood stain I could figure out how to make, using available materials... and as it turned out, reducing Createx's airbrushable T-shirt paints using their Wicked reducer, make a pretty decent stain. (You pinecar guys and gals might want to take note of that wood staining trick! I have also tried their iridescent colors, and man, are they a wild way to stain wood! Best on pieces where the grain's visible: these were just random scrap pieces I'd experimented on.) The blue puddle is dyed epoxy resin. (I must be on a "dying things" kick, lately!?) Over time, I've found that "Sharpie Juice" is a good / cheap / simple dye for epoxy resin. I use an index card with a strip of packaging tape stuck to it, as a mixing palette for epoxy; and I've found that if you scribble on the tape with either a black or a colored Sharpie marking pen, and then mix the epoxy on top of the scribbled-on spot, the epoxy will absorb enough of the dye to tint the epoxy. (Fake water for dioramas, any one?!) The third image is just the dyed epoxy resin, hardening on top of some packaging tape I stuck onto the inside of the custom body: which was there to act as a catching device, for any excess that might have tried to drip or flow off of the body. The reason for the orange color is just that I'm a goofball. (Okay, actually, I'm making a wooden project later for a Harley-Davidson fan, and I want to make it as cool as I can, since her husband is a pretty talented custom painter. But goofball explains it, too.) The blue color was more relevant to this project than the orange: but the idea there was just to have an obvious color difference, so I could easily see where the "already done, and don't mess it up" work from before was (because it had been dyed red or black; in small amounts: which only shows up dark in thick areas) so that when it came time to trim off any flash or excess, it'd be easier. Not shown: I let that stuff harden for most of a day, then checked on it. The room it was in was cold enough that it didn't fully cure, totally hard -- but it will, if I give it enough time: I'm not worried about that, since I've had it do that to me, in the past -- but that just made it easier to trim off the excess. I just plopped the body onto a small cutting pad, and used an X-acto to trim off the blue epoxy, where it had flown or oozed past the body's upper line. I repeated this trick, for the other side. That's hardening up, now. I'll let it go, overnight, in the coldish room; then I'll trim off the "flash" that results; then, put it in a warmer room, to cure. If all goes well, I'll be ready to block sand the sides, by mid-week. Meanwhile, if a new toy comes in soon, I'll be playing with that... |
|
|
|
Post by ira on Nov 22, 2011 9:38:05 GMT -6
[glow=red,2,300]Great Work Ward!!![/glow]
Thanks for sharing your techniques.
|
|
|
|
Post by Wardster on Nov 26, 2011 3:53:53 GMT -6
Thanks, Ira! I don't know how much use anyone else will get out of what I'm doing, techniques-wise ... but when you're cluster-bleep'ing your way through past screw-ups on a project, I guess a step-by-step approach and some lateral thinking is a good way to go about correcting things. Problem solving is such a huge part of this hobby ... and can be pretty satisfying, at times. Anyway ... after some thought, here's what I came up with for the next step: some 220-grit sandpaper, stapled onto that 90-degree wooden block thingie: 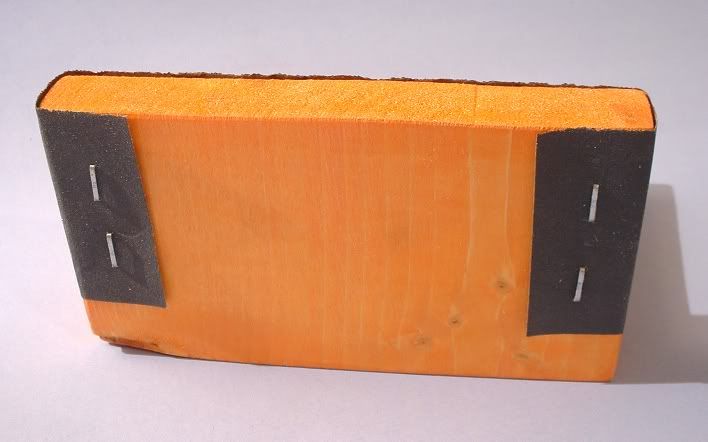 ... which when in use, resulted in this: 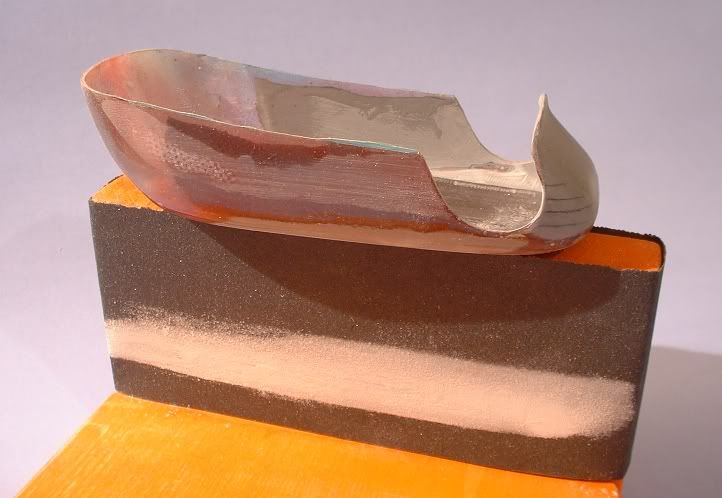 ... showing me that while I mostly fixed the inward bow, it's still not all the way gone. So, I repeated the "add some resin" step; but this time, mostly only where the sanding work showed me a low spot still existed. (I'll end up repeating all this, on the other side of the model ... but at least now I have a plan of attack. And little by little, it's getitng better. I had it in paint, actually, months ago; and was going to cheat things by photographing it at angles that wouldn't show the flaws, to worst advantage ... but it was one of those things where the flaws were visible to me, and/or I knew they were there; and I stripped things down, to fix flaws. No amount of fancy painting is likely to hide an overly wavy surface!) |
|
|
|
Post by koffinbuilder64 on Nov 26, 2011 23:49:52 GMT -6
Well said Ward! Its lookin better!
|
|
|
|
Post by baddgass on Dec 16, 2011 4:43:18 GMT -6
Nice work bro.
|
|
scotty
Showrod Basher
  
Posts: 72
|
Post by scotty on Dec 28, 2011 23:40:19 GMT -6
Done any more to it Ward?? I'm liking what I see so far.
Scotty.
|
|
dogfish7
Showrod Builder
  So many models.... so little time
Posts: 37
|
Post by dogfish7 on Dec 29, 2011 8:44:40 GMT -6
Great carriage work! Interested to see how you make the snow chains for the slicks:)
|
|
|
|
Post by Wardster on Jan 5, 2012 2:09:12 GMT -6
Thanks, guys! Done any more to it Ward?? I'm liking what I see so far. I actually did a tiny bit more, yes ... but then got slammed by Real Life stuff; impending deadlines (in the last coupl'a days, on that) and so forth ... but it's one I plan to come back to, fairly soonish, after I get caught up on Real Life, etc. I'm still determined to get that one done ... regardless of the season having passed, or not! It remains a cool design, and I do want to get back to that one. |
|


