|
|
Post by Wardster on Nov 21, 2011 13:04:43 GMT -6
Hi all. One of my smaller, side-projects (in between Real Life and whatever ends up on my workbench) is an attempt to make new tire insert pieces, to fit onto standards Deal's Wheels car tires. 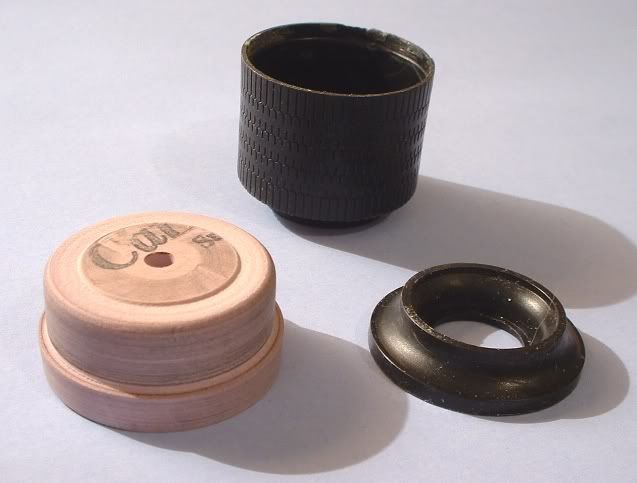 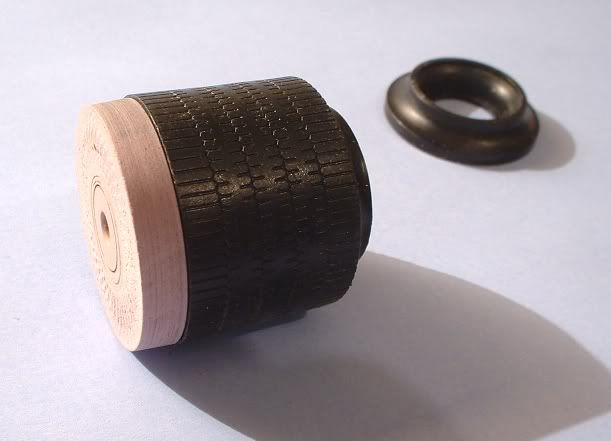 These are obviously just started; not finished products. I had to stop, temporarily, because the small (wood type; not metal type) lathe I'm using works well when you're clamping pieces between two pointy "centers"; but right now, there's no good way for me to hold small objects on something like a faceplate; with enough precision. More pics later ... I'm waiting on a newly-ordered "dial indicator" device, so I can put what I have, so far, into an aging four-jaw "hand me down" lathe chuck; with enough precision in mounting it that I don't end up cutting the tire faces off-center. |
|
|
|
Post by Wardster on Nov 23, 2011 21:06:52 GMT -6
Here's the latest work on those DW tire inserts. 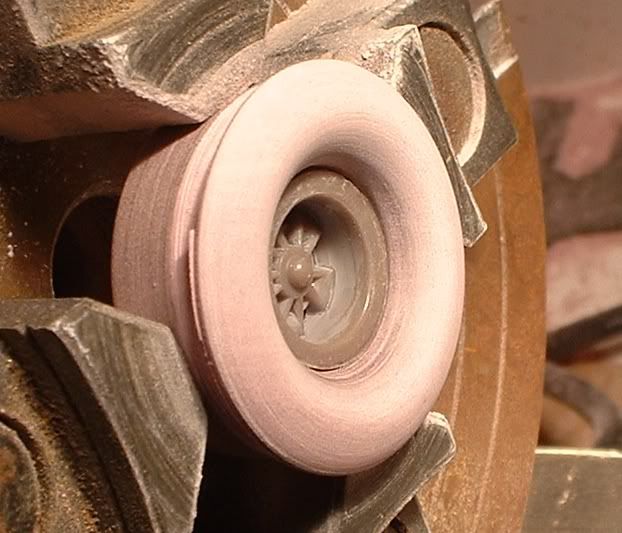 Still got a ways to go, but now you guys can probably visualize the final result better, since more work has been done. (Couldn't do more until I got in a dial indicator, to properly set up a four-jaw lathe chuck. Once I got that in, the new work sped way up.) |
|
|
|
Post by ira on Nov 23, 2011 22:24:56 GMT -6
Deals Wheels Inserts, looks like a Great Idea Ward!!!
I think something like these might work out well for my Willys Deal...
|
|
|
|
Post by Wardster on Nov 24, 2011 14:22:44 GMT -6
Coolness, Ira! (I'm working on it! I'll try and get some "test ones" cast up, as soon as possible, for you to try out. You're moving so fast on the Zzzzz-28 Dragster, that they'll probably be too late for that one ... at least, if you glue on those pieces permanently!?) If anyone's interested in what lathe I'm using, it's not a super-expensive machinist's lathe. It's a benchtop lathe mostly intended for things like turning fancy pens; and doing small-scale woodworking... but in my experiments thus far, I've turned pink insulation foam with it (large stuff like simulated planetary bases for sci-fi models; and a simulated porthole for a shadow box diorama I'm making) and it turns pattern-maker's material just fine; and of course, wood. Shop Fox W1704 lathe: www.amazon.com/gp/product/B001R23SWW/ref=oh_o05_s00_i00_detailsDial indicator (for setting up a multi-jaw chuck): www.amazon.com/gp/product/B002YPHT76/ref=oh_o00_s00_i00_detailsThe multi-jaw chuck I'm using to hold the tire insert piece is an old hand-me-down a friend had in her collection of wood-working tools her late husband once had. (Thanks, Miss Clara!) |
|
|
|
Post by Wardster on Nov 26, 2011 4:15:47 GMT -6
I got in some more work on that custom tire insert piece, today. I had let it sit, untouched, for a few days, after the last pics were taken -- partly so I'd see it with "new eyes" when I went back to work on it -- and having done so, quickly saw the parts I didn't like. I changed those things, in "subtle, but significant enough" ways. When I had the shape the way I wanted it, I hit the tire sidewall areas with some black primer; then polished it up quite a lot; then (accidentally) killed most of the shine, when I tried to wipe it down with some plastic prep (to get rid of some really bad static cling that had begun with the last polishing steps). Anyway, I slapped the new "mostly done" tire insert onto a half-finished 57 cHEVY model, just for kicks. See what'cha think... 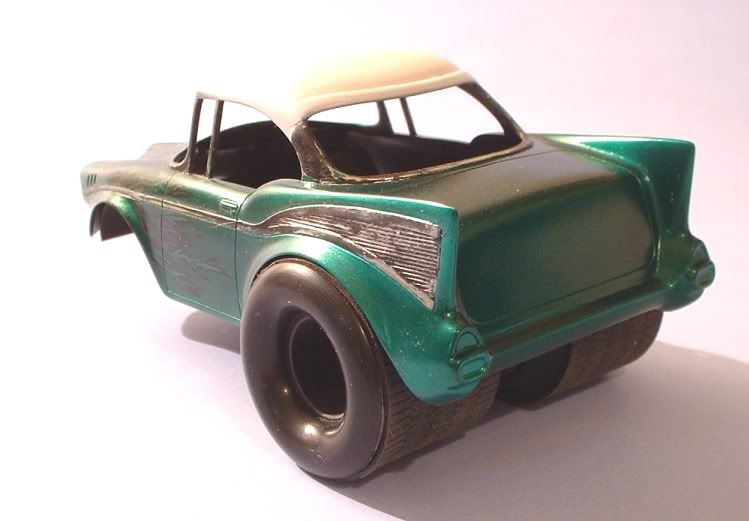 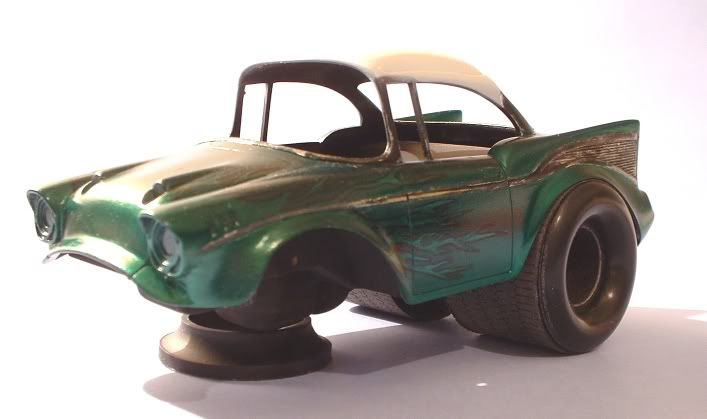 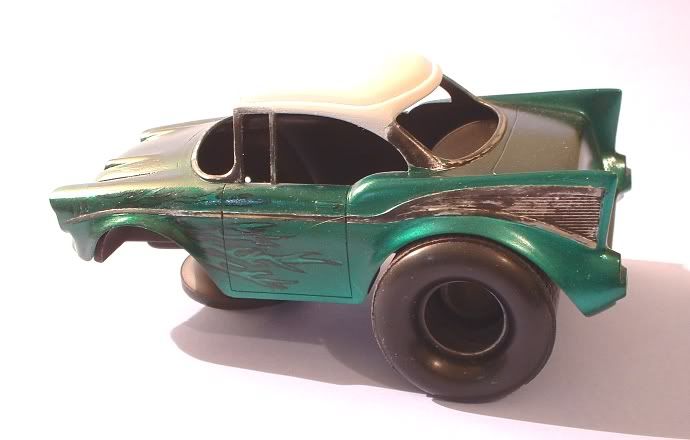 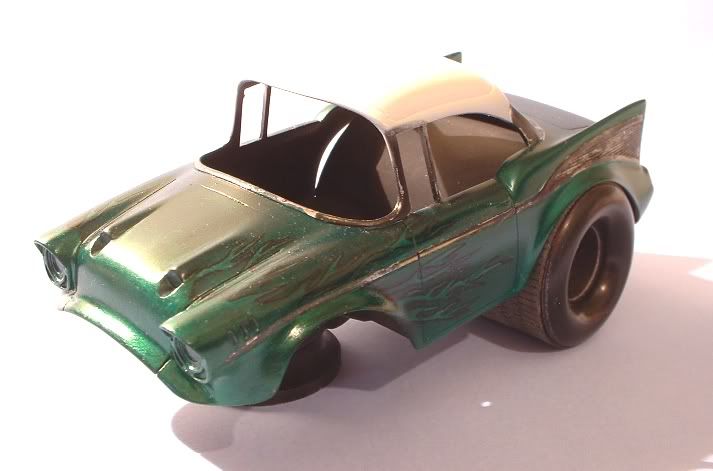 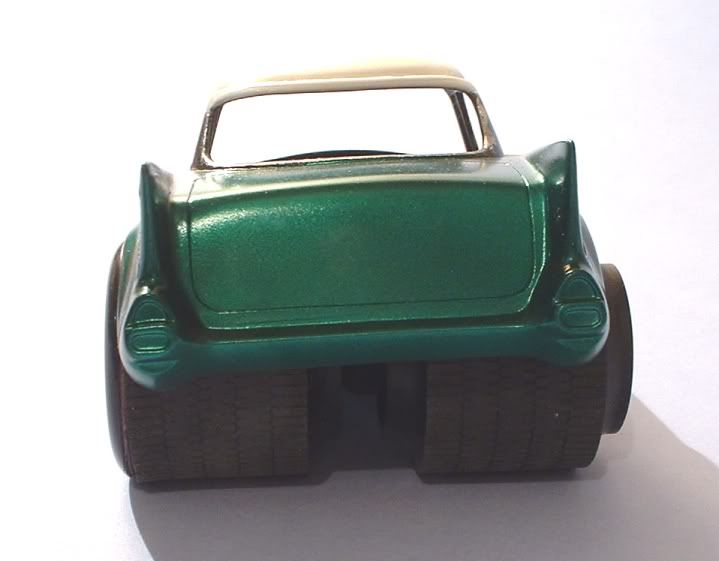 Something I should have mentioned earlier, but spaced out, was that I'm trying to make a hybrid piece here, that will meet more than one need. What I'm referring to is the ability to simply plop a regular, stock Deal's Wheels rim into the center hole; or, since I'm working with a much thicker (side to side) tire insert, I decided it might not be a bad idea if I extended the center hole back for a ways. This makes most of a custom rim; built into the tire piece. This is all pretty preliminary work, and I'll play more with it to see how well it'll work out, but ideally I thought it would be cool to be able to add a custom "spoke section" part of the rim, behind the "tube" that's now there; to have more options for wheels. One of the other "trying to think ahead" stages of things was to make the "tucked inside the tire tread area" section of the part be the best compromise diameter I could come up with, for all of the different (old "bunny" issue; and new re-release issue) tires. I haven't tried it yet (since I only have the one part!), but once I get to the stage of things where I have a few decent castings sitting around, I want to try cutting off the sidewall that's molded onto the tire, from the factory; and put inserts onto both sides. The piece is still (literally) rough around the edges. I'll keep doing a bit more to it, here and there, over the next few day. Then I'd like to make a few castings, and put them into Ira's hands, for test purposes; and to get some comments on their actual use. -- Ward Shrake -- |
|
Deleted
Deleted Member
Posts: 0
|
Post by Deleted on Nov 26, 2011 8:16:35 GMT -6
I think you have a WINNER here! When you get one done
you need to make a mold to cast them.
Bill
|
|
|
|
Post by ira on Nov 26, 2011 10:16:54 GMT -6
Good Morning Ward,
[glow=red,2,300]The updated inserts Look Great![/glow]
One Suggestion... looks like the insert is not as large as the tire when in position. Maybe make an increase of 1/16" to the diameter?
Enjoying the updates...
|
|
|
|
Post by Wardster on Nov 27, 2011 1:53:31 GMT -6
Yeah, I accidentally shaved off a hair too much. It won't be too hard to fix. I had thought about it, before I took it off the lathe chuck, and I figure I'll add that little extra back, by hand, with epoxy putty (Milliput) or something. Blend the insert's edge to the tire's actual edge, at that last little little bit before the sidewall meets the edge of the tread section; and turns.
One thing I've noticed, in going through my collection of old (and new) Deal's Wheels tires, is that sometimes they're molded with a sudden increase in diameter, in the last row of treads. In other words, when viewed from behind, most of the tire's tread area looks rectangular; and then, where that (stock) insert normally goes, things bow outward a bit. Also, on some of the tires, I've noticed that sometimes there's something like a sink mark, all the way around, on the other opposite tread. (The side with the molded-on sidewall.) The tires in both of my Trans Um kits (the modern re-pops) had more distortion than any of the older ones I have in my (rather meager!) collection of Deal's Wheels car kit tires. But no matter ... in studying how that series of tires looks, from behind, it seems like one additional way to increase the "make it look more real" effect would be to cut off half of both of those outer treads: reducing the width, overall, by one tread. Seems that way, anyway: I'll have to cast some copies up, and give it a try, before I'd say for sure; but I can picture it, and my mental image looks cooler.
|
|
|
|
Post by ira on Dec 2, 2011 15:12:12 GMT -6
Hey Ward!
How about an outline for White Walls?
|
|
|
|
Post by Wardster on Dec 2, 2011 19:07:05 GMT -6
Hey Ward! How about an outline for White Walls? Getting slammed with Real Life Stuff, and have (almost) no hobby time, at the moment, so haven't done anything more on those, the last few days ... but I'll add that item to the wish list of future upgrades, for when I get time again to work on those inserts. |
|
|
|
Post by Wardster on Dec 3, 2011 15:28:23 GMT -6
In thinking that suggestion through, overnight, I think I have it in mind how I would do that. However, I need to make some molds / castings in any case, to be able to make more than one of these little suckers, so I put some molding / casting supplies on order, this morning. The plan, at this point, is for me to make a multi-part mold of what I have, now (well, what I have now plus some minor touch-ups, in places) and then make a mold of that piece, as-is. If I make the mold in such a way that the face (sidewall) of the tire insert is a separate mold piece (probably the best way to do make the molds, anyway), then I can modify the original part however I want to ... and can then make a separate "face" mold piece ... giving me, at least in theory, the ability to make slightly different versions of the same basic thing: like "whitewalls" and "no whitewalls". This will get me through the try-out period, okay, I think ... and I suspect that after that, I might make another original insert, etc. (using whatever I end up learning is the best way, after doing this one.)
I'll likely have more photos to show, later; after the casting supplies arrive. I'll try to remember to show some pics of as-is Deal's Wheels tire pieces, too ... just to point out a few minor nits I've noticed with those original pieces. Such as them being a bit of a cone-shape. (Plop one down on a table, side-wall side down, and get out a small 90-degree square, to set against the tire's tread. You'll see it's not quite a ninety degree angle. They made the open side a bit larger than the other side, presumably for "getting it out of the mold" purposes.) More of a "hmm, that's interesting" thing; than trying to pick on those parts.
More later, when supplies arrive. Presumably sometime mid-next-week.
|
|
|
|
Post by surfjunke on Dec 7, 2011 10:08:47 GMT -6
The new tire side wall insert you made for the Deal's tires you show on your '57 Chevy look great! So much better looking than what comes with the kit, never did like them.
|
|
|
|
Post by Wardster on Dec 7, 2011 20:35:54 GMT -6
The new tire side wall insert you made for the Deal's tires you show on your '57 Chevy look great! So much better looking than what comes with the kit, never did like them. Thanks! I never really cared for the ones that came in the kit, either. Love the tread pattern ... but could do without the oddly shaped sidewall pieces. For what it's worth: some folks say that Dave Deal never drew the sidewalls that way; and they blame Revell's management for the strange sidewalls. Thing is -- as box art readily shows -- Big Deal *did* actually draw them that way. So, the question lots of us would have, in that case, is "Why did he do that?" ... and as far as I can tell, my guess is that those sidewalls were once intended to be an obscure, half-joking reference to types of tires that were then popular. Back then, it seems they were all over the car modeling magazines. Now, though, they original things he was 'tooning are rather obscure; and the joke isn't seen as being a joke. People may just see those sidewalls, and say "that looks stupid" ... but, in any case: Revell did make the tires so that it's pretty easy to do something like I'm doing: make a new insert. More progress on these, later. I have some casting supplies on order, but they are taking forever to get here. I figured they'd be here, by now; but UPS tracking says it'll be more like late Friday. |
|
|
|
Post by Wardster on Jan 23, 2012 19:12:23 GMT -6
|
|
|
|
Post by ira on Jan 23, 2012 19:36:55 GMT -6
[glow=red,2,300]Great Progress Ward![/glow]
Your idea of putting inserts on both sides of the tires sounds great!
This would also allow you to adjust the width of the tires.
This might also work well with the warped DW tires.
I would like to give it a try, I think that would be perfect for the Willys...
|
|
|
|
Post by plastimatic on Jan 23, 2012 20:12:58 GMT -6
Good stuff, Ward!
Tho I tend to leave the tires on my DW kits mostly as is, I really like where this is headed. You can keep the exaggerated flavor (width and tread) of the originals and give them a more (dare I say) sophisticated styling. Glad to see you back at 'em.
|
|
|
|
Post by Wardster on Jan 24, 2012 3:16:44 GMT -6
Thanks, guys! Appreciated! (And glad I finally got some fun time!)
> Your idea of putting inserts on both sides of the
> tires sounds great!
But will take a little bit of work on the user's part ... not too terribly much, I don't imagine, but some. In following up on your previous suggestions (make them larger in diameter; and add "whitewall" scribe lines) and after hearing my Trans Um kit's tires weren't the only ones badly distorted (related to non-ideal molding practices, as they came from the factory) I made a few changes to "how they were, before" ... which, fingers crossed, were good changes to make.
The reason I said it might take a bit of work to put 'em on both sides is that, as molded, one side of DW tires are a different diameter than the other. You can see the difference, if you study the first picture in this thread. The "open" end of the kit-supplied tires is slightly larger than the other side: and while not on every kit tire I've seen to date, to the same degree, there's often a bit of a "V" shape and/or "swelling" at the edge of the larger diameter.
With these slightly-modded inserts I tried to make the "least worst" of the choices I had, as far as a user's work level goes.
Part of the "what's the best compromise" problem there is: if I made the diameter match one side well, it'd be a non-great fit on the other side. Not by a crazy amount, but enough to notice it.
And (from doing it) I noticed that if you don't cut the sidewall pieces off, nice and smooth on the inside of the tire, when you're wanting to put inserts on both sides -- there ends up being a bump / distortion of the "rubber band" (since you left a bump on the inside of it) ... so in that case you may end up with (once the sidewall has been removed; and the insert inserted) a tire that is slightly out-of-round, at that point around the tread's area.
... so, all in all, the compromise I came up with was for me to add some extra material around the edges (wrapped tape around the master; then built things up to that fatter new outer edge); to make the outer diameter slightly too big for just about any of the expected combination - with the idea that whatever individual tire distortion problem you may have, with your kit's individual tires, it shouldn't be too hard to just insert the tire inserts, and then sand their sides down until they match up well with the tread area. In other words: insert the insert, then sand the edges of the insert - until its edge and the tread area match. Seemed to me that having to "sand to fit (your situation)" beat "add putty".
(Hopefully that wasn't complete gibberish!?)
After having studied the kit's tires, from various DW kits I had on hand, I can see why Luca would make his own tires, completely from scratch. As a "supreme ultimate" thing, that makes sense.
For what I'm doing, though, I'm trying to expand my abilities, a step at a time; whilst also coming up with usable parts. It has been an interesting challenge to make a "simple" upgrade to what's in the kit boxes. (I hadn't fully realized all the brain work that goes into even something as "simple" as DW kit tires are!? It's a fine like to walk, to make parts easy to use; but also flexible as far as what different people (with different skill levels and motivations) can do with them. I'm gaining respect for what kit designers have to imagine / plan for, in advance!)
> This would also allow you to adjust the width of the tires.
Yup! That's the plan, anyway! And so far, it seems to work...
And hopefully being able to do that, will make it worth whatever extra bit of work it entails, for the users. (Presumably, it would be, for adult builders. I'm pretty sure younger modelers would either like help, or wouldn't bother? But I could be wrong there.)
I'll keep posting in-progress pics, as I go ... including claying up the master part, and pouring a two-part mold, to cast 'em up.
|
|
|
|
Post by ira on Jan 24, 2012 12:19:32 GMT -6
Hey Ward, More questions... Would it be hard to make a "Tube" that would fit between 2 tire inserts? This would make for an easy conversion, your own complete tire... Would it be possible/practical to cast these in plastic resin instead of rubber?  Later, Ira |
|
|
|
Post by Wardster on Jan 24, 2012 13:10:44 GMT -6
Hey Ward, More questions... Would it be hard to make a "Tube" that would fit between 2 tire inserts? This would make for an easy conversion, your own complete tire... Would it be possible/practical to cast these in plastic resin instead of rubber?  Keep in mind that I'm admittedly over-thinking things, with the comments above. Any of the builders here are way beyond being up to the challenge of modding DW kit tires, to use these inserts. A lot of things are "possible" ... but for now, what I want to do is just to get this one master finished / molded / some copies cast up, so I can spread some around to others to play with and to comment on - sort of in advance of the next official contest: so that, hopefully, I'll have time to work out some bugs, before the contest actually begins -- but yeah, down the road, it would be a great thing to not have to buy a kit, just to get the tires in it! One of the "future expansion" things I would like to do is to play around with different styles of sidewall pieces, for a bit -- sort of taking what I already have, and changing some details around -- and one of the things that keeps occuring to me would be some sidewall lettering that said "Whose Yer" instead of "Good Boot"... But for now, I just need to get this first version cast and sent off! |
|
|
|
Post by Mysterion on Jan 24, 2012 13:42:26 GMT -6
Don't you mean "Hoosier Daddy"?
What a great improvement on the flat extended sidewalls. Good job my friend.
|
|
|
|
Post by ira on Jan 24, 2012 14:22:06 GMT -6
Hey Ward, More questions... Would it be hard to make a "Tube" that would fit between 2 tire inserts? This would make for an easy conversion, your own complete tire... Would it be possible/practical to cast these in plastic resin instead of rubber?  Keep in mind that I'm admittedly over-thinking things, with the comments above. Any of the builders here are way beyond being up to the challenge of modding DW kit tires, to use these inserts. A lot of things are "possible" ... but for now, what I want to do is just to get this one master finished / molded / some copies cast up, so I can spread some around to others to play with and to comment on - sort of in advance of the next official contest: so that, hopefully, I'll have time to work out some bugs, before the contest actually begins -- but yeah, down the road, it would be a great thing to not have to buy a kit, just to get the tires in it! One of the "future expansion" things I would like to do is to play around with different styles of sidewall pieces, for a bit -- sort of taking what I already have, and changing some details around -- and one of the things that keeps occuring to me would be some sidewall lettering that said "Whose Yer" instead of "Good Boot"... But for now, I just need to get this first version cast and sent off! [glow=red,2,300]Sounds Good Ward![/glow] I guess I'm getting ahead of myself, with the tubes. I'm starting thinking about what I might do when I get a hold of some of these inserts...  |
|
|
|
Post by Starry Eyes on Jan 24, 2012 14:23:15 GMT -6
I'm awaiting some proofs back from the printer on the same stuff Ward...I too am ready to change up the didewalss on some if my future Deals builds ..
|
|
|
|
Post by Wardster on Jan 25, 2012 13:28:12 GMT -6
Quick update: I'm claying up the tire insert, for mold-making ... pics in a day or two, but know that progress is being made. I'm awaiting some proofs back from the printer on the same stuff Ward... Sounds cool! Great to see so many folks putting all kinds of fond attention into these fun little 'toon kits! (Especially since some folks say that the usual trend is that if a person goes totally ballistic, designing and building something from scratch that no kit was ever made for, that sometimes an official company releases that thing as a kit, soon after! Or at least that's what my WWII airplane-building buds used to say!) I'd love to see Revell make "parts packs" for their 'toon models! I too am ready to change up the didewalss on some if my future Deals builds .. I can't wait to see what everyone does, with the next contest! I missed the last one, thanks to Real Life kicking my backside ... but I'm doing all I can to keep my schedule clear, for next time! (Dumb question: are Deal's Wheels 'planes gonna be off-topic?) |
|
|
|
Post by Wardster on Jan 27, 2012 1:22:31 GMT -6
Here's a photo update on the tire insert project ... with the actual progress being a bit beyond what's shown. (The second half of the rubber mold was poured, earlier today; and is hardening up at this point. I should be able to get some resin castings made, tomorrow... and get a few to Ira, so he can check 'em out.)
EDIT: I'm gonna remove these photos from this posting, and move them down a few notches lower in this thread; and add some captions to the photos, so things will make more sense.
|
|
|
|
Post by Paul B. Canney on Jan 27, 2012 9:41:25 GMT -6
I don't "get it"
(and I really want to learn resin casting)
whats the blue clay doing? Isnt it ruined when pulled back like a scab?
help me
~mind block~
|
|
|
|
Post by ira on Jan 27, 2012 10:33:30 GMT -6
I don't "get it" (and I really want to learn resin casting) whats the blue clay doing? Isnt it ruined when pulled back like a scab? help me ~mind block~ The Blue clay temporarily fills in the area that will be filled with mold material. Take out the clay and fill it up! Thats how you get 2 sides to the mold, you make one side at a time. The 2 little lines of blue clay are for pouring in the resin or venting out air, these will not be filled with mold material. |
|
|
|
Post by Wardster on Jan 27, 2012 19:59:23 GMT -6
(re: blue clay) "What Ira said!" That summed it up pretty well... (but I'll try to go back and edit the post above, later, to fill in any major gaps.) Until then: There are a bunch of different ways to mold and cast things. One way is a one-part mold. That wouldn't work out well, with what I want to make: an easy-to-use, "minimal clean-up" final casting. A two-part mold would make it easier to "hide seams" and so on ... so, I went with a two-part mold. The clay is "standing in for" one of the two parts. You shape the clay exactly as you want one of the two rubber parts to be; then you pour rubber over both the clay and the part (and in this case, some cut-off pencil "sprues) ... and after the first part of the two-part rubber mold has had ample time to harden (overnight, if you're paranoid like me!), you pull the clay off (and put it back in a plastic bag, for later uses) but leave the master part and the first-poured mold attached to one another (so that nothing leaks in under the part!); and you cover everything with some mold release (the clear shiny stuff that shows up, after I pulled the clay off, in the pics above) ... so that when you flip everything over, and pour the second part of the two-part mold, that the two rubber parts don't accidentally stick to one another; and end up accidentally becoming a tomb for your part. (Forget the mold release, and you'll have to cut the rubber mold apart, just to find your master part; and start over!) It's like anything we do: lots of steps, and it seems really hard at first ... but the more you repeat those steps, the easier it seems. Keep in mind that when you're looking at someone else's way of making molds and/or castings, that they were faced with a very specific problem; and their solution to that problem reflects both the problem they faced; and where their current skill levels are. (Not to mention the expense of various available materials! And whether or not they can obtain what they want, in time; etc.) As far as what's going on, above: I mainly learned from various articles in places like Fine Scale Modeler, over the years. (And it threw me for a loop, too; the first few times I saw it happening! The clay, at one point, made absolutely no sense to me, either!) I'll throw in something that Ira didn't: the reason I'm running a sprue channel down, then across, then up, is to try to give any air bubbles a path away from the resin; and safely up and out. It (seems to) waste expensive resin, that way ... but since I don't have pressure casting equipment, as of yet: anything that keeps air bubbles out of the final casting is a Very Good Thing, indeed! Switching to a more generalized "I have questions" mode: As far as learning about general molding and casting goes, I can recommend a really good web site; and a book I really enjoyed. I'd suggest such folks should check out the web site by "Smooth-On". They have all sorts of great tutorials over there, on all sorts of different ways to mold and cast stuff. (Not just small parts, like we would make; but making molds of HUGE things, too!) Smooth-On makes the mold rubber I'm using, and the resin -- I'll look up the names, later on -- and they also make and sell all sorts of fancy industrial-grade stuff I've barely heard about, let alone ever used. They sell DVD tutorials, too, if a person wants to go that route. They're good: I'd recommend them. (I just tried brush-on rubber, about a month ago; and used their DVD to learn how to.) (Clear some time, or bookmark their site: you'll want to go back!) www.smooth-on.com/There's a really good book I'd recommend, too; if people want to find out about all sorts of alternative ways to do things. (Some of which are pretty cheap, as far as materials go; and "less formally industrial" than what we see in most scale modeling articles I've seen to date. Things like paper mache, for some one-time uses!) Amazon has that book for $13.59, brand new. Title on that one is "The Prop Builder's Molding and Casting Handbook": www.amazon.com/Prop-Builders-Molding-Casting-Handbook/dp/1558701281/ref=sr_1_1?ie=UTF8&qid=1327714323&sr=8-1But getting back to the pics, above: who else has questions? I'd try to gear what I'd say about those pics, to those questions - but to do so, I'd have to know what portions need explaining! |
|
|
|
Post by Paul B. Canney on Jan 27, 2012 20:28:48 GMT -6
okay. I have the Kindle version of The Prop Builder's Molding & Casting Handbook downloading ($8.99)
|
|
|
|
Post by Wardster on Jan 28, 2012 0:41:01 GMT -6
okay. I have the Kindle version of The Prop Builder's Molding & Casting Handbook downloading ($8.99) Crazy world, when a person can just download a book! (But I have a Kindle, now, too: thanks to friends and Christmas!) The reason I like that book is that it comes from a completely different point of view than most of the articles "guys like us" would read, on that subject. Most of the scale modeling articles make it sound like the only possible choices are RTV rubber, for making molds; and a handful of industrial resins, for castings. (Which is actually fine, for what we're doing -- not knocking it!) I feel it's great to be able to see those are not the only choices. To me, seeing all sorts of other ways to cast things, opens other doors as far as a person's ability to problem-solve. I'm a big fan of lateral (outside the box) thinking; so, to me, that book was well worth buying. It'll do a lot more, but even if all it did was to teach a person not to get too "precious" about making a one-use-only mold, or whatever ... well, it'd be money well spent, I think. One of the halfway advanced things some of my mentors (R/C submarine modeler David Merriman comes to mind) taught me is how to "tighten up the fit" on certain things, using a trick I think of as "molding in place". (For lack of a better way to put it.) You put some mold release, of one sort or another, on one part; put some auto body icing on the other; and smoosh 'em together. Let the icing mostly but not completely set up, hard. Trim off any of the goop that spread where it wasn't supposed to go, when you smooshed things together. Let it sit and harden up, the rest of the way. Then, pull 'em apart. Whallah! Two parts that fit like they were molded together ... because they literally were! Sometimes I find that a certain part I'm making, out of various types of different materials, gets to the point where it'd be less of a hassle to work with it, if it was all one material -- so, a quick-and-dirty "one time use" mold gets made; and I cast that part up ... sometimes in auto body icing ... giving me what some folks might call an "intermediate master". Then, I keep working on that part ... but in the new, easier-to-work-with form. (One reason for doing this would be to make a solid part for the first steps; then, mold that; make a hollow copy of the solid part -- "slush casting" resin in a rubber mold, for instance: when making a car body or something ... and, well, you guys likely get the idea.) I guess what I'm trying to say is that while casting up final copies of some "master" part or other is a useful thing to know how to do, and making lots of identical copies of a certain part is the most common use we're exposed to, for molding and casting ... there are other uses, too; including some very useful ones for when you're mastering that part in the first place. It takes a while, but once a person wraps their head around the core ideas behind casting and/or molding, all sorts of ways to fabricate parts suddenly opens up -- and that, to me, kicks butt! Anyway ... hopefully, you'll like that book. (Obviously, I did!) |
|
|
|
Post by Wardster on Jan 28, 2012 1:46:55 GMT -6
Okay ... I stole my own photos, from above ... and here they are, again; but this time I'll add a bit of explanation below each photo. 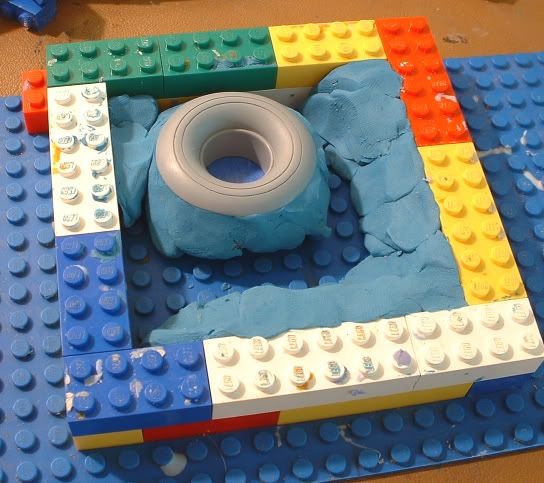 What I'm doing here is taking the "master" part I made, in the earlier steps, and I'm beginning to surround it with some Klean Klay. The purpose here is to make a shape that will later become the first half of a two-part mold. You'll see what I mean, as we go; but this early pic just shows how crude the process looks, at first. It looks better in the next few steps; as you smooth things. Not visible in any of these pics, but important: certain kinds of clays (those which contain sulfur, if memory serves) react badly with certain casting rubbers. If you use the wrong kind of clay, for these early steps, that "wrong clay" will literally cause the rubber to never properly cure -- wasting a lot of time, and $$ materials. The Klean Klay product doesn't do that; and it pulls off pretty cleanly (as you'll see later) making it a good choice for this step. 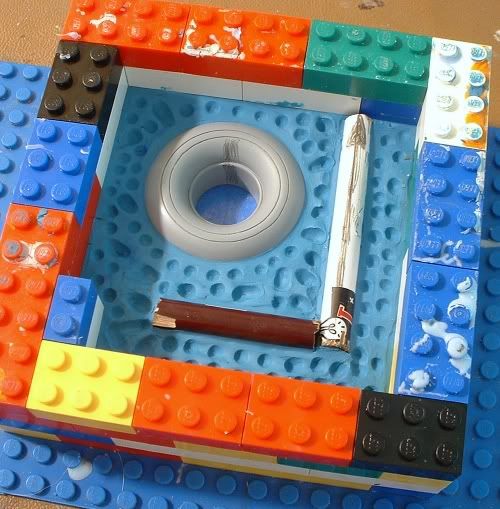 The second picture (above) is showing the first part of the mold, in a "ready to mix up some rubber, and pour it over everything" stage. (That stage being implied here, but not photographed - just ran out of hands for pouring the rubber, and taking pics!) I over-did the number of dimples, in this case. You don't really have to add as many as I did; but you do need some. Why? Their purpose is simply to make "alignment pins" between the two halves of the rubber mold. By making a series of irregularly-spaced, irregularly-shaped depressions in the clay, you end up later with poured rubber "hills" which end up fitting perfectly in these "valleys". The two halves of the old will literally not fit together, if you have one part rotated 90-degress out from where it's supposed to be, or whatever. But, when the two halves of the mold are rotated around correctly, they just plop together like they were made for each other; 'cause they were! You'll notice that I added something in the corner of the mold - some thin Lego blocks, which sort of fill that one corner up, for no apparent reason. The reason is this: as you use the molds for resin casting, later, you'll constantly be taking the two halves apart, and setting them on your work bench, somewhere - and it is just easier to see how to rotate the two halves around, (when you pick them back up) so that they line up correctly, with no real thought. If you have some sort of a "marker" that is built into the mold itself, on the outside, it's easy to see at a glance which way the two halves go together. (And you save a few drops of $$$ casting rubber in the process! Yay!) Just to save myself some work, later, I cut up some old used pencils, to make the beginnings of a channel for the resin to flow into. I stuck those halfway into the clay, to act like sprues - but I didn't go ballistic making that part of things perfect, because you can go back in later, and using a sharp knife, refine those sprues wherever you need to. (You'll see, in future photos, that I cut a funnel-shaped opening at the top ... but we'll get to that, later.) 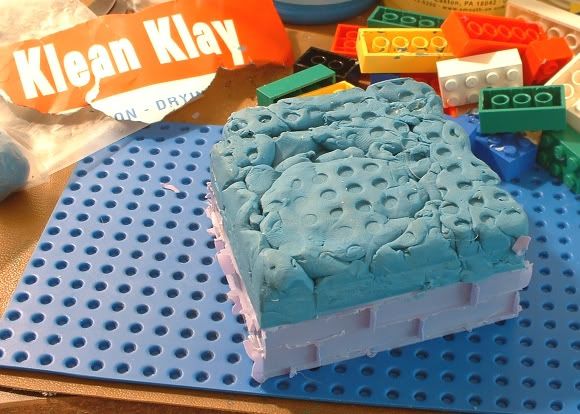 The pic above is showing things, after the first batch of rubber has been mixed and poured. I let it sit, overnight, to harden up properly. Once I was sure it had worked fine, I pulled the Lego blocks apart, and set those aside, temporarily. Then I flexed the thin "sheet plastic" bottom off of the clay, and flipped the mold upside down. You can see how crude the bottom of the clay looks -- and that's okay. Only the surface that the rubber touches has to look good, and/or be the shape of the final mold. As you'll see in the next few steps, the clay that you laid down at the beginning defines what the first pour of rubber looks like. As soon as you have the first half of the rubber poured, the clay can go back into storage - because the first pour (now hardened) of rubber will be what defines the shape of the second mold half. (If that makes no sense, just trust me ... it'll clear up, soonish.) 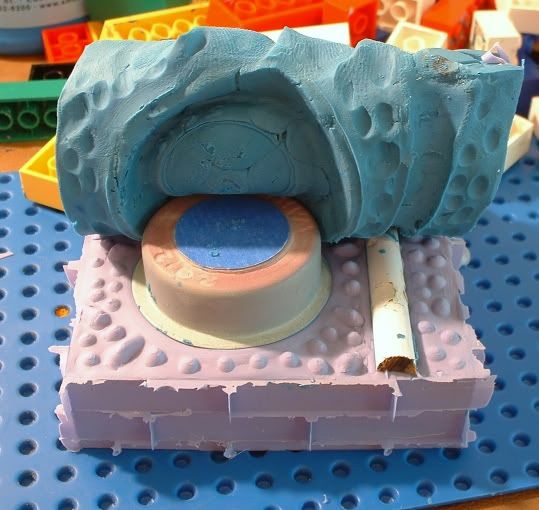 Peeling the clay back, off of the master and the first rubber pour. You'll note how little clay stuck to things: you have to really look for any bits that stuck, where they shouldn't have. It doesn't always pull off quite this cleanly, but this time it did. Good stuff! Side note: some of the super-advanced guys, which make molds of really complicated, really detailed masters pop the hardened rubber, the clay, and all of that into the fridge for a while, THEN they pull it apart. Why? It helps the clay to come off cleanly. I'm too cheap to turn the heat on, in the room where I'm working - so the somewhat-low temperatures probably helped a tiny bit. The relative lack of complexity of the master likely helped, too. If you look at the back of the master part, you'll see something that doesn't make much sense: that blue blob on the back. I'm sorry for so much blue, everywhere - it may make things a bit more confusing?! In this case, it's simply a piece of index card or a random piece of card stock, with blue painter's tape over both sides. I stuck that onto an area of the master that may have not done me any favors, when I got around to doing the casting with resin. Think of that empty hole in the "wheel's" backside as sort of a window in a resin car body. Sometimes casting folks put tape on the backsides of such "holes" in their molds, so that it's easier for them to make a two-part mold; but also, there's this: the thin cavity that will end up being part of the two-part mold (where the tape kept rubber from being able to fill that thin space) may allow resin to flow easier, in and around that "hole" without leaving a gap or whatever, later. (I'd rather peel out some very thin flash than deal with a void in what was supposed to be a solid part!) That last bit is, to be honest, something I'm just learning. When you make your first molds, you may end up with mistakes here or there - and studying how other people made SUCCESSFUL castings (and therefore, working backwards: molds) helps as a teaching tool. Some things like the flash in windows are such a common thing that I figured they were onto something; so, I sort of copied what those others did. (And it may have helped, later.) 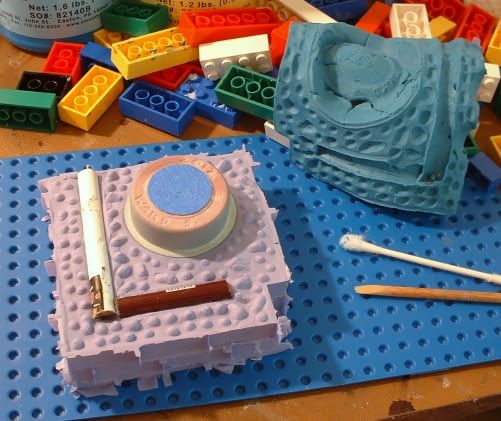 Seen off the the side, in the pic above, are the only tools I had to use, to clean off the tiny amount of Klean Klay that "stuck". The cotton swab took most of it off, if it was in some place that was pretty easy to reach. The little wooden dowel is actually a tiny "Bondo spreader" / sculpting tool I made, using one of the sticks ladies use for doing something or other with their nails. (I buy sanding sticks in bulk from an out-of-town beauty supply wholesaler, and anything else I see there that looks cool, and I think I might be able to mis-use in some way, I also pick up. If you'd rather not do that, bamboo cooking skewers also work.) 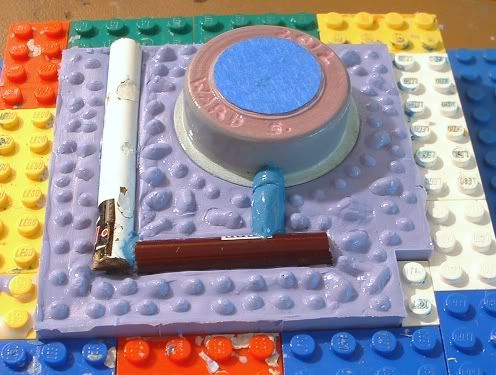 A close-up on the first rubber pour. Notice I didn't remove the master part; and I left the "sprue" substitutes in place, too. You don't want to remove anything like those parts, just yet. Leave them in the mold, right where they were, until you're ready to take both poured halves of the mold apart. (Right before use, with your first resin casting in this particular two-part mold.) The reason you don't want to remove anything is the rubber is incredibly thin, and WILL flow into any gap you give it - and if you wiggle the parts loose by accident, then try to get them back into the exact same spots, they may end up not quite fitting back in as they're supposed to - and any tiny gap will allow the second pour of rubber to get into places it's not supposed to go. That's definitely a bad thing! You may end up screwing up the whole mold, if enough (of the second pour of ) rubber gets between the master parts and the first pour or rubber. Avoid doing it, if you can. (Again, the Fancy Guys sometimes lower the temperature of their clay / rubber mold combos, so that the clay removes itself from the sometimes-intricately-detailed mold -- but as it turns out, in this case, nothing bad happened. It all worked fine.) If you'll study the picture, you'll see that I added another small section of "sprue" - by adding a Klean Klay "blob" that starts at the end of the existing "sprue" and ends at the back side of the tire's sidewall. The pictures will explain it better than my words, most likely, so study those ... but the idea of embedding the original "sprue" channels where I did (right between both halves of the two-part mold) was that it's just easier to do, there ... but if I had extended that upwards, originally, I'd have had a big and nasty sprue to remove, right on the face of the cast resin part. By waiting till later to make the rest of the sprue channels, I got away with making things easier on the users, later - because the resin pours downwards, first; then sort of rolls or oozes across, sideways; then starts moving upwards -- pushing air bubbles in front of the "ooze" or "lava flow," if all goes well: reducing the number of air bubbles that end up making flaws in the castings -- and the sprue ends up "attaching" itself to the final part's back. 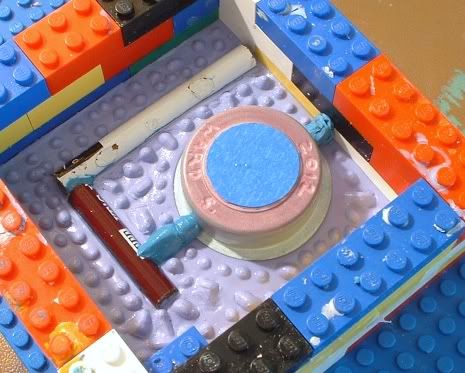 The pic above is just another angle on the same basic thing -- this time, showing off the "air vent" channel, at the top side. Note also that these last two pics show everything all glossy -- that's because I added some mold release spray, so that when I pour the second batch of rubber on top of all of this, that the two batches of rubber won't stick to one another. (Definitely bad!) (And yes, I've forgotten to do add release, a time or two over the years! You remember not to repeat that mistake too often, after an experience or two of having to cut your master parts out, in a solid blob of expensive-but-now-totally-wasted mold rubber!) ... and before I call it a night, know that the next batch of pics will clarify a few things. Once you see the two rubber pieces, you'll be able to compared them to these last pics; and it'll make far more sense. If you're like me, "thinking backwards" (seeing a hole in one stage, that'll become a hill, in the next) takes getting used to ... but with exposure to the idea, and practice, it gets easier. That's it for this time! More pics and words, before too long! |
|

