Thank`s John!

I think this model will be quite a bit of fun, and i will get to try something completely different.
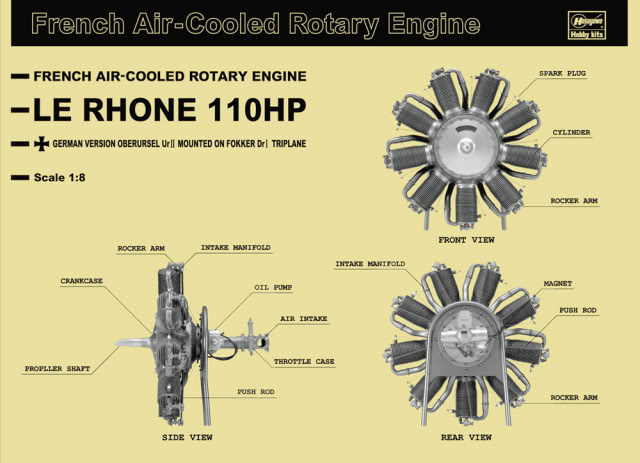
The EngineOne of the most popular engines of the First World War was the Le Rhône 9J, a 110-horsepower rotary engine.
Distinction between
"Rotary" and
"Radial" engines.
Rotary and radial engines look strikingly similar when they are not running and can easily be confused, since both have cylinders arranged radially around a central crankshaft.
A rotary engine is essentially a standard Otto cycle engine, but instead of having a fixed cylinder block with rotating crankshaft as with a conventional radial engine, the crankshaft remains stationary and the entire cylinder block rotates around it.

In the most common form, the crankshaft was fixed solidly to an aircraft frame, and the propeller simply bolted onto the front of the crankcase.
With regular production in France, license production in Great Britain, and copied examples produced in Germany, the 9J was a very common sight on all fronts.
Some of the more notable aircraft that used the engine include the French Nieuport 17, the British Sopwith Camel, and the German Fokker Dr.I.
This kit, marketed as a stand-alone model, was once part of the very impressive Museum Series model of the Fokker Dr.I that Hasegawa put out a while back.
While those models were absolutely amazing in the amount of detail presented, they were also very complicated, challenging to assemble, and understandably expensive.
For those who just wanted a taste of that detail, Hasegawa has released just the engine, and included a nice display stand and plaque.

Scale : 1/8
Length : 4.6" (117mm)
Width (or Ø) : 5.03" (128mm)
Skill level : 3
Parts : 82

Given that this is 1/8 scale, there is quite a bit of detail provided, and much of it needs to be built up.
Each cylinder is split into halves, with a separate cap.
Onto each completed cylinder assembly there are three more small parts to add.

Multiply that by the nine cylinders and already you've got a bit of an assembly line going.

The cylinders are likely the most challenging assembly, as they are split in halves.
This means that you will have a seam running through the cooling fins on each side.
There are several ways one could work this area, with the most common using a piece of sandpaper folded in half.
An alternative, though, is to get some abrasive cord, which can be found in small diameters.
That would have the added benefit of being able to follow the curve of the cylinder, maintaining the round shape easily.
Moving onto the crankcase, this has two main pieces, front and rear, on which the completed cylinders will sit.
A separate rear flange assembly comes with separate mounts for the pushrods and pipes, with an extra piece providing the attachments for the ignition cords.

The latter are to be made from silk thread, which is not included in the kit.
Monofilament could also work here, and an examination of reference photos of museum examples will help in finding something appropriate.

The crankshaft assembly is designed to allow the engine to rotate.
This also has quite a few other details added to it.
I'm sure by now you've noticed that I refer to quite a bit of 'other details'.
As I am no expert in WWI engine assembly, I was in the beginning not sure what many of these boxes and shapes are.
( Oil Pump, Magnet, Throttle Case, Air Intake, yes its all there, but... )

The instruction sheet doesn't provide any additional information, either.


The Intake Manifolds,...

... the other small details and the final painting are not quite done, there is still much to do, but i hope you like it so far.

