|
|
Post by modelcarfan on May 13, 2011 15:54:03 GMT -6
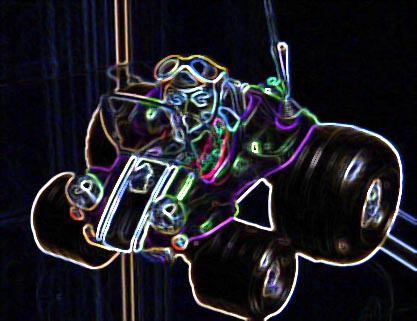
Hello folks... I got this ferd phony car, finally , from e bay ... yet it was in such a bad shape and some of parts has survived .. so here’s the one right after I got from e bay..  These parts here has some broken pieces, is how it looks when it came in... Its not a dead end, there is always a positive opportunities for reviving something so ancient.  Of course, there are some sacrifices for making this project a success, I used a Funster Mailbu kit as a donor to help with some broken parts... and used the rest for future work. The body of a mustang has glass underneath and is very hard to remove them as the glue bond is so tight and cover almost entire roof of the car inside. So I try a different technique by putting paper sliced through between the body and windshield. Then I will paint over, hoping it will come out a good finish. Crossing my fingers   This is the completed project ... whew it takes a few months because I had sent the parts to Chrome Tech USA (http://www.chrometechusa.com/ ) and have it rechromed and came out really super. I did not get the exhaust pipe rechromed, I used SPAZ STIX chrome paint (http://www.spazstix.com/xcart/Chrome-paint/ ). It really stun out right after I put them all together. I plummed out wires on engines, I used wires from an old discared plug for computer.. stripped the thick wire and ah there it is. I take as much as I can and save them in coils for future kits. I really enjoyed so much building this delightful model car.  at a different angle You may compare the chrome on the manifold and the exhaust… they are sooo much close … manifold is replated… the exhaust is painted with spax stix.  I still have more to work on... a body. Currently I am still not sure whether to paint a certain color on the body, I been doing some researching on popular colors used on this mustang.. and want to get a best decal for that. I might will have to custom design a decal for side stripes, I will let you know as time goes... It will be on and off the times and will post up more when I finally get the kids out of house and in school or activities and then I can get to do the rest.  have a great weekend. |
|
|
|
Post by ira on May 14, 2011 12:53:43 GMT -6
[glow=red,2,300]Great Start!!![/glow]
|
|
|
|
Post by flounder on May 14, 2011 13:38:04 GMT -6
THIS IS LOOKING GOD. I'll have to try the spaztick paint. Your pipes came out great.
Flounder
|
|
|
|
Post by Wardster on May 18, 2011 1:19:35 GMT -6
Dumb question: when they made the Ferd model back in the 70s, did they re-use the window glass from the Malibu funny car? (As they re-used many other parts from prior kits, in that series?) Or did they make an all-new glass piece? I ask mainly because your photos make it look like the sizes / proportions of things like the roof on both cars might be similar. What I'm thinking, if the "new" glass looks like it might fit into the "old" body style, would be to cut the window glass out in many tiny pieces; using something like a grinding bit in a moto-tool.
I got in some old glue bomb Deal's Wheels kits I hadn't seen in person in forever, and had to cut out the window glass from two Stinkray kits, in a similar fashion. (I actually used a needle tip in a Hot Tool device, to cut most of the larger window pieces taken off; then went to the grinder in a Dremel, to get the stuff that was stuck to the roof, off of there.) What I'll do to add new window glass depends on what I do with the bodies, later ... one's being radically cut up and stretched; the other I'm still undecided on. I'm only mentioning those builds to say the technique worked fine on them -- but, of course, killed the glass pieces in the process.
Anyway ... great looking chassis and engine, etc.! I'd hate to see that sweet interior hidden by solid windows, so I hope you can find a way to get past the problem of the "bad glass".
|
|
|
|
Post by Dennis M on May 18, 2011 4:24:33 GMT -6
Great job. Dennis
|
|
|
|
Post by plastimatic on May 18, 2011 5:54:41 GMT -6
Dumb question: when they made the Ferd model back in the 70s, did they re-use the window glass from the Malibu funny car? Unfortunately, and frustratingly, no! The glass is unique to each of them. I considered it some time back, and was sadly denied. I've picked up 2 glue bomb Ferds, and the glass in one was split at the scoop cut-out. On that glass, the best I could do was patch it together and try the mirror black chrome effect, but I wasn't happy with it. The other I was able to dremel it off of the roof without too much vibration damage, but it's still a little off. |
|
|
|
Post by modelcarfan on May 18, 2011 15:53:44 GMT -6
Dumb question: when they made the Ferd model back in the 70s, did they re-use the window glass from the Malibu funny car?
To answer that question... Like Plastimatic said there is no similarities in all glass and are very different shapes and designs... So.. when I got this Ferd phone car out of Evilbay.. the glue was so tight inside the roof of this car so i tried finding ways to paint a car .. so I came up with a thought and yet have not come to an outcomes yet. I put the thin paper enough to cover all the window through between the glass and the body of a car... and covered it as much as I can. You may notice in the picture, the yellow covering on window is a post it note paper which is strong enough to protect paint from getting on windows. I am also glad the glue has not gotten on the lower part of glass and it would be a pain.
So .. with hope I can paint and succeed in applying colors and stuff.. and will be trying building some decal using photo shop and design according to whats on real cars. I will post it as time goes... With my kids in way, ugh I need a velcron wall so I can put kids wrapped with velcron clothes and stick up there to stay there while I do the work.. hee hee...
|
|
|
|
Post by koffinbuilder64 on May 18, 2011 17:09:13 GMT -6
Looks really good so far!!
|
|
|
|
Post by Wardster on May 19, 2011 2:39:46 GMT -6
With my kids in way, ugh I need a velcron wall so I can put kids wrapped with velcron clothes and stick up there to stay there while I do the work.. hee hee... Well, maybe there's a solution to the gluey glass situation, hidden in that? What I mean is (and no, this isn't a serious suggestion!) you could always paint lots of small handprints on the glass, as if it was in a car show, and the kiddies all had to touch it!? In any case ... keep us posted, as work progresses! (Sweet and trick, so far!) |
|
|
|
Post by colbart/colin on May 19, 2011 2:49:30 GMT -6
[/quote]
Well, maybe there's a solution to the gluey glass situation, hidden in that? What I mean is (and no, this isn't a serious suggestion!) you could always paint lots of small handprints on the glass, as if it was in a car show, and the kiddies all had to touch it!?
In any case ... keep us posted, as work progresses! (Sweet and trick, so far!)[/quote]
I have seen such a build myself, a rebuilt glue bomb which the
builder had removed glue spots from screen (polished out), but was not happy with the result. He put a cat figure on the top, and a pot of opened paint, and blue paw prints over the screen and car....to cover the glue spots.....ingenious..
Col.
|
|
|
|
Post by modelcarfan on May 19, 2011 20:29:25 GMT -6
Yeah thats a great thought, but actually the window itself on the car is clean and clear... just that I dont want to risk a spot there Update on this model... I have not started painting the body yet, it has been a rainy week outside so I dont usually start out painting when outside is gloomy and clouldy.. I dont trust the weather, as you know many meteorologist lies a lot LOL... ( joking).. When I get them worked up and I will definitely post up the pictures in and follow you all up folks... thanks for the comments and really enjoying talking with you all. b |
|
|
|
Post by modelcarfan on May 20, 2011 12:43:48 GMT -6
|
|
|
|
Post by modelcarfan on May 21, 2011 17:12:22 GMT -6
Hey guys or gals.... I have come to a point where I am not sure whether to make a hole for headlights to put in.. after along brain battle.. should i come up with a headlight cover that usually puts on during drag racing... the one I have here is just a simple bump and looks like a head light but going to paint it perhaps white or silver just to cover it up because its a drag car.
your opinons?
b
|
|
|
|
Post by treswright on May 26, 2011 15:21:36 GMT -6
Nice work on the resto! I'm really impressed with the finish you got on the pipes, that appears to look more chrome-like than Alclad. I like using Alclad, but it has more of a polished aluminum look rather than chrome-plated. Regarding your headlight question, flip-top funny cars typically have decals on them for the headlights/ taillights (to save weight), but hey, anything goes on a cartoon model There are headlights molded in, so trying to replicate the type of decaled headlights that would have been used on a 1:1 would be pretty tricky unless you made some flat plastic inserts. I've tried painting the headlights on my DW models and have never been real happy with the results, I wish all the kits had come with clear lenses. |
|
|
|
Post by modelcarfan on Jun 7, 2011 17:37:38 GMT -6
Hey builders... Hmm update on this model car currently.. hmm I have had quite several setbacks... figuring ways with headlight design... Went to work daily as usual with my head pondering out soo loud, few co workers bothered to ask if i am okay ..LOL thought mmm according to several opinions, thanks to Treswright giving me a good direct opinion... I have decided to come with a fake headlight which usually gets on drag cars. Yet I combined a few things in one... Going to make it a little realistic, yet fake. Here are all the parts I have built, bumper, Grill streams, headlight lens... It has been on for a while... I had to buy several plastic parts which will save me time doing all the hand work.  all combined, I bought few plastic parts, I used the tube to cut a thin slice of rims for headlight, I then cut clear thick sheets of plastic, round up and sanded to smooth. I then worked on grill streams using plastic strip , its very easy to work with but have to control most of shapes and stuff and finally glued the ends together... going to sand them and will paint spaxsix over them... I hope the success is worth while.  Closer look on these parts I worked on... I will be going over instruction on how to draw the headlights in computer and then will apply lens and rim over it, giving an illusion look of semi real headlights on Drag Cars. I have to remove the molded in headlights from the body of car... to give room and smooth finish for the fake lights to apply on. This is as far as I have gone... oh man... kids again ... gotta go and will drop more later.. b |
|
|
|
Post by modelcarfan on Jun 17, 2011 16:05:46 GMT -6
Let you guys know, this model car is still in shop... still going through Botox facelift... so bear with us One question to you all guys... do you all guys have pics of this ferd phony car already painted on the back with tail lights? I try to paint it the right way ... in the brake light area... I know the rims ought to be a chrome like... but yet... I see far inside the sides of each brake lights... should all of them be chrome as well or is the chrome rims very thin like string around the tip signal lights I wonder... If you all have pics you have made one, send me a couple in my pm and give me some ideas to help paint it right. Gotta put my surgery mask back on. |
|
|
|
Post by modelcarfan on Jun 29, 2011 13:54:32 GMT -6
Hi folks.. I have not been back for a wile.. my dad passed away and am at moms place dealing with grieves. I should be back in the next couple of weeks to finish up this model.car. thanks for the patience. Have a great weekend.
|
|
|
|
Post by barten on Jun 29, 2011 16:39:37 GMT -6
Sorry for the loss. . . . not an easy time.
May God bless you and your family!
God Bless
Dan
|
|
|
|
Post by ira on Jun 29, 2011 20:01:20 GMT -6
Sorry for your loss..
|
|
|
|
Post by plastimatic on Jun 29, 2011 20:40:42 GMT -6
Family first, friend. Everything else will balance out.
Take care.
|
|
|
|
Post by modelcarfan on Jun 29, 2011 20:46:45 GMT -6
Thank you for your kindness. I will follow up more later.
|
|
|
|
Post by Wardster on Jun 29, 2011 20:49:32 GMT -6
That sucks, man! Hang in there, as best you can.
Don't rush it, or make it a chore. Personally, I find that models often make for great therapy (from Real Life, that is) ... when the time's there, and the mood's right again, you'll know it.
-- Ward Shrake --
|
|
|
|
Post by modelcarfan on Jul 20, 2011 15:01:16 GMT -6
Hi folks .... Going to get back to working on this model car now.. and just put some chrome on bumper and now am going to work on body... gonna do something rebellious on a spray paint. I can not find a bottle paint that would match whats in the spray can so I am gonna get the paint out of the can and use it on airbrush. I have done it for years and years... yet risky b |
|
|
|
Post by modelcarfan on Sept 26, 2011 17:46:50 GMT -6
hello folks again I just got the chance to do some work on the body and revised quite a lot of them. I just covered them gold and will be painting candy apple red or wine... so hopefully its gonna work. I just put the silly putty covered the tail lights and the bumper... So heres the updates right now The rest will follow up soon..  The red paint sitting beside that will be the one I use. Its kind of wine color candy color. This is the one I stole from a spray can paint. Luckily when I popped a hole, it did not fly off ( Please do not attempt doing this type of work unless you understand the process of removing the pressure before applied a hole.... do not do that at home please it is for your own safety)   Have a great week. |
|
|
|
Post by robriley on Sept 26, 2011 19:59:01 GMT -6
an easier and MUCH safer way than popping a hole in the can, is to just spray the paint from the can into the bottle.
There's no need to releive the pressure when doing it this way.
just get a spray nozzle from a can of w.d. 40 (or a spray nozzle that will accept the little red straw from a can of wd-40).
put the straw into the jar, and spray as much paint as you want into the jar directly from the can.
|
|
|
|
Post by modelcarfan on Sept 26, 2011 23:33:36 GMT -6
Yes I have heard of that but have not tried. I understood some say the paint spatters out when spray in bottle. Hmm just thought of a way.. I may drill a small hole on the lid designed for collecting paint and will fit the red stick in. Then u spray and the paint would spatter but won't splash out. Just a thought.
Thanks and will try that and yes, is the safest way. And sure save some paint after you use some.
B
|
|
|
|
Post by modelcarfan on Sept 29, 2011 16:07:41 GMT -6
Hey Folks Just updated pics  This paint is wet, just came out of spraying... so its in drying process...  This paint sure made a big change after covering the gold but showing some gold colors undereth giving out a real stand out. I really love the texture of the color to our eyes. I am anxious finishing up... whats next after painting... sigh... going to take crash course in photo shop hee hee... building decals making them into decal paper... Wish me luck |
|
|
|
Post by ira on Sept 29, 2011 16:57:27 GMT -6
[glow=red,2,300]GREAT COLOR!!![/glow]
|
|
|
|
Post by modelcarfan on Nov 2, 2011 19:37:51 GMT -6
I decided to put black portion on top of the front hood to add character of a true mustang. I am currently taping the spots and thought of adding a spoiler, so I am scratchbuilding one..  placing tape to prepare for black top on hood  anticipating location for spoiler... scratchbuilding the spoilder and is in drying process... going to buff and sand then paint black. Ugh kids again  b |
|
|
|
Post by modelcarfan on Nov 6, 2011 14:43:54 GMT -6
Hello guys... Just updating on this car... after doing some painting ( not the professional one but the best I can), the result has really evolving to almost a really true mustang !!! really love it a lot! heres the one I did so far and here is the teaser photo which is near to completion.  painted flat color on hood ... did not come much out...  after putting the inner chassis together and it shows soo much and whoa!! it looks way out rad!!! and really love it... hee hee, I know you all are squirming on your chair waiting .. to see the end of the work.. Have fun |
|