|
|
Post by Hemi on Jun 26, 2016 18:03:28 GMT -6
So then I went right to getting things on this model, next up? The mirrors!!! Sadly, the kit supplied parts were again WAY OFF.... I took them and used them to guide me to making ones a little closer, to what Daisy Jeep "Dixie" had.... They were chrome in the kit, but the real Jeep they were Semi-Gloss Black! SO, I did in fact paint them to reflect this!   Got them made, and then got them in-place on the Jeep, and painted them right after the CA dried..... I made my OWN Mirror parts here, the kit-stock parts were nothing really, I even used the actual round mirror they supplied as a "mount"..... The brackets are made from straight pins! I then CA glued them to the Jeep. AND as you can see, I also got the Antenna in-place too... Not the actual true location for the real one but this Jeep is so far off, at this point, I had to use that little mount area for something other then to "plug" it up like I did the same thing on the other side..... SO....   Looks pretty good considering! I also put the spare tire and rack back in-place, (it will remain functional the spare tire rack!)  -And just a couple extra's...... ENJOY............... There are a few more to come!!!! -Stay tuned, Comments welcome. |
|
|
|
Post by Hemi on Jun 26, 2016 18:03:04 GMT -6
So I got the antenna painted and drying, I had to come up with a way to chain that 426 Hemi down..... What fun! -I sat for a bit to think up a few ways to make chain bracket or tie-downs (loops) and then was like yeah thats either not gonna look right, or simply be "too big" for in the Jeep.... The remedy? A simple hole drilled and then some softer wire, to bend made into a "U" and then one open end of the "U" slipped through a link in the chain, and then BOTH ends of the "U" guided into the hole that was drilled and CA glued from underneath the Jeep. Worked for this task, PERFECTLY!!!! I then had to come up with a way to attach the chain to the engine block. WELL thats easy, same way its done in real life, a bolt through a chain link, that goes into the block from the back side where the transmission mounts, and in the front where the timing chain cover or water pump mounts! Easy enough. WRONG!!!!! Getting a few short sections of wire to "stay" put as the chain was guided onto them and then CA glued to the wire was a bit fun, and a little challenging I have to say! I started in the back of the engine to mount just behind the seats.... The hardest part, first!!! -As the front of the engine to the back of the Jeep would be easier.... and it was!!!!  Drivers side end of chain, in-place..... THEN the first mount to the engine in place added a little "sag" in the chain, and then moved to the next bolt hole location to have 2 bolts on the engine and then the left over chain flows over the passenger side.... Looks good so far! I really struggled with getting the passenger side end of the chain in-place, DAMN is that tight in there!!!! (My hands not being what they once were showed out here, BUT I got it, with a little frustration on the side, but I got it in-place! Same way I had planned, a "U" bent piece of wire slipped through a chain link and in it went.... I left some of this end of the chain "loose" -to look as tho the chain was longer then actually needed.... Tightened on this side!   Front of engine got its chain, mounted to the floor as I have been doing, then ran right to the block, only this time I used 2 thin (really little) straight pins, and did the same thing as I did on the back, tight on the chain going to the engine, and then sagged a little between the mounts on the block and then tight on the other side to the floor......    Chained all 4 corners down to the truck as well as got that intake in-place too! NOW it looks better. Not so odd-lookin' because there was nothing "there"..... I'm pretty pleased with this whole part of the build! I actually can not believe just how good it turned out..... Stay tuned, more to come right after these short messages!!!! Comments welcome! ~ENJOY!! |
|
|
|
Post by Hemi on Jun 26, 2016 18:02:32 GMT -6
So guys, how about some REAL updates on this build? Shall we? YEAH lets go..... LOL I took and got to the point of the back getting the engine in, as well as the separated head, and just, that passenger side was well, LACKING badly... it needed something, but what? -You know, I GOT IT! PERFECT!!!! The engine, as I add to the story, was bought, for the General Lee, in case they tired the 426 Hemi in the Generals limitations. SO, they found one, that was being built, locally, and the owner, well sort of ran out of money to complete the build, and with that, he decided to sell it to catch up a few bills. Cooter on a tow truck run, and the boys Bo & Luke, both out somewhere not answering their CB as Daisy yelled for 'em. SO Uncle Jesse, told her to take the Jeep to this guys house and pick up the engine.... As he had paid for it. SO, with that..... I took that thought, and began thinking of that "empty" space, the engine was missing THE INTAKE!!!!  This part was from a kit!!!! NOT my casting, and for what I had done to it, I could NOT have done with my resin! Why? WELL its simple, the inside of an intake is "open" for the porting, and the carburetors to feed that..... The resin ones I make are cast SOLID. Meaning that open interior was unobtainable due to the resin being solid, AND I could have "milled" it out, sure, BUT I have so many of the 2x4 barrel "Inline" intakes, whats one for a detail! Plus if I need one for a build, I'd be then lookin' for its exterior looks, NOT the ability to have open insides, SO, having said that. I milled a little inside, flat, and then plated the bottom. Then only to drill out the carburetor feed openings, as well as the carburetor mount bolt holes!  I think it turned pretty good, I see a few things now that I would have (SHOULD HAVE) done differently, BUT thats OK, it fits the purpose here!!!!  After all the drilling was done, and the bottom was plated to have a nice sight inside-wise, I then painted it with Testors model masters "Metalizer" paint color of Aluminum NON-Polish. I did not however "seal" it as they say as I didn't even "polish" it, It looked GREAT as-is when it dried! So it got painted, and sat aside, to dry..... While the intake was drying, I turned my focus on the CB whip Antenna..... The kit-supplied part was not going on this model! NO WAY NO HOW it looked horrible!!! SO, I cut it off the sprue, and then tried my hand at cleaning up the parting line on it, to a decent look. BUT the "antenna" part, had nothing round about it! I just then cut off the what is to be round, from the flex stress-relief. And then center drilled it to take .020" stainless steel wire, that I had laying on the bench, glued one end into it, and then got to looking for that "ball" part, to see what I had, and low-and-behold, I have beads in the shop, for all sorts of different modeling reasons (I use them a lot on model train stuff for the telephone poles to look like anti-conductor cups) BUT this time the other way around, on a model car, they work for gear shift knobs, as well as what your about to see, and measured in 1/25th scale come out to be around 2 inches in diameter.... NOT to bad I have to say, so I figured out the length of the Antenna and cut it to length, and then BEFORE I added the ball to the end, I thought, the flex Stress-Relief needs something more too.... Thinking of this, don't they have a sort-of spring in them to "whip" the antenna up and down vertical? OR is that so-called "spring" just part of the stress-relief? Anyway, I took out my spring arbor, and wrapped one, to just to touch over what it was going to go around.... Got the nice "start" on it, and then got a equally nice "finish" where the wraps of the spring are close together..... I think it turned out pretty damned good!  As it was, the parts made had to be CA glued together, so drying did not take long at all.... SO once it was all thought out, I sat right out to begin painting the antenna WITHOUT the spring in-place or the ball end! The Flex stress-relief was done first in semi-gloss black, let to dry. Once dry, it got the spring slide over it, and then CA glued from the back side, and then held the black mount with an alligator clip, and glued the ball onto the end,again, with CA. I then painted the wire part, and the ball end gloss white.... The actual spring I made, will remain un-painted.... Its made from stainless steel music wire!  I'm pleased in how that all came out!  It sure will look good in-place on the Jeep when the time comes, (and that time is VERY close!) More to come, stay tuned and as always comments welcome, ~ENJOY!!!! |
|
|
|
Post by Hemi on Jun 26, 2016 18:02:06 GMT -6
Well guys, a little further.... I sat down, dug out what I think will look GREAT as "chain" to tie-down the Hemi load! WELL this chain is necklace chain that I picked up somewhere a long time ago for when I was detailing HO scale train cars with heavy loads on flat cars. BUT each package, I have has 10 feet in it (The bags I originally bought were HUGE and from one or 2 moves they had gotten lost or forgotten somewhere, (Who knows) BUT I had 5 or 6 sandwich bags full! LITERALLY! So anyway, when I got all this chain, it was merely "brass" and nothing more, bare brass. SO I took it and I have a chemical thats for stained glass "blackening" known as "patina" -Just like our rat rod thing and clear coating over rust, as a "patina".... SO, with this chemical, you can get it for all sorts of metals, as well as all sorts of color patina's. I use it A LOT in "black", the silver-ish shade, is a tad expensive and you only get 1/2 the amount as you do the black for any of the different metals. (They make it for brass, die-cast, lead, silver, Antimony, etc....) I have black for all of these metals. ANYWAY take the chain and dip it in the container allow to sit for a couple minutes, pull out and lay on a paper towel and this is what it looks like when its dry:  I think in-place it will look GREAT! Heres a close-up:  This isn't ALL I got done tho! I have some more ot add when I can get pictures of it. I have the white "Whip" antenna done ready to go onto the model, as well as something "more" to fill the space on the passenger side of the Jeep beside the engine! I thought that looked a little to empty.... I'll be getting pictures of that little gem when I can handle it. As once thats ready its going right in the Jeep. As you'll see! I then while doing this was planning how I was going to attach the chain to the engine and to the floor of the Jeep, to look as its being held down. So its coming together...... Stay tuned, more will follow (probably tonight!) Like always, comments welcome, ~ENJOY! |
|
|
|
Post by Hemi on Jun 26, 2016 18:01:41 GMT -6
So I had to sit and move things around in the back of the Jeep to get it to fit and look right. Naturally, the engine had to be "centered" to some point and have as much of it to sit over the axle as these 426 Hemi's in real life were in fact HEAVY...... I made the engine cradle from REAL wood, and stained to looked "used" but had to have a wide stance for side-to-side stability..... This took up some space to make that happen and gave it a wide "foot print" With space at a premium, I had to shuffle it around a little to see what worked best, and looked right and all still fit! SO, here is how that all worked out....  Engine centered, like I said, and just enough space to place that loose head to the drivers side to even weight.... NOT really, but for the "look" of it........  Showing the head a little to see what it all looks like over-top! JUST ENOUGH space to fit it all!  A look from the outside..... NICELY put. BUT as you can see it sits "high" BUT has too........ The engine has a deep sump oil pan so the craddle had to be deep to support the engine by means of the oil pan lip..... Like they would be in real life.  From the back, showing the center of the engine to the head on the drivers side, with the passenger side kinda "bare"..... this will have other things in there, like chain to be used for holding it in-place, OR loose chain to look like its being un-chained from place, to be unloaded!  other side.....  Outside passenger-side shot..... Thats it guys!!!! As of this last pic, the engine, the head, is drying IN the back of the Jeep! Some small extra details will be added, and a loose valve cover will be placed I think, yet, BUT thats about it for this part of the build! Coming will be the finishing details! The hood latches, the mirrors, the rear-view mirror just above the windshield and I have yet to paint the valve stems & then the CB's "Whip" Antenna! After that, this build is D-O-N-E!!!! Comments welcome! ENJOY! |
|
|
|
Post by Hemi on Jun 26, 2016 18:01:03 GMT -6
NOW I'm gonna be showing you all the engine BEFORE it goes into the back of the Jeep!  I learned a valuable lesson adding the pistons! DO NOT use "gel" type glue!!!!! It creates a pressurized cylinder! That top-dead-center piston was a PITA to get to sit right! It kept coming out of the cylinder WAY TO FAR!!!!! I had to remove it, remove the glue from the piston, and use liquid CA "Krazy Glue" to get it to "stay" top-dead-center!!!!! LOL  A bit better angle, showing depth of the piston detail, as well as the cam parts in-place!!!! The cam parts are a bit difficult to see..... The paint and color of the cam parts are real close the same color..... BUT had to be!  And there ya have it guys!!!!! Next post will be of this detailed beauty in the back of the Jeep! Comments welcome, ~Enjoy!!!! |
|
|
|
Post by Hemi on Jun 26, 2016 18:00:35 GMT -6
So while the engine sat for a bit, I decided to get that head that I super detailed and stick some boards under it to show to some extent that the valves stuck down out the other "top" side and needed to be lifted up to haul it..... SO:     I THINK that looks pretty good! I thought to show the valve detail I had to come up with something in order to show this in the "load"..... I'll be now going to show you the engine after it sat for a bit to dry and sure up ANY glue joints I made in my last posting to then move onto adding the pistons and cam parts! Stay tuned and like always comments welcome! ~ENJOY! |
|
|
|
Post by Hemi on Jun 26, 2016 18:00:18 GMT -6
WELL LET 'ER RIP!!!!!!!  So then you all wanna see the NICELY detailed unpainted 426 Hemi, PAINTED?  ?   Engines is painted, and has the head in-place, with it topped with a nice Chrome valve cover. You can see some special details I made with my Unimat Lathe. I turned all those round metal parts in the Timing Chain recess. A little glimpse of the valve push rods as well can be seen here.  Looking down onto the engine! ALL edges of other parts require seals and or gaskets painted to show "bare metal", as well as all the areas needing to be Hemi Orange painted too! Looks real good!  Other side, showing the oil filter & pump area, drill passage, and nicely built "crate" for shipping! -Stained to look old and has been in a garage!! ![]() s-media-cache-ak0.pinimg.com/564x/5f/dd/98/5fdd980a7356da9a7e9eb2c97a15c1ed.jpg s-media-cache-ak0.pinimg.com/564x/5f/dd/98/5fdd980a7356da9a7e9eb2c97a15c1ed.jpgA real good side-shot!!!  The back of the block! This shows the Flywheel..... a left-over gear with thee FINEST teeth I could find! (NOT able to be used on a HO scale train. A bit course teeth, but as fine tooth as I had! With the edge of the bell-housing edge mount bare metal too!  GREAT "Valley" shot! NOW ya can see those push rods! as well as all the areas that are bare-metal..... NICELY done I have to say..... I'm pleased!  A bit better angle? Maybe... to show the depth of detail!   Just a few "extra's" I thought I'd toss in here!!!!! Notice the pistons aren't in-place yet, as well as the "cam" isn't there either! Its coming! More to follow stay tuned! Comments Welcome, ENJOY!!!! |
|
|
|
Post by Hemi on Jun 26, 2016 17:59:56 GMT -6
So then I keep talkin' about this "load" going in the back. YES I DO. You all have gotten an idea of what its gonna be, BUT you all only seen some of it. The "loose" 426 Head, the block and some of its detailing.... NOW however its time to unleash the beast..... yeah?  Front of block, all drilled out, water coolant passages, oil passages, you name it, ALL drilled EVEN timing chain cover bolt holes drilled out!  Un-bored side of the block! Showing the valve push rod recesses in the valley as well as the cam center detailing to show cam lobes, as well as the locations in the cam for its bearings, I also added a lip to the rear of the transmission mount to show its detail, (you'll see more of that in a second!) -The 2nd head is setting in the fore ground waiting too!  Bell housing mount lip for the transmission, I literally MILLED out that white lip from stryrene to fit my resin block for this! Notice, the block also is drilled for a crank! Ya can't tell I had a LOT of fun with this can ya?  Now you get to see the side of the block that I bored out! I also drilled in oil passages, and water coolant passages, as well as bolt holes for the head! Yeah, the head isn't going in place on this side, SO, this side of the block has to be fully detailed as far as I can get it.... Thats what you see here! NOT 100% true to life, but its close (some holes in 1/25th scale I just don't have small enough drills to do.... OR I WOULD HAVE!)  That lingering head that was in the fore ground is now in-place on the block. This is how that part will be till the end as I plan to add some more to it!  Showing a little more detail on the head. The head (just like the other one) got the intake ports drilled out as well as the exhaust ports! Also notice the distributor "hole" is drilled out too! This shot shows a good view of the bored out cylinders, as well as oil and coolant passages!  Other side of the block, showing the head detail from this side. I also went as far as drilling out the water plugs in the block sides, They will be replaced with the "caps" painted in-place! The oil filter passage is also drilled out!  A somewhat "OK" valley shot with the head in-place.   Front of block with the deep sump oil pan on the block. Almost ready for paint she is! This shot shows all the holes drilled in the face of the timing chain recess! Stay tuned, there will be more of this detailing to come, I'm waiting for the block to dry of its second coat of Hemi Orange.... I then will be able to do the bare metal areas for where seals and gaskets will be! MAYBE even a little more hole drilling, where applicable! Detail is coming! Thanks for looking, Comments welcome! ENJOY! |
|
|
|
Post by Hemi on Jun 26, 2016 17:59:36 GMT -6
Well as I said guys, there WAS more coming and here it comes!!!! LOL I took and got to lookin' at the Jeep and the wheels needed some added details! Valve stems would go a long ways!!! SO, I took and seen what I had for wire, and what drill bit I needed. I had steel music wire, that was .020" thick. SO, I went to make sure I had a drill bit to drill a hole just a bit bigger then the wire being used to allow glue to go around the wire in the rim. SO, that all worked out! Have a look:  Holes were drilled as deep as I could for valve stem length adjustment, while gluing. So the valve stems are just shy of 1/4 inch long.  Holes were drilled into the rims in staggering locations around its circumference to look realistic! More to follow, The detailing of the "load" going in the back is coming! Stay tuned, Comments welcome ENJOY!!!! |
|
|
|
Post by Hemi on Jun 26, 2016 17:59:19 GMT -6
Quick update for the Jeep here! The HOOD IS DONE!!!! Its about freakin' time!!!! LOL I'm glad to see it done, I had to get it on the body and get some sort of picture of it.... And I'm pleased with the look of the hood, I just have to do a little trimming to get it to close right, as its uneven in places to keep it from closing right, but thats all work done from the underside and the edge of it!  I know whats keeping it on the drivers side from closing flat, its the way the firewall was glued in from when I got it, its not "straight" and even, so its throwing off how the hood closes. I'll remedy this by trimming the underside edge of the hood!  Passenger side closes pretty good! I'm happy with that side, but its the drivers side thats "off" just enough to not allow the hood to sit flat on its edges all the way around! Thats it for now! I'm pleased with the turn out of the hood (more like sick & tired of working on the damn thing LOL) but you all know how that goes I'm sure! I'm calling the hood "good" and moving right along to whatever else needs done to finish the ole Jeep up and move on to another "partly built", build I got going on! As for this Jeep, all things considered it WAS a glue bomb, plus its OLD 2001 is the year on the box and the instructions. PLUS, I added a bit to it, and changed A LOT to be more closely representation of Daisy's actual Jeep Dixie.... I put a lot into it, and I'm close, BUT I have yet to add that load to the back of it. AND get the little fragile details on it after that..... More to come as I get closer to the finish line! Comments welcome, Enjoy! |
|
|
|
Post by Hemi on Jun 26, 2016 17:58:54 GMT -6
OK so to keep going a bit, I took the Jeep and got to making the hinges on the body so that the spare tire rack would mount up to the body and look somewhat decent too. HOWEVER in the process of doing this, I got the insane idea to make the spare tire rack..... OPEN.... AND CLOSE!!!!! Just to add to the detail and the work I had ahead of me! SO, I made this spare tire rack to open & close, and have a "latch" on the handle end.... SO, having said that, off we go! I took some plastic tube I had as scraps, and drilled them just enough to hold the brass wire spare tire rack and not be to tight, but loose enough to open & close!  The hinges had to sit for a day to make sure the glue was 100% dry and were fully attached to the Jeep! As the rack is getting a hitch too on the drivers side. That part is yet to come!  The rack is made, cleaned and painted, The "bolt" in the tire mounting plate is just to "hold" it while I painted it! The "latch is on the drivers side as well! made from a Model Train handrailing detail!  Looks really good! AND....   DAMN does that look GOOD!!!   And YES, the hinges do work! Thats what the last 2 pictures show! Opening and closing the spare tire rack!!!!    Looks really good! I do see some touch up I need to do, as far as the spare tire goes a little flat black touch up along the rim will go a long ways on that resin cast tire!  NOW you see the Spare tire rack in place, and latched, WITH the new tail lights in place AND the license plate too! WITH Daisy Dukes "real" plate number on it!    I'm VERY pleased with how this all turned out!!!! A bit of work sure, but this is the reason that makes it all worth it, the end result! Thanks for lookin' Comments welcome, Thats it for now, more to come as the rest happens to finish up the model! The "end" is REAL close now! ~ENJOY! |
|
|
|
Post by Hemi on Jun 26, 2016 17:58:27 GMT -6
So while the tail gate liner was drying to be ready for painting, I thought, what about the spare tire? The tires, on this remember are resin! The ones that the kit had with them were NOT the right for the kit! The rims you see here would simply fall through the openings in the tires!!!! SO I had to seek out other means for tires for on the Jeep PLUS fit the rims you see here! WELL then, originally the spare tire just glued to the back of the tail gate. Not exactly detailed at all, and sadly enough as you all know, you know that lacking bit with me well, I try to up the detail level to be more fitting to the build. SO, I went on lookin' at "still" shots from the show showing the back of the Jeep to see the tire details.... 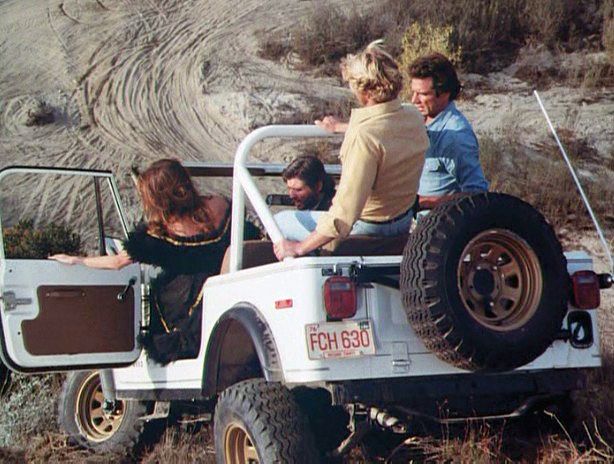 This ---^ Is what I plan to try and replicate!  SO, I start out by going to my metal stock bin, to see what I had for brass wire, to use. I choose brass so I could "solder" it together for strength.... This ALSO allows me to make all the fine adjustments to fit the tail gate, as well as the custom made hinges! I then got to looking to see HOW I was going to "hang" the spare tire on it, as well as it "close" against the truck, AND clear the rear bumper at the same time! Remember the tires are a bit bigger in size, AND slightly wider.... SO, on making the place for the spare, I made it all go to the location it be on the tail gate (was a glue pin on the spare tire hanger, and a dimple in the tail gate for this so I just carried it over to the newly made parts for the same purpose.   Brass sheet is soldered to the frame, this adds strength, AND holds shape to the wire really well! -Hinges, are made to the right, adjusted to the receptacles on the Jeep (that I also made) and this is how this detail is coming together!  Brass plate drilled for the spare tire and its mount. As well as a vertical brass bar by the hinges to hold the shape and support the tire and its weight, as well as look good detail-wise.... So since this brass work had to cool, AND be cleaned by a bath in Acetone I then painted the tail gate liner and got in place..... That way I could get the tail gate on the Jeep body too! SO on the liner went, and then on the tail gate went..... and this is how that all looks now:  A LOT better lookin' then leaving it as the kit box-stock would have been! The tail gate had a BUNCH of imperfections in the plastic so I sanded and filed it off and then with the looks of it by that time something "more" needed done! So thats when I sat out to make the tail gate liner. NOW however its all in place!   I think that looks GREAT! A LOT BETTER then if I had left it box-stock! NOW, I can focus on the spare tire rack and all that detail on the other side of the Jeep! Stay tuned everyone, more to follow! -I got A LOT done on this build in the past couple days/nights! Thanks for lookin'!!! Comments welcome! ~Enjoy! |
|
|
|
Post by Hemi on Jun 26, 2016 17:58:01 GMT -6
So MORE progress on this build! (man is it going FAST!) BUT I can see the end coming! Which for this build is a good thing! So, right to it shall we? I took the tail gate and painted it, but in the process of that, I noticed the "back" side of it was more to be desired of! Detail-wise anyway..... SO I sat out to make a "matching" cover "liner" for it, to match that of the bed inside the Jeep!  Spare stock sheet plastic, .020" thick, then made marks to "guide" me to location, to match that INSIDE the Jeep Floor that I made all flat back and painted the runners "gloss black" to show some detail depth! -I then looked for strip stock to see what I had, (This is from a buy it all or nothing bunch I got so I'm NOT sure what size it is, BUT its close to the raised runners in the Jeeps floor! I used that and glued to the sheet as the markings went.   I let this dry till I could paint it.... SO, while it was setting and drying, I went on to see what it take to get the CB in-place!  From the pictures of "Dixie" WITH one of the shows cast members in the picture, to locate where the CB actually was, (coupla instances, I seen the CB in DIFFERENT locations in the Jeep!) WOW, SO, I had to pick one! So between the seats as I mentioned before, it went!  For all thats "wrong" on this Jeep to be Dixie, and from the show, I don't think I done to bad, all things considered! Plus it is after-all the actual "Jeep" MPC-AMT-Round 2 dedicated in 2001 to be Daisy's Jeep "Dixie", as I also have the kits box as well! Thanks for following along guys! Comments welcome, MORE to come! Stay tuned, right after these short messages.... ENJOY! |
|
|
|
Post by Hemi on Jun 26, 2016 17:57:43 GMT -6
Well I got the hood lookin' really good.... Its ready for decals! Heres what it looks like AFTER I fought with the hood finish to be ready for paint (Was A LOT of work getting it to be this smooth AFTER I had to remove the old paint), and old decals and then to remove 2 cast-in details that really messed up the first attempt of the decals.   Looks GREAT! I was gonna add in some more Glosscote from Testors to seal this in, BUT I thought maybe more wouldn't be a good idea as it was nice and smooth as seen above! SO, I left that set for 48 hours BEFORE I went into doing the crazy decals.... The Eagle was VERY difficult to work with, (it did actually rip, BUT, in a place, I could to some extent repair... Its the best I can do on it, with what I had to work with and to that, I'm pretty pleased, that it turned out as well as it did.... Thanks to Santachas for helping me out getting the needed decals for it, Thanks man!  You can see where the decal would NOT lay flat, and then while it sat and the decal set was drying, tore.... Wasn't to-too surprised the decals are after-all somewhere about 15 years old!   I then took the words "DAISY" that were made to look like those "DIXIE" ones for the hood sides, and cut all the straight sections of the wording out one small slice at a time and placed it over that gap in the Eagle! It still shows, yes, but not nearly as bad! I wasn't to pleased they ripped originally on this application, BUT, I'm almost fed-up with trying to get this Jeep to look "perfect" it now is as good as it gets! That Eagle decal was in fact VERY difficult to work with, and to get it to lay out as I have it, took an entire night working on it to get it as you see it, was intense to say the least, but considering how old and how difficult those decals were, I'm good with it........ While the decals were sitting and drying between working times, I began to work on what was left of the little details for inside the interior.... Meaning the CB, and its painting detail, as well as making a better looking CB mic, and wire.... This is what I came up with for a CB mic wire....  I took some of the thinnest gauge wire I had and whirled it around a thin drill bit. I then took a section of really thin wire, removed the insulation from it to make plug boots where the mic would plug into the CB and the wire stress-relief on the mic, and got them in-place!  I now have the wire glued to the newly made mic, and is drying. I will hold the mic, in a alligator clip to paint the wire flat black, and then once thats dry, I'll "stretch" the coiled mic wire to sit the mic on the seat, and once the wire is stretched out a bit, I'll hold the wire and paint the mic! Thats all for this for now! I will be gluing in the CB some time tonight, and then I'll be able to glue the mic and wire to it once the glue on the CB itself is dry. FINALLY, I can see the light at the end of the tunnel with this build! The end is coming, as all I'll have to add after this is the steering wheel, and then finish up the detailed load going in the back of the Jeep as well as the tail gate, and the spare tire! ENJOY thats all for now, Thanks for looking, comments welcome! |
|
|
|
Post by Hemi on Jun 26, 2016 17:57:25 GMT -6
NOW I bet your setting there reading this, (I'm a damn fool for detail) as you all know, SO, I sat out to make something NOT not normally seen in a model engine or a model for the most part, UNLESS its "cast-in" the part of the engine! THE PISTONS!!!!!  And you seen them, they are turned in my Unimat Metal Lathe, from solid Aluminum! This as-seen would be considered "Billet Aluminum"!!!! -They were NOT made to be the same length or size, BECAUSE, the piston "skirt" will NOT be seen, BUT I made them the length they are for placement in the block!  Domed as a real 426 Hemi would be, I think (not exactly sure) but at a guess, I'd say they would be something to the tune of 12.1:1 compression for the distance they would go up into the head with how I turned the dome into them! I MAY YET go and file the valve reliefs to these, I just have not decided 100% on that yet but its a damn good possibility that I will!   Placed by the block.... I have a little "fine tuning" to do to them BEFORE they're ready, to go in, BUT #8 piston would be "top dead center", the 2 "center pistons" #4 & #6 would be the same location up & down in the cylinder and then #2 piston would be "bottom dead center", lowest one in the even numbered bank of cylinders.... -As per the REAL engines firing order, "1-8-4-3-6-5-7-2"  I think I've got a little more "drilling" to do to open oil passages, and coolant passages, and I'll be off and running for painting this up to match that heavily detailed Hemi Head I did up from one of my resin Jo-Hans castings!!!! A quick update on the hood, ITS NICE! I have a little yet to do to it paint-wise, and it will be ready for that Eagle detail! Pics of this will follow in awhile!!!! Enjoy, Thanks for looking! Comments welcome! |
|
|
|
Post by Hemi on Jun 26, 2016 17:57:08 GMT -6
Well guys, here comes some REAL CRAZY detail...... nothing less from me! (don't you all know it!) Anyway, I mentioned the valve train and engine block valley detail, as well as the cam openings in the center of the blocks valley. WELL You seen pics of me "milling" out the center to add the plastic rod to then be milled for the bearing locations on the cam as well as the lobe openings that I spoke of, so heres what that end result looks like:  Notice the "valley" center? Its WHITE, bare evergreen styrene "rod", that I milled the block to except, and look as it does, to then go and vertical mill out the "cut outs" where the cam lobes would be seen rotating! (I have yet to make the parts for this for the cam to go into these areas! (IT WILL be there when I'm ready for it to be, I have some other work yet to be done!  This picture -----^ Notice the FRONT of the block? The hole drilled down the center of the block thats made from my resin cast for the cam! YES it goes all the way to the back of the block too! NOW, I'll end this post there for a short time, theres another post to follow! -STAY TUNED! |
|
|
|
Post by Hemi on Jun 26, 2016 17:56:51 GMT -6
Well guys, I'm lacking........... BAD! I had some home-work around the house to do and that set me back just a little (2 days) so..... To start again, I actually got the hood to the Jeep in NICE shape! Ready for decals! I have yet to check it, (I'm almost afraid to look at it!) LOL BUT last time I "glanced" at it, it looked GREAT, we'll see! I'm ALMOST there with this build..... No pics of the hood tho.... I loaned the camera to my Daughter for the day and won't see her till later today, at some point to get it back! BUT I did get pics of what I did prior to the 2 days set-back! I thought, I'd get them posted for the up date with a little bit of a verbal update (on the hood situation!) So.... to the pics huh?  I'm "milling" out where the block stiffeners, & the cam bearings would be going in the "valley".  A little more "milling" of this area, was required, as I plan to glue in a detail part and then AGAIN mill it to spec!  The part I plan to glue in here, is of round stock "rod" made of styrene, to then be milled vertical (not angled as you see now! The Milling now, is being done with a "Ball End-Mill", to give me a "round" base, to hold the round styrene rod, thats going to be placed in there, to then be milled to have the cam bearing seats in the block, where needed and then the "openings" in it, to show the cam in place! As of this posting, (I have to get pics BEFORE I proceed), but the round bar stock styrene has been glued in, and milled for what I've mentioned here. I plan to make something, to represent a cam. The front of the engine block has been drilled length-wise, for the cam! MORE will come once I have the camera back in-hand!!!! Enjoy for now! Thanks for looking, comments MORE THEN WELCOME! |
|
|
|
Post by Hemi on Jun 26, 2016 17:56:31 GMT -6
Well, as I mentioned I had "secrets" to this build, right? WELL, so far you asll have seen 2 of those "secrets" BUT I've added a NEW one!!!!!!! Ohh yeah, let it up to me to add in a LOT of detail, WELL, your about to see some of that extreme detailing I speak of! To get to a little story to the build, as you all read by now, I wasn't adding that rear seat in regards to "loading" Daisy's Jeep for a trip to Cooters Garage, for parts to keep the 2 cousins Bo & Luke, out of trouble and the General Lee running!!!! WELL I decided a while back I was gonna add in a head, DETAILED to the max, for how its gonna be loaded into the back of daisy's Jeep. WELL I got to thinkin' they wreck and get themself into trouble a bit, what happens if its not just the heads that they want to use, brutalize, and have trouble? WELL I'm adding a spare 426 Hemi BLOCK too! Now to get right to it, heres what it began as:  One of my Resin casted 426 Hemi Blocks, the master copy is of a AMT-Ertl engine, that came in the '70 Dodge Coronet Super Bee kit, I molded it and added a little to it. I'm also adding in the timing chain recess too! Also seen in the pic above, and ALSO one of my resin castings!  This pic shows WHY I choose this block! PERFECT cylinder start for detailing! Remember, I want to keep the detail level on both the heads as well as this block equal! SO that means boring the block to show actual cylinder walls..... I then also choose this block as it of all that I have, has thee BEST "valley" detail for the valve gear push rods and such. This now is saying something, if your all following me!  This pic is showing the valley, not the greatest, but it will come. I took and milled the block to remove the molded in, "push rods" for the valve gear..... I think your getting warmer as to where I'm going with this!    I had set up my Unimat milling machine, to mill off all that cast-in detail, so I can add my own "real looking" detail! Here you see me milling off all that push rod detail that was originally molded into the block.....  This is the crazy one...... Instead of typing it out what I was in the process of doing, I'll show you!!!!!     I bored out the resin casting to have a set of 4 in-line cylinder walls and able to be SUPER DETAILED! I only did one side! WHY? WELL, thats the trick here, when the block is "loaded" into the back of Daisy's Jeep, its going to look as tho it was partly assembled, one head and valve cover in-place, the other head is the detailed one, with the valves that I added, setting loose, with it up-side-down to show the valve work in the head. The other head, will be on the block, detailed for what you'll be able to see, AND possibly have a valve cover on it. (I'm not sure I am going to detail the TOP of the 426 Hemi head, we'll see! Which if I do, would mean I'd have to leave the valve cover off of it, and have it on the floor of the back of Daisy's Jeep! AND it would, if I go that route! The other part I noticed with this block is it had no "ear" or tail where the transmission would bolt to the blocks "flange" for the transmission. I built it up with CA and baking Soda, to then mill to what it should resemble, closely (its not 100% exact, the resin base makes some milling nearly impossible, so it has to be done VERY lightly, when you do it, as you will see! Have a look:  Thats it for now.............. MORE will follow when more progress has been made!!!!! (I really am enjoying this part of the build), to see just how close to a real one I can get a model, that I made in my own molds!!!!!! ENJOY! |
|
|
|
Post by Hemi on Jun 26, 2016 17:56:10 GMT -6
OK back at it...... LOL Remember I said there were "secrets" to this build? ALL of my builds normally have some sort of secret involved in them, just to incorperate something a bit different as I have a twisted sense of humor! WELL then, having said that, whats ole Daisy Duke known for? (BESIDES being pretty, and pleasant to look at) HER SHORTS!!!! LOL Can't build a Daisy Duke "Dixie" Jeep without something shes known for in it, Without her in it of course!!!!  Made from "Denium" tape...... LOL THEN in the Jeep the guy that had it before I got it, remember, I bought this as a glue bomb from a local hobby shop, that bought a MASSIVE collection to sell. So on the jeep floor there was a hole drilled into it, and I left it alone, wasn't sure what it was for if for anything, (I thought maybe a fire extinquisher at first) turns out, NOTHING goes there, WELL by that time it was to late to go back and make a repair, "filling".... SO, I had to come up with something to "cover" it.... I think I got just the plan......  LMAO, I love it!!!!! I think thats KILLER! (my goofy sense of humor kickin' in here!)  Worked out perfectly!!!!! Covered that hole that was put there by someone else, and puts something of "Daisy's" in HER Jeep! All while I added the roll bar, its in-place, and painted! (MAY need one more light brush coat to even it all out tho) Thanks for lookin' guys, Stay tuned, its coming, the end is near!!!!! ENJOY! |
|
|
|
Post by Hemi on Jun 26, 2016 17:55:42 GMT -6
Well I got MORE done!!!! LOL I have a secret to reveal..... You know how this Jeep is to have a REAR seat? Yes? WELL I'm NOT adding it! I have plans to "load" Daisy's Jeep for a trip to Cooters Garage, for a delivery..... Have a look:  Whats THIS? Have another look!  How about a 426 Hemi Head.............. Combustion Chamber DETAILING? You betcha!!!! I took and used one of my resin molded parts, (master copy was from a Jo-Hans '71 Cuda! And then machined it (YES MACHINED IT, to have somewhat close oil drain passages, spark plug holes, AND all the VALVES, the intake valves are larger then the exhaust valves, as you'll see! I EVEN added valve "seats" to the head! REMEMBER, I am a serious detail oriented type guy.... I love this kinda stuff!!!! SO, with that, heres a few more!  How about added "Intake Ports" ?? YOU BET!  Other side...... Exhaust Ports!!!! YES they are all the way through BUT do not "meet" I didn't just drill/mill straight through (Altho, that would have been easier to make this happen!  ALL but one valve in-place! Now I bet your sitting there going OK thius guy is CRAZY (Yes I am thank You) BUT whats this gonna look like "painted" Well see for yourself!    Valves in-place!!!!   Valves in-place, and painted, bare surfaces sort of look "polished" where the intake will have its gasket, as well as the bare area for where the head gasket will go, as for the exhaust, that too! ALL from one of my own Resin castings!!!!    Under a little bit different lighting:  This is just "part" of the load that will be in the back of Daisy's Jeep, as I mentioned all to keep her cousins '69 Dodge Charger R/T's 426 Hemi, RUNNING as they pound on it to keep themself out of trouble with ole Boss Hogg, and Rosco! This is only part of ONE secret! Theres one more to follow!!!!! -Stay tuned! |
|
|
|
Post by Hemi on Jun 26, 2016 17:55:20 GMT -6
So by the time I got the whole CB thing in paint, and decided how I was gonna do it, the windshield frame, and hinged should have been dry, and able to be handled L-I-G-H-T-L-Y..... Its not got a lot to hold it in place! SO, I began painting the hinges Semi-Gloss Black......     I think it looks pretty good! I sat the "roll bar" in place for looks........... its NOT glued in-place in these pic, just for "looks" only, as I have yet to paint it the same white as the Jeep.... I also installed the Headlight lens as well........... As of this posting, the whole thing sat over-night, to dry, cure and harden up for more handling, as I have a lot yet to do, as the parts dwindle down.... I have yet to finish up the CB, get it in place, and then add the Steering wheel, and then that "secret" of mine will follow!!!! So, there will be more to come in the next day or so, UNLESS things go faster then I anticipate! Thats all for now, Thanks for looking! ENJOY!!!!! |
|
|
|
Post by Hemi on Jun 26, 2016 17:55:03 GMT -6
SO to go at it some more, I took out the CB and got to lookin' and come to find, I'm GLAD I didn't glue the CB to where the instructions showed it to be! Its NOT under the dash on the passenger-side of her Jeep! Its between the seats! SO looking at the CB, I was like, yeah, thats NOT gonna work to my detailing ways! SO, looking at the area between the seats, How in the hell was I to put this, there? WELL thats easy! The Emergency Brake lever is there, I had to remove it, and file down the "boot" a bit, and add a bit more rear-ward, downward angle to it, which I did, and then re-glued it in place..... BUT the left the CB, how was I to mount it, and right in front of me was a short section of "H" beam structural stock, I was using it for my "Dream Truck" build parts, and this little section happened to be a left-over that stayed on the bench! SO I took it and began "fitting".... The CB? I can not stand the look of that mic, as well as the Mic wire they molded into it. SO, I cut the molded on "wire" drilled a hole where its to plug into the CB, and then completely cut the CB Mic OFF the CB where it is/was to hang..... You'll see why, when I get that far! Heres what it started out as:  Mic cut off holes drilled.  "H" beam mount made (its now a "C" channel mount, and a notch cut into the bottom of it to clear the Emergency Brake Lever. Mic, made from a section/scrap of Styrene block, square rod also laying on the work bench! Hole drilled into it as well. awaiting paint!  Little bit better pic.....  The CB itself, has been painted, and is drying. I have to detail the knobs, and add the little Channel screen to it as well as the Mic wire and boot..... I then got this aside, drying (The Mic, however will be painted once its on its wire to the mic, to have something to hold it with! Its awful small..... Stay tuned, more to follow! Thanks For looking! Enjoy! |
|
|
|
Post by Hemi on Jun 26, 2016 17:54:41 GMT -6
A few days worth of fighting with the windshield, I think I got it as best I could...... The real "Dixie" wasn't nothing like the model, BUT I was to far into it to stop and change it all, and then repaint!!!! GO FIGURE! (A LOT is wrong with this model to the real one!)  Got the frame painted to match the Jeep body, and then got the windshield wipers painted "Aluminum", and the "motors" Semi-Gloss Black. Once dry to handle, I installed the windshield! AFTER that, was dry, I worked on fitting the so-called shield-flip hinges, What a PITA those were!!!! The instructions don't show them clearly, AND the "inner" hinge is NOT what it shows to be in the instructions! NOT AT ALL!  The hinges are chromed, and on the real thing, there aren't any, BUT because of the model, being what it is, I had to do something more to make them, fit the model and look the part, SO I sanded off the chrome where they got glued, and began by adding the passenger-side outside hinge half, FIRST, then got to figuring out HOE the passenger-side "inner" hinge fit, as the pin "hole" has either upwards facing, or downward facing, WILL fit either way, make NO mistake, here, they must face DOWNWARD!  Over-all shot, of it sitting and drying! I added glue to the bottom edge of the frame as well as the inner edge of the dash "top" where the windshield would sit to glue it in place (it can be let to "hinge" without gluing) BUT I want it to be "solid".... So, I left the whole works sit and dry, for a couple hours to be STRONG to the painting of the hinges. They are to become Semi-Gloss Black! More to follow after these short messages!!!! |
|
|
|
Post by Hemi on Jun 26, 2016 17:53:58 GMT -6
Well a little "progress" has been made on this build! Looking at pictures of the REAL "Dixie" WITH Daisy herself, in the picture to make sure it was the actual Jeep she drove and not a clone. I noticed the tail lights to the kit! These are no where near what the actual Jeep Dixie had! (I know the kit is way off) BUT if I can add to it to make it that much closer, why not!? SO, I took the old ones, stashed 'em away for a future possible build, and dig out of my parts bins these:  I have yet to paint everything to go with the Jeep, BUT that white plastic "mount" is actually just that a mount. For the license plate! That mount will be painted black!Then as you all have seen and read, I was working on the side steps, they were WAY to big for the side of the Jeep! I cut them down as you all have seen thats following along. And got them painted Gloss Black. And now, they're mounted in place!    I think they look a bit better then what they were! I'm STILL thinkin' of taking about 3/16ths off the front edge still they look to stick out from the side a bit to far! And to think, I already did this once when I was re-working them in the beginning, can you guys imagine how far they would protrude if I hadn't!? WOW! While I was doing this, I took the front and rear bumpers off the chrome sprue, and got to lookin' Daisy's Jeep ALSO DID NOT HAVE "Chrome" bumpers! They were gloss black too! SO I stripped the Chrome with oven cleaner, let to air dry, and got right to painting them gloss black! NOW, they too, are on the Jeep!   While I was adding the front bumper, I also got right to adding the front turn signals! They were chrome and it said to leave them chrome, BUT I had to paint the lens Turn Signal Amber....  I think they look pretty good!!!! This is all I've gotten done on this build to date, I am waiting to paint another "good" coat of white onto the hood of the Jeep as that should be all it needs to then allow to dry and add the "Eagle" and "Dixie" to it and then set to cure for clear coating! Its ALMOST done!!!!!! Enjoy for now, more to come as I'm able! (I've been doing A LOT of mold making, pouring of parts, and cleaning the parts for those I owe so very little "model building" work has been done in the past few weeks!) |
|
|
|
Post by Hemi on Jun 26, 2016 17:53:37 GMT -6
To follow up, I did a little research on this Jeep to follow along to as close as I could get it to Daisy's REAL Jeep in the show.... One thing I noticed during "fitting" was the side steps. they right from the kit are HUGE. they almost "over power" the look of the Jeep, and for that, I took and went about it in a whole other way! Have a look:   The one on the left, is the box stock part.... It measured damn close 20 scale inches long! Looking at the real Jeep (WITH Daisy in the picture), to make sure it wasn't a "clone"Jeep, they are about twice the size of her foot.... SO, I took and "sectioned" them, using all kit stock parts BUT the Diamond Plate! -The one on the right is the one I shrunk.....  Nice shot showing the Diamond plate "tread" well..... The Diamond Plate came to me just in time for this from our very own "mopar".... Thanks Dan! AND I still have enough to make the bumpers to my '67 Power Wagon too!  Now I began by cutting with a razor saw, long ways against the vertical uprights, down till just about the thickness of the kit box stock Diamond Plate, then cut it right up to the center brace.... One I cut through to that center brace I merely just clipped off the "ear" on either side of the step. -You can see one of the factory "ears" of the Diamond Plate in the upper left-hand corner.... I then took a file, with a NO cutting "edge" to file the top of that little center brace that goes underneath the Diamond Plate to keep everything the same height.  I then made 2 pieces of Diamond Plate to fit the new step's frame.... Seen waiting to be glued onto the frame! Notice how "wide" the stock frame is, and how I made the one already done narrower to make it smaller so to not "over-power" the side of the Jeep as in one picture I have the steps are in fact rather small!  One side, of the frames bracing cut off.... I took the center brace, matched it up to my 1/25th scale ruler, and cut the brace at a point that would make the over-all step 12 inches wide. 6 inches deep. -I then took the corner of that brace, measured in from its end to remove the material out of that horizontal brace, to make the over-all one side, 6 inches from center.  I did the exact same thing to the other side, BUT in this picture notice the center brace, still connected to the horizontal ones are even more short then the last picture? I removed that amount from that horizontal brace, to get my 12 inch wide step....  All the parts glued in place and drying.... When they're dry, I plan to paint them Testors Semi-Gloss Black, just to have a slight "shine" to them.... And to have them stand out against the flat black "undercoated" frame.... As this is being typed, I took the bumpers and soaked them in over cleaner to remove the chrome from them. Daisy Dukes Jeep, did NOT have Chrome bumpers! They were gloss black! SO one is done and on the Jeep (the rear bumper) and one has a coat of gloss black on the back-side of it drying till I can do the front "face" of the bumper. I also changed the tail light details too, they were also NOT correct to the Jeep Daisy had in the show, and mine will reflect those that were on her Jeep! This is it for now! More to come when things get done (Or while they're being done!) ENJOY! |
|
|
|
Post by Hemi on Jun 26, 2016 17:53:15 GMT -6
Well as everyone knows, I been going hard and heavy on getting this model completed!!!! SO having said that, lets get right to a FINISHED "Engine Compartment"....  An over the top "looking down onto the engine" shot... for all that wire and all the work I put in, I'm pleased with the result here.... This had to have been (to date) my most difficult engine compartment yet.... A LOT of wiring going in places, I never done before!  NICE! This happens to be thee first time I have EVER "wired" in the headlights............ BUT with that, on a real Jeep, the headlight wiring follows the grille braces to the firewall. Thats WHY you see it here!  The air cleaner looks GREAT, sadly, the kit itself came with a VERY ODD Air Cleaner.... AND because I choose to replace the original 4 cylinder engine with a V-8, I had to use something for an Air Cleaner, and being I used "Chrome" valve covers, I thought it was fitting to use a Chrome air cleaner!!!! -Just because....  As I said, I'm VERY happy with the result of my efforts under the hood! (I'm working on the hood now to get it ready) as there really isn't much left to finish this restored Jeep model of Daisy Dukes..... Stay tuned right after these short messages, theres more to follow! ENJOY! |
|
|
|
Post by Hemi on Jun 26, 2016 17:52:40 GMT -6
OK on the engine bay.. details, details...... ohh did I mention DETAILS? ? Its almost done! Have a look! I'll point things out as I see them, for those who are following along!  So you got the whole battery set-up wired in, and then I took and added in my OWN "horn" kit came with none at all! Wired it in, as a "green" wire. THEN this is a complete first for me, I wired in the headlights! WHY? WELL the headlight bezels have the wire coming out and follow the grille supports back to the firewall! SO, being thats a "seen" detail on the real thing, WELL yeah, it HAD to be put on my model! -Also notice the brake booster & master cylinder are in place WITH coiled brake lines!!!! -I had to let the glue dry "hard" so I can go back and fit the piping to the proper holes in the triple valve on the frame.... Thats to come! (Gonna be a fun one to do as its tight quarters in there!!!! BUT, I'll get it!  The grille supports through the engine compartment are brass!!!! I did NOT like the kit supplied parts and how damn brittle they seemed so I made my own from 1/16th brass rod, that was painted the same color as the body.... Super Glued in place, with heat-shrink tubing used as a "loom" type thing to hold them to the grille supports. Left un-shrunk till I got the headlight wires through them on the passenger side, then I headed a brass rod up so to not "burn" anything as all that heat shrink tubing needs to shrink is heat, not flame! This will hold the headlight BLUE wire in place as its only glued into the headlight bezel WITH a plug boot (if you look!) I also have to go back and paint the master cylinder "lid" to look like brass...... I see its unpainted! Like I said, there are some small details I have to go back and fix, paint, or merely just touch up, BUT the ole Engine Compartment here isn't lookin' to bad!  Last but not least, and "overall" look at the engine bay..... YES, it took some work, some thought, and some extra parts to make it look this way BUT I think it fits Daisy Dukes Jeep CJ-7 VERY WELL!!!!! Thats it for progress for now! More to come as I get more done!!!! ENJOY! |
|
|
|
Post by Hemi on Jun 26, 2016 17:52:09 GMT -6
Then I'm off to begin the engine compartment details.....  Here you see both batteries in place.... The details are about to surround this all!  Notice in the pic above, the little black box? Thats the electrical box for having 2 batteries, as well as 2 "charging" sources.... In the top of it, is 2 holes, one hole for each red wire, one off the Alternator, and one off the generator. THEN in each end of it, is a hole, one for the black "main" battery, and one for the whit e battery, BOTH "positive" sides of the batteries.... They will have red wires going into it, and red going out to the each battery.... As you'll see!   As I said, one red wire each to the top of that little black electrical box. One from the Alternator, and one from the generator! -Notice there is one "lonely" red wire going to the black battery? Thats the starter positive wire! Its NOT in-place to stay as there needs to be 2 more red wires added to that!  Now theres 3 red wires going to the black battery, as well as a link black wire going between the 2 batteries and into the firewall!  One red wire off the Alternator going to the firewall..... As well as a red battery wire off the black battery going also into the firewall!  Slightly better view of all these wires and where they're going....  ALL the posts of the batteries tied in, red going to its respective locations as well as the black. ONLY the black crossing between the 2 batteries! The positive sides will be meeting elsewhere unseen.... BUT go in the right direction! Stay tuned MORE to follow!!! ENJOY -Thanks for looking! |
|
|
|
Post by Hemi on Jun 26, 2016 17:51:37 GMT -6
Well now, I had mentioned a few posts ago, that looking at the model as well as Daisy's REAL Jeep (from the show, with her or someone of the cast in the TV Series in the shot), I noticed that the roll bar was NOT right in the kit.... The supports to the upright were not made to be rounded corner, and horizontal..... (This had to be a Jeep from a Military Kit they retro fitted) As the Jeep Daisy had had those braces/supports angled.... I took the factory kit part "up right" and made and added my own "angled" supports!!!  Not painted yet, and won't be added till I'm at that stage of the build, BUT will be ready when I am! I still have to figure out the placement of Daisy's CB BEFORE I add ity to the model, as I do not think where they show to "put" it in the instructions is the correct location, we'll see. I'm trying to build this as close as I can get it, and let me tell ya, its not even close! Short posting, on this interior detail, BUT more to come! Stay tuned, more to follow after these short messages! |
|


 ?
? 
