|
|
Post by Hemi on Oct 9, 2016 19:57:57 GMT -6
NICE!!!! Some interesting work goin' on here!!!!
|
|
|
|
Post by Hemi on Oct 9, 2016 19:55:05 GMT -6
Guys,
I'm looking for a single Blower from the S'Cool Bus kit. I need the body, the front & the back of it. I'd like to get the parts to complete a 2 engine set-up I've started and seen I was missing one blower too it!
Anyone have just the blower (Supercharger) nothing else, I'm interested! PM me on it, if you have one to spare!
|
|
|
|
Post by Hemi on Oct 9, 2016 19:50:42 GMT -6
NICELY done! Question on the engine in the front, whats the twin blower set up like? I have a build, I plan to do something similar, BUT I'm not sure if I'm gonna "stack" twin-blowers, OR if I'm gonna angle them as you have them in he front of this truck! Any help, and or pictures of the way the engine went together be greatly appreciated, and VERY helpful in me deciding how I'm gonna do mine! I used the blower from a T'rantula. It has twin scoops on top. 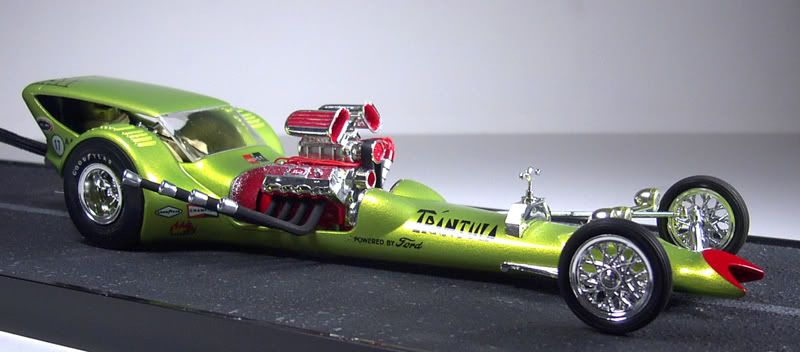 There are some "V-twin" blowers out there, on a '60s AMT Corvette, the drag-style Studebaker, and the Bathtub buggy, but I think their belt system looks bulky... Brandon, VERY nicely done! I had to ask on the engine and blower set up (I am looking for V-Twin Blower set-ups) so.... I'm, looking for ideas of all this to make my own. I myself like the belt clustering, make it look real and all that serpentine work in the belt system! |
|
|
|
Post by Hemi on Sept 23, 2016 17:20:48 GMT -6
NICELY done! Question on the engine in the front, whats the twin blower set up like? I have a build, I plan to do something similar, BUT I'm not sure if I'm gonna "stack" twin-blowers, OR if I'm gonna angle them as you have them in he front of this truck!
Any help, and or pictures of the way the engine went together be greatly appreciated, and VERY helpful in me deciding how I'm gonna do mine!
|
|
|
|
Post by Hemi on Sept 23, 2016 16:38:08 GMT -6
-I wouldn't mind seeing better pics of the real cars twin Supercharged 392 Hemi..... For model building on a completely different model that I'm planning and building....
|
|
|
|
Post by Hemi on Aug 16, 2016 17:55:12 GMT -6
OHHHH thats AWESOME!!!!!
|
|
|
|
Post by Hemi on Aug 9, 2016 7:23:03 GMT -6
Thanks guys! On the landau top I just lucked up on paint color. I'll look to see what it is. Bert, I'm not worried about the color! Its the texture you achieved with it!!!! That looks GREAT man! |
|
|
|
Post by Hemi on Aug 7, 2016 21:38:43 GMT -6
ever have one of those ideas for a build and start with all going good and that one part you need you just cant seems to find welp folks the c body popped up thanks hale now i have a need for a hemi block and trans from either a amt 68 gtx,roadrunner or superbee tried mixing stuff from revell and amt don't work blocks to short with the revell charger peices so need those parts from the amt kits i know it aint a show rod but thought id see Just checking in to see if you may have gotten that Hemi block and transmission? I have a choice of Automatic trans and 4 speed Manual.... Let me know. |
|
|
|
Post by Hemi on Aug 7, 2016 21:36:56 GMT -6
-I appreciate it in any case, BUT I am not interested in ALL of it, I am only interested in the 2 exhaust manifolds..... I'll save and circle them in paint and re-post them to clarify if you need me too! As I don't want ALL of it, only the 2 small parts! Let me know! HI my apologies again... I dont come to this site much but I will take a look on that and i can check if i to still have them ... if so then we can work it out. Thanks again . No problem I too haven't signed in in awhile myself! I just noticed something, these 1/16th or are they 1/25th? IF they're 1/16th, I may have to pass, as I was thinking they were 1/25th scale! I'm sorry about that! |
|
|
|
Post by Hemi on Aug 1, 2016 8:00:50 GMT -6
-VERY NIICE!!!!! How on earth did you accomplish the leather-like roof covering?  I just gotta know!!! |
|
|
|
Post by Hemi on Aug 1, 2016 7:58:37 GMT -6
Body needed and gotten THANKS Bert! This topic can be deleted, or locked! -Thanks!
|
|
|
|
Post by Hemi on Jul 26, 2016 18:17:08 GMT -6
Thanks guys! As I can I'll add in Tutorials as they come to me.... Its a matter of knowing what I do thats useful and whats not.... Sometimes, is the biggest thought to what could be used by others and whats just tricks of my own....
|
|
|
|
Post by Hemi on Jul 18, 2016 19:58:00 GMT -6
Different..................but NICE!
|
|
|
|
Post by Hemi on Jul 14, 2016 9:28:47 GMT -6
HI, I m sorry for not getting back to you, Hemi... I asked for 20.00 but I am willing to go down for 15 plus shipping... I am not sure where I had placed the pieces some where, I will look for it if you are interested. PM me then  -I appreciate it in any case, BUT I am not interested in ALL of it, I am only interested in the 2 exhaust manifolds..... I'll save and circle them in paint and re-post them to clarify if you need me too! As I don't want ALL of it, only the 2 small parts! Let me know! |
|
|
|
Post by Hemi on Jul 14, 2016 5:09:25 GMT -6
Then, I mentioned to drill the holes for the supply and carburetor fuel lines. Here they are:  Then, I went ahead and made the fuel line from the pump, to the carburetor.  I bent my own line, and made my own fuel filter "in-line", and added it and then went back and painted the line a aluminum color, as the real counterpart would have been. Difficult to give a "shopping" list when most of this was "scraps" I had laying around. The rod is Evergreen Scale Models Styrene plastic Rod thats .100 inch in diameter. The rectangular stuff, is scraps, chosen by its size, to match that of the engine in 1/25th scale! Hope this helps! Enjoy..... |
|
|
|
Post by Hemi on Jul 14, 2016 5:09:05 GMT -6
So you guys, ever go to detail an engine, to add the piping from the mechanical fuel pump to the carburetor, EVEN fuel injection, and when ya go to look for the mechanical fuel pump the model has none on the engine? What ya do? Here's the way I do it. You have the engine:  See in the picture showing "pointing" there is no fuel pump on the model. SO, then you left high and dry, literally, OR you can add an in-line electrical fuel pump, I suppose, BUT thats not a good "detailing" of an engine, not to me at least. Or well at least not good detailing on Stock or "street rod" building. Then, I went to look, this motor had none period, it wasn't broken off or not added at all. It simply did not have that detail made from the factory! SO, then John goes on a hunt to see what I have in my "scraps" (and yes, I have on HECK OF A PILE/Stash of scrap plastic, sheet, and shapes.) I find I have some to use for making something.... Turns out, I have a bit of it, not only short scraps, but full lengths of stuff. You could even go as far to make this part from sprues! The best I can give ya is the following, look for some flat stock, and some round stock! The round stock:  Turns out this was a pretty long section (over 4 inches long) that was out of my Evergreen Scale models styrene shape supply. Its .100" Rod. You take that rod, and put a slice in it on an angle, like so:  Slice this about 3/4th across the "round" end, and about twice as long down the length of the diameter of the rod (hope that makes sense!) This slice will then be filled with the hanger. The hanger part/portion needs to be square, and able to be trimmed. As you'll see. I found what I needed in my scrap stash of really small sections of styrene plastic! Granted, your best choice is to find something flat, rectangular to fit in the slice you cut into the rod, not extremely tight, but snug. Glue with your choice of capillary glues, (I prefer Ambroid Pro-Weld, but you can't get it anymore), SO my second choice is Tenax-7R. Allow to dry. at a 90 degree angle, remember the rod part has to "hang" and the flat rectangular part is the hanger that is mounted to the engine slightly above the crank center!  Now, you made that slice in the rod, the end of the rectangular part and down the side of the rod, has some "openings" needed filled in, trim the rectangular strip on the "top" add a small drop of CA (I prefer Krazy Glue) and a dash of baking Soda, file/sand to shape and thats done, then onto the slice down the side of the rod, do the SAME thing add CA to the slice opening, and a dash of baking soda file/sand to shape done! See:  Now as I said, this was all done, and everything left "long". You have to go back and trim things to be in scale to the engine.  See the rod is trimmed, short, but looks about right, when you see it on the engine, you'll see what I mean by "looking right". Be sure to drill the hole(s) for the fuel line to the carburetor, or fuel injection, as well as the hole doe the supply from fuel tank! As once on the engine, its a bit more difficult to do at that time (My first one taught me that issue!). The rectangular part however leave LONG! It has to fit into a oblong hole made into the engine block to fit it and then be filled in around. Here is the oblong hole in the block, notice the location, slightly above the crank and below where the fan pulley/cam is located.  Now, what it looks like in place, and have had filler added. I had to go back and repaint the engine block to match, and then go and paint the fuel pump.  And now painted:  |
|
|
|
Post by Hemi on Jul 7, 2016 0:07:48 GMT -6
Agree'd -----^
|
|
|
|
Post by Hemi on Jul 7, 2016 0:06:38 GMT -6
NICE! I'm not "set up" right this moment for Milling, BUT I use my Unimat extensively...... I have planned to go a i-6 Cummins for in pick ups (Yeah in the Rams) both a 5.9L and the 6.7L as I think the V-10 in the VTS Rams is way over used..... Sadly, there ARE other good engines by Dodge to go in those trucks.... I also have the means to make a resin 5.2L V-8 "318" BUT with the Magnum valve covers (they're different then those found on the old LA small block 318's so.... Which I also have them molded in resin!GAWD talkin' tools, I'll just keep my mouth shut.... I got WAY to many in the eyes of some, and some REAL "machines" to work side by side for different tasks.... Moto Tools, you mean "Dremels" ? Good Lord, thats a tool NO model builder should be without I own at least one of every model they made! EVEN the Table Saw, & the Wood Lathe!!!! Altho, I have to say, I LOVE my Unimat, that thing is unstoppable in a Hobby Den! |
|
|
|
Post by Hemi on Jul 2, 2016 13:25:51 GMT -6
I heard (NEVER tried) but soaking the whole model in luke warm water helps glue joints soften. I use ELO too, and it ALWAYS works for getting seams to un-glue.
Paul, ELO (Easy-Lift-Off) WASN't a Floquil product, Floquils version was called "Dio-Sol" but, anyway is now part of the Testors line as Floquil was dropped from the Testors "line-Up" of paints! MOST know it by now, but Boyd, Floquil, Poly-S (Poly Scale), Pactra, were all bought out by Testors some time ago, and was part of the product line of Testors. However A LOT of the "Boyd" paints were made into the Testors "Model Masters" line-up, as well as the Floquil stuff, also now part of the Model Masters stuff, and then certain colors of the Poly S brand went into the Testors brand/type of Acrylic paints, and I THINK Pactra went into the "Standard" Line-up of Testors paints and some of all these old "Companies", was spread across the Testors entire product line....
The original "ELO" was a Poly Scale product!
|
|
|
|
Post by Hemi on Jul 1, 2016 13:41:23 GMT -6
So Paul you machined a set out, or hand-built them? I have a Unimat and use it A LOT! so, this is what its lookin like what I'm gonna have to do to get these to look the part....
|
|
|
|
Post by Hemi on Jun 30, 2016 17:28:05 GMT -6
DAMN! LOL I think I'll set out and machine my own from solid Styrene, (was trying to save my self some work), but...... I'd LOVE to know where Competition Resins got the masters for those they have up for sale!
|
|
|
|
Post by Hemi on Jun 30, 2016 14:29:12 GMT -6
The Piranha covers have the angled tops also. The AMT 1970 Pro Street Super Bee come with the parts to make the experimental Chrysler DOHC. Wide pretty flat hemi covers in it. Don't have one to look over in my stash though. Paul Paul, Figures!!! I need them to be the "Moon" types..... The DOHC Hemi covers, I have, I bet I have 6 or 8 of those in plastic, never mind those I have molded!!! I'm looking for the full top finned ones for the 392 Hemi. MAYBE I'm looking for the wrong Hemi too....... The 331 Red Ram Hemi "Moon" covers would work, OR the 354 Hemi "Moon" covers would work... Slightly different in size, but the "look" is the same! |
|
|
|
Post by Hemi on Jun 29, 2016 21:42:15 GMT -6
-Did a quick search on the AMT '57 Chrysler 300, they're just finned versions with the angled top edges... I have these as well!
|
|
|
|
Post by Hemi on Jun 29, 2016 21:38:27 GMT -6
The AMT '57 Chrysler 300C **custom** version kit has some finned valve covers in 1/25, but iirc they are similar to the Revell Willys covers. Not sure I've seen any that are "flat" on top and completely finned like those resin ones. Brian Brian, I've never seen the '57 Chrysler 300 "Custom" kit..... I'll have to look an see what those may consist of! |
|
|
|
Post by Hemi on Jun 29, 2016 21:37:21 GMT -6
I hear you. I looked through about 40 kits and first thought the original issue Piranha had them, close but not cigar. So then, my next question would be, can you post me a pic of what those in the Piranha kit look like? I ask as if they're something closer then what I HAVE, I may search out ones like them! As my pickins right now are lookin' pretty slim! |
|
|
|
Post by Hemi on Jun 29, 2016 19:00:03 GMT -6
Thanks! As for what kit that would have them would be any of the older Drag racing kits, (That I know of) I am unsure as to what kits that do actually to spell out an actual kit with them.... -I just recall seeing them at one point just can't remember what kit it may have been! These are in the Revell Willys kits, either the Big John, the Stone Wood s Cooke and the Street Machine. Theses are closest to the covers ? I don't recall the full rib covers in any of the older kits and I looked through my collection of drag kits going back to 1970. Paul -I have those 392 Hemi valve covers.... And they're not right.... HOWEVER, in researching, the "Moon" type had to have been made at some point.... Our member "RatRod" posted the Competition Resins part for them.... 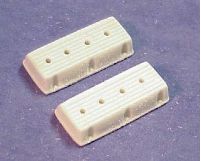 Seen and bought here: 392 Hemi "Moon" Valve CoversBUT The issue with those is, they're resin, they don't or won't be easily but-joined to make a V-10 Valve cover from. and I'm not sure how well the resin would take "body work" to make them smooth and such, I KNOW what I need and have to do on plastic to make this happen.... I may have to sit this one out "kitbashing", and Mill my own part, as thats what its looking like...... -As I'm to hard headed and stubborn to settle for less then what I'm trying to achieve even knowing those Moon valve covers do exist, but where and on what model is the real question! |
|
|
|
Post by Hemi on Jun 29, 2016 8:48:32 GMT -6
Thanks! As for what kit that would have them would be any of the older Drag racing kits, (That I know of) I am unsure as to what kits that do actually to spell out an actual kit with them.... -I just recall seeing them at one point just can't remember what kit it may have been!
|
|
|
|
Post by Hemi on Jun 26, 2016 21:18:20 GMT -6
I tell ya, I don't know where or how I'd put them! LOL There isn't a lot of choices, I even had a difficult time with the chains never mind "straps".....
|
|
|
|
Post by Hemi on Jun 26, 2016 20:24:02 GMT -6
Nice paint would you call it magenta?,it looks righteous. Thanks!!!! The paint is actually a Chrysler color, Dodge called it "Panther Pink" Plymouth called it "Moulin Rouge"..... |
|
|
|
Post by Hemi on Jun 26, 2016 18:03:51 GMT -6
So then, as you all can see, I got a LOT of detail into this build, and you all watched it come together, (I have to say all things considered) I am very pleased with it. Heres Daisy Duke's Jeep "Dixie" COMPLETED!!!!!!             And there ya have it....... a SAVED build from, start to finish..... (I have to say, its feels GREAT to have completed yet one more model, thats been in the works for over a year now, with a few issues and bumps along the way, but as said several times throughout the build this model was a glue bomb when I got it, and it was old...... SO I restored what was needed, replaced what was missing, and made it as close as I could to the real Dixie (Even tho it really isn't even close to the real one) I'm happy with it............ Enjoy! Going to resurrect Daisy Dukes Jeep! COMPLETED 6-4-2016!!! |
|


 I just gotta know!!!


