|
|
Post by rocketeer on Aug 11, 2008 7:38:01 GMT -6
I really like the central spine in the hood area.
I don't know anything about how showrods are built. Will all the seams be welded solid before proceeding? And the next step is Bondo? How thick will the Bondo be? I notice the rear fender contour is not a smooth curve--would you typically build that up smooth with Bondo, or would you do some metal-shaping to get it smoother?
|
|
|
|
Post by rocketeer on Aug 11, 2008 7:31:11 GMT -6
If you were using baking soda and super glue as a filler, well, that sometimes acts strangely after a loooonnnnng time. One of the reasons I don't use it any more.
|
|
|
|
Post by rocketeer on Aug 7, 2008 21:42:56 GMT -6
I love the sloping-down-at-both-ends look. Makes it look really tied down to the ground.
|
|
|
|
Post by rocketeer on Aug 6, 2008 12:47:54 GMT -6
Why not an Allard-style split front axle? The front axle is cut in half. Each half is pivoted to the chassis at the inboard end. Add a coil spring near each wheel and the usual radius rods Cheap and easy independent front suspension (although the camber changes a lot as the wheel goes up and down). There's a big picture of a red car going around a corner about 1/3 of the way down here that shows the front suspension fairly well: community-2.webtv.net/raydonggp/PeacockBlue/ |
|
|
|
Post by rocketeer on Aug 5, 2008 17:53:16 GMT -6
also I'm not sure if the later issues come with the exhaust manifolds that feed to the outside of the hood opening (?) Starry Eyes That issue, in yellow, has the Blue Beetle-style exhausts. But you reminded me: the exhaust tips on the Beetle are trumpet-style, and I think the yellow truck has simple slash-cut exhaust tips. Oh, and the Beetle has brake backing plates, too--i think you could adapt Little Coffin stuff to fit. |
|
|
|
Post by rocketeer on Aug 5, 2008 7:15:21 GMT -6
Wow, that worked nicely! Where'd you get the tubing?
|
|
|
|
Post by rocketeer on Aug 5, 2008 7:12:20 GMT -6
I remember a million years ago Model Car Science had a little article on that--the gist of it was that you used a piece of real lace as a mask. Did it myself on an old--poop, I forgot the name--the Tom Daniel mid-engined El Camino funny car--anyway, it worked fairly well.
|
|
|
|
Post by rocketeer on Aug 5, 2008 7:10:03 GMT -6
It's the same basic mold. For the engine, you'll need a set of Cadillac valve covers (AMT 49 Ford) and a six-carb setup (the one from the Little Coffin can be adapted). For the interior, you'll need a pair of rounded bucket seats (don't know a current source) and a round-topped roll bar. For the chassis, you'll need front steel wheels (Predicta) and rear five-spokes (Little Coffin) with whitewall tires (slicks in back). I think Replica and Miniatures of Maryland sells resin copies of the scuba gear. Good luck!  |
|
|
|
Post by rocketeer on Aug 1, 2008 7:31:30 GMT -6
Where did that motor come from? I don't think I've ever seen a 1/8th scale six-banger.
|
|
|
|
Post by rocketeer on Aug 1, 2008 7:26:01 GMT -6
|
|
|
|
Post by rocketeer on Jul 29, 2008 21:10:54 GMT -6
I also saw it at Wonderfest and it was incredible, as was the space girl! (Please post that one - nice chrome!) As a matter of fact, we spoke briefly on Sunday - we were discussing the models that got merit awards and you pointed out your space girl. Back when I finished her, I posted pics of the space girl to this board. ;D Here they are: coffincorner.proboards89.com/index.cgi?board=completed&action=display&thread=5373The chrome rocket is Al-Clad over Tamiya black. It was a pain to do; I painted it three or four times, and finally figured out that I was going to have to polish the black before spraying the Al-Clad. Even now, I'm so scared that I'll scuff it that I built a special holding bracket for transporting the model, to avoid touching the rocket. I vaguely remember our exchange--but by then I was pretty pooped, so I'm sure I wasn't any too charming. |
|
|
|
Post by rocketeer on Jul 27, 2008 11:33:19 GMT -6
A little followup: I took the Aircar and a couple figure models (my four-armed Bride of Frankenstein and my purple space girl sitting on a rocket) to Wonderfest and to my surprise, won a couple awards! The girls took bronzes and the Aircar got a silver.  |
|
|
|
Post by rocketeer on Jul 27, 2008 11:29:45 GMT -6
How about gun and steering controls mounted on armrests projecting forward along the sides of the passenger area?
|
|
|
|
Post by rocketeer on Jul 27, 2008 11:26:31 GMT -6
Oh, Little Coffin, what have they done to you?   I've got this pic on an old calendar--this girl fueled a lot of fantasies way back when...  |
|
|
|
Post by rocketeer on Jul 16, 2008 8:04:08 GMT -6
My god, that project is moving fast! Don't you ever sleep? ;D
|
|
|
|
Post by rocketeer on Jul 16, 2008 7:55:02 GMT -6
I belong to PSAMA (Puget Sound Auto Modelling Assn), based in the Seattle area. We've been putting on a yearly contest for, um, nineteen years now, and we'd been in existence for several years before that. We started out meeting at people's houses, in an informal rotation, but now we usually meet at the local library, except for our July picnic at my house and the December meeting, which we usually hold in the super-garage of a local rich guy one of our members is good friends with. At a normal meeting we get ten or twelve people; our show usually runs about 250 entries. Like any club, a few guys do the work; but hey, there isn't much work to do. An occasional letter I send out to remind everyone of the meeting and that month's meeting theme ("No Substitute for Cubic Inches", "Summer Fun", etc), and working at the show--but we've been doing that for so long that everyone knows their job and just does it. Everyone is pretty mellow--the Type A personalities all got impatient and wandered away, and now we're just a bunch of easy-to-get-along with Type Bs.  |
|
|
|
Post by rocketeer on Jul 15, 2008 20:31:24 GMT -6
But, but, but, your workbench is so neat! It's unnatural! Truck looks good. I like the front-mounted blower setup. |
|
|
|
Post by rocketeer on Jul 15, 2008 20:25:07 GMT -6
No secret at all: EasyCast clear casting epoxy, bought at Michael's. It seems to work well enough; it's very transparent when cured. It does take a long time to completely cure, though: at least a day before you can pull it from the mold, and several more after that until it's fully hard. The slow setup time means that your mold has to be leakproof, because it stays liquid so long that it'll all run out if it sees a crack. I'm doing the tinting with a little set of liquid dyes my wife bought me for my birthday; they're intended for use with polyester resins, but work fine with the epoxy. One drop red, twelve drops yellow. I'm gonna run out of yellow long before I run out of red. |
|
|
|
Post by rocketeer on Jul 14, 2008 7:11:28 GMT -6
Over in the "What to do with a Lindberg Auburn" thread, I promised to make copies of the clear flames for several people. I'm still working on it, and it's going real slow. I'm having a lot of trouble getting good castings, and about half my pours are ending up with the 1/8 inch at the tip missing. At this point I have five presentable ones. I'll keep pouring and poking out bubbles and cursing, but towards the end of this week there'll be a short hiatus while I attend Wonderfest. Due to the trouble I'm having with this, I'm going to have to stop taking more orders. I have requests from Dr. Kerry, Tim Nolan, The Flame, and A.J, and I have every intention of filling those requests, but that'll be all. So you lucky ones will have Valuable Collectible Limited Edition Flames. (oooooooh, aaaaaah) |
|
|
|
Post by rocketeer on Jul 14, 2008 7:02:16 GMT -6
Thanks to everybody for the kind words. The color is a pale yellow, mixed from Testors bottle paints and sprayed through my trusty Badger 250, then overcoated with Tamiya clear. I looked through every paint rack in every hobby store in the area, but couldn't find anything just right. I hate airbrushing (too many chances for something to go wrong  ), but finally gritted my teeth and did it. |
|
|
|
Post by rocketeer on Jul 13, 2008 20:02:26 GMT -6
I'm really really impressed by the exceptionally neat job of painting the moldings and interior and top trim. Nice job! What kind of masking tape did you use?
|
|
|
|
Post by rocketeer on Jul 13, 2008 19:41:41 GMT -6
After a major thrash yesterday evening and this morning, the aircar is finished. No engine yet, but heck, I may never put an engine in it. That's what hoods are for: to hide your laziness. Aaaaand pics: 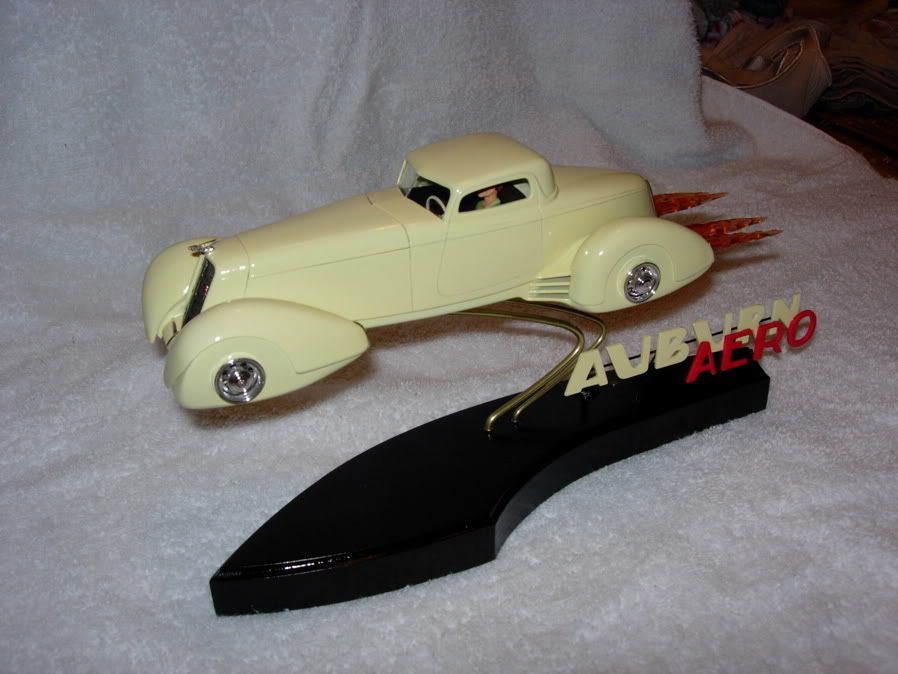 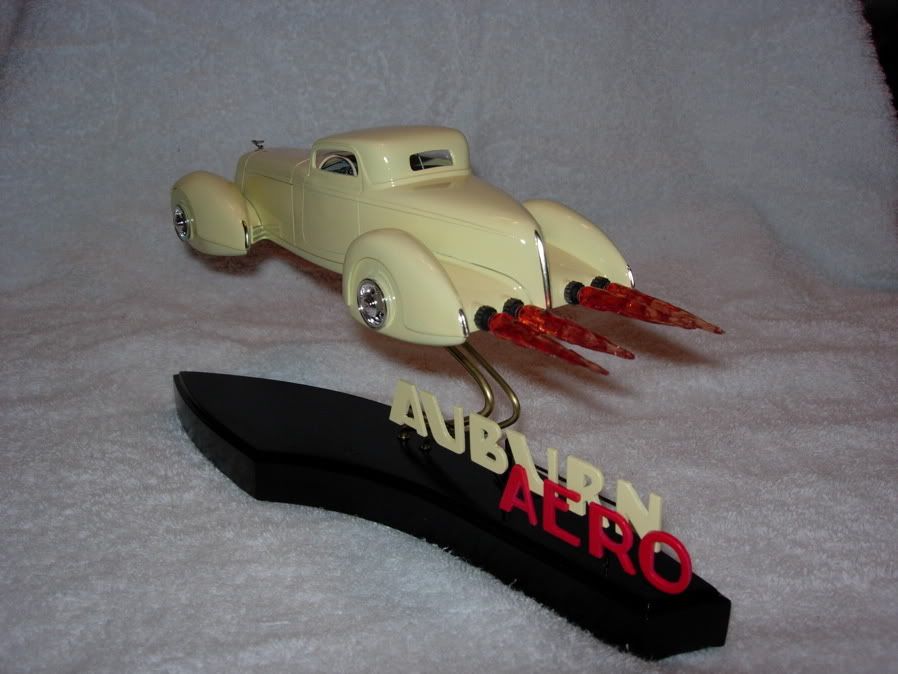 The centers of the "wheels" light up with a color-changing effect (done with a 2060 chip driving three-color LEDs) and the rocket flames light up, too--not very brightly, but certainly noticeable in a dim room. The battery and switch are in the base and the power travels up via the two swoopy brass rods. |
|
|
|
Post by rocketeer on Jul 7, 2008 12:54:49 GMT -6
These "little somethings" are getting stranger and stranger. I'm waiting for the rocket-propelled barstool! |
|
|
|
Post by rocketeer on Jul 7, 2008 12:53:41 GMT -6
Wow, the cowl is separate, eh? How interesting.
|
|
|
|
Post by rocketeer on Jul 7, 2008 12:52:47 GMT -6
...Well, in smoothing up the engine halves I managed to drive a blunt end XActo blade into my thumb...yeah! That one hurt a bit and bled a lot. It's pretty much standard procedure around my place that when popping apart a gluebomb I'll plunge a knife into my finger. Something about the massive forces needed to break half-a-tube-of-glue-applied -by-a-berserk-thirteen-year-old joints.  I hate gluebombs.  |
|
|
|
Post by rocketeer on Jul 6, 2008 13:19:59 GMT -6
I really like what you have going on now! You did a killer job casting those flames! I'd love to have a couple of those too in the future if you can spare a couple! I'd be glad to reimburse you for resin/time! Thanks! SO WHAT ARE YOU DOING WITH THAT ROOFLINE? ;D The roof remains the same. Stay calm; it'll grow on you. ;D So far, Dr. Kerry, Tim Nolan, The Flame, and A.J. have requested exhaust flames. I just finished making a triple mold, so I can cast three at a time; less wasted resin that way. And I poured a set this morning. But the resin takes a good solid 24 hours to set up, and the mold is kind of fiddley--the castings want to have air bubbles--so I'm not sure whether I can count on getting three good castings consistently. I guess what I'm trying to say is that it may take a bit before you get your flames. And it's going to take even longer if I don't have your address I have Kerry's, but the rest of you ought to PM me with your mailing addresses. At this time I don't plan on charging anything, but if I find myself devoting all my free time to making flame castings, that may change. |
|
|
|
Post by rocketeer on Jul 5, 2008 9:51:12 GMT -6
Looks really promising! |
|
|
|
Post by rocketeer on Jul 5, 2008 9:43:12 GMT -6
Drop me a line (I've unhidden my email address) and I'll send you a couple. It may take a while, since I only have the one mold and the resin takes a day or two to set up.
|
|
|
|
Post by rocketeer on Jul 4, 2008 17:12:41 GMT -6
It's the old Car Craft Dream Rod. They're removing all the bodywork that was added when it was converted to the Python (a Hot Wheels car!) and returning it to original Dream Rod configuration. Heckuva lot of work.
|
|
|
|
Post by rocketeer on Jul 4, 2008 15:42:18 GMT -6
A small update: I've been doing the infinite prime-putty-sand cycle lately, and building a bunch of small details. As of this morning, the body and underpan are in final primer, and the underside of the hood and inside of the engine compartment are painted the final color, a pale yellow (I wanted a color that said "Thirties"). I've also built a few details. This first blurry picture purports to show the seat and the driver. I had to "scoop out" the seat's bottom cushion to get the driver to sit low enough. (I didn't just lower the seat, like all you guys are thinking I should have, because I like the way it interfaces with the package shelf area.) The driver is assembled from Preiser "Eve" bits, with a Milliput dress. The (ahem, unnatural) color is just an undercoat; her final fleshtones, etc will be done in oils, which work really well for fleshtones and other things where you want to blend colors together.  The next picture is better:  The four dark doodads are Buck Rogers-style rocket exhaust nozzles, built from Plastruct tube and rod, and the four orange things are flaming exhaust plumes. I dug out an old Hawk Atomic Bomber kit which had neat-o exhaust flames molded in clear orange, then poured a mold and cast four plumes in clear epoxy resin, tinted orange. They turned out really well. Each exhaust will be lit by an LED. If anyone here would like a plume or two, drop me a line. Off to the side is the steering wheel (duh) with its aircraft-style control column. |
|


 ), but finally gritted my teeth and did it.


