|
|
Post by ira on Nov 23, 2011 14:16:43 GMT -6
Got the final coat of Primer on...  |
|
|
|
Post by ira on Nov 23, 2011 15:44:38 GMT -6
Question for ya, Ira: How big are those eye sockets? (And/or the entire skull, itself?) Any chance of getting an image of that modded skull with, say, a common coin near it for comparison? (Thinking about possible future eye lights, is why I'm asking.) The SKULL is as tall & deep as a quarter and you can slide a dime inside it. Not quite as wide as a quarter. The eye sockets are about 3/16" D. |
|
|
|
Post by ira on Nov 23, 2011 16:28:00 GMT -6
I painted the body with Testors Diamond Dust Silver and Tamiya Mica Blue.  I am looking forward to applying the SKULL Decals, this should be fun! |
|
|
|
Post by ira on Nov 23, 2011 16:56:17 GMT -6
I cut off the front of the frame and then cut 1/2" from the center. Glued it back together and put bracing in to strengthen the joint. This will allow me to mount the rear tires and tuck them in under the body.  |
|
|
|
Post by Wardster on Nov 23, 2011 20:52:17 GMT -6
|
|
|
|
Post by ira on Nov 24, 2011 13:26:50 GMT -6
Thanks, Those tire inserts look like a good idea! |
|
|
|
Post by flounder on Nov 24, 2011 20:39:34 GMT -6
Hey Ira,
Great Build. Also reminds me of the Super Digger - one of my favorites. You are doing a great job with the conversion!
Flounder
|
|
|
|
Post by ira on Nov 25, 2011 10:20:24 GMT -6
Hey Ira, Great Build. Also reminds me of the Super Digger - one of my favorites. You are doing a great job with the conversion! Flounder Thanks for your kind comments Scott! |
|
|
|
Post by ira on Nov 25, 2011 18:34:17 GMT -6
Here is the first SKULL decal I applied on the body. It would have been easy on a flat surface but these contours were a challenge. I cut the decal in several places to reduce the stress and allow it to lay down a bit. Using wet and dry Q-tips, and a sharp blade, eventually I got the decal to lay down pretty good.  The Slixx Decal held up pretty well during the process and should look Great after touch-up and the clear coat is applied. |
|
|
|
Post by Tim Nolan on Nov 25, 2011 22:10:54 GMT -6
Nice progress on this Ira!! It looks great!!!
|
|
|
|
Post by ira on Nov 27, 2011 0:23:02 GMT -6
Nice progress on this Ira!! It looks great!!! Thanks Tim! |
|
|
|
Post by koffinbuilder64 on Nov 27, 2011 0:53:24 GMT -6
Lookin very kool Ira!!
|
|
|
|
Post by ira on Nov 27, 2011 11:37:10 GMT -6
Thanks Daniel, Glad you like it! |
|
|
|
Post by ira on Nov 27, 2011 17:42:52 GMT -6
I found a great seat for the ZZZ-28 Dragster in the Streetfighter kit. This seat will probably fit nicely in most Deals Wheels Interiors too! I had already cut the seats out of another interior so it was easy to sepparate the 2 seats.  Fitting to the Deals Wheels interior is pretty easy! I cut down the seat a little more for a better fit.  Here is the seat in place...  |
|
|
|
Post by ira on Nov 27, 2011 22:07:18 GMT -6
Test fitting the Skull Driver...  I think he looks pretty comfotable, don't you? |
|
|
|
Post by ira on Nov 28, 2011 10:03:04 GMT -6
Here are the Shotgun Scoops in place on the dual Superchargers...  |
|
|
|
Post by Wardster on Nov 29, 2011 3:13:19 GMT -6
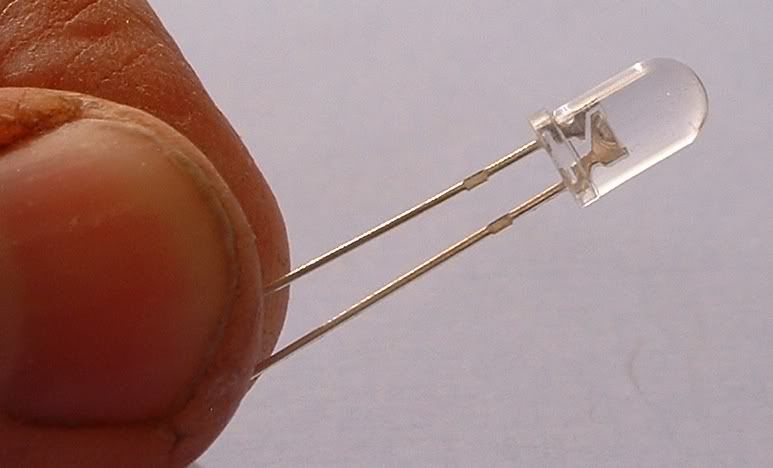
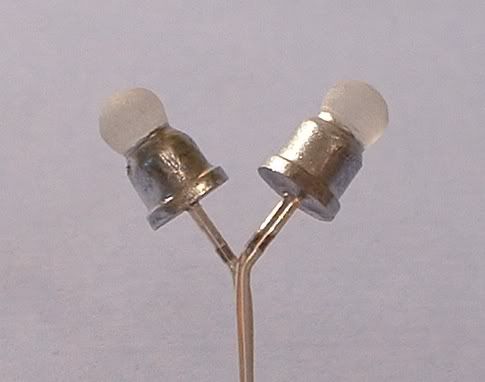
"And now for something completely different..." In private e-mail, I had volunteered to cook up some eyeballs for this project, if Ira was cool with me doing that. He was, so for those that didn't already know what an LED is supposed to look like, here's a shot of an unmodded LED:  ... and a shot of the main modifications I made to a pair of them:  ... and a shot of how they look, lit up, after a bit of additional painting:  They still have some touch-ups I need to do, and I need to put a resistor in series with them to limit the current flow to a safe and reasonable level (and also to knock down the light output! The yellow to orange to red "fade" isn't visible at all, in this image; but is there, "in real life") ... but for now: you guys get the idea. I'll keep piddling on these, a bit more; then, will mail them to Ira, so he can plop them into his amazingly, inspiringly cool project. For anyone wondering: here's a few LED-related tips. The main thing I'm demonstrating here is that you don't have to leave LEDs just as they come in the package. You can gently sand the outer plastic surfaces, to get a more "frosted" effect. You can (again, gently) grind away some of that plastic, if you so desire. Or you can add some epoxy resin (or glue) to alter the shape, somewhat. ('Toon "sausage eyeballs," anyone!?) You can paint over part of them, with something like opaque paints (I used Testors square bottle Silver, here; and will add black over that, later) if you want to hide part of the "way too bright" inner portions. (Angling the LEDs slightly away from pointing at the viewer also helps with cutting the "My Gawd, I've gone blind!" bit.) All of which I did to this pair of LEDs, to knock the light output down; diffuse it over a more fully rounded (appearing) surface; and just generally make it look like it's not a normal, everyday, vanilla, right out of the package LED. Although I didn't use them here, you can tint the outer surface by using the usual suspects -- such as Tamiya's clear acrylic paints, etc. After trying a bunch of stuff that didn't really work out well, for what I wanted (dying epoxy, mostly) I simply drew on the frosted surface with colored Sharpie markers. Right now, it's getting hard to draw additional layers of Sharpie on, without the "new layer killing the old layer" marker problem; so, I'll likely give this pair of eyes a blast of Testors dullcote spray, tonight; and can then draw on them some more, sometime tomorrow. Anyway ... sorry for the interruption. Now, back to your regularly scheduled program, already in progress ... :-) -- Ward Shrake -- |
|
|
|
Post by ira on Nov 29, 2011 11:40:57 GMT -6
[glow=red,2,300]The LED Eyes are looking good Ward![/glow]  Are they ready yet? .........................How about now?  |
|
|
|
Post by ira on Nov 29, 2011 12:15:09 GMT -6
The Deals Wheels hands look to small for the SKULL Driver. I am trying to make a Scary Skull Hand. This is the first attempt.  I made it with solder, Zap-A-Gap and baking soda. Then I applied a coat of filler/primer to seal it. This hand might be a little too big... back to the work bench. |
|
|
|
Post by Wardster on Nov 30, 2011 2:08:21 GMT -6
[glow=red,2,300]The LED Eyes are looking good Ward![/glow]  Are they ready yet? .........................How about now?  Ha! For those "watching over our shoulders": Ira and I have been firing e-mails back and forth, lately, about the eye lighting needs. We may be abandoning the earlier set (as seen above) and going with a more "beady little red eyes" set, which matches those decals better. I'll let Ira fill in all the details, though, when he has the eyes (LEDs) in his demented, err, talented little hands! Frankenstein lives!  |
|
|
|
Post by ira on Nov 30, 2011 12:40:30 GMT -6
Here is a shot of the body with the rest of the decals in place!  |
|
|
|
Post by scotttansley on Dec 1, 2011 6:31:55 GMT -6
Very cool Ira.
|
|
|
|
Post by ira on Dec 2, 2011 2:09:40 GMT -6
Made some progress on the SKULL Hand...  I cut down the length of the fingers, then I coated the hand with "Aleene's Tacky Glue". 12 hours later I made Knuckle "bumps" on the fingers with a toothpick and dots of Tacky Glue. After the glue dried I painted Hand and SKULL with white acrylic paint. The paint on the hand dried and cracked all over. I like the cracks! Then I sprayed the hand and SKULL with Testors Dullcote.  Next I'll try some a little dry brushing and shading on the SKULL and Hand. [glow=red,2,300]STAY TOONED!!![/glow] |
|
|
|
Post by Wardster on Dec 2, 2011 18:59:41 GMT -6
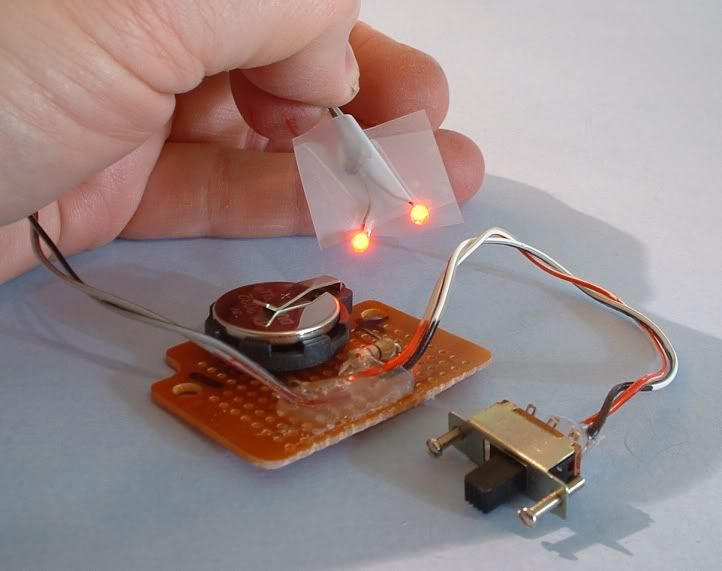
Here's a shot of the final lighting system I made for the Skull Driver's eye lights -- with this version using smaller LEDs, and a little PC board, etc. Basically it's just a (semi-) neatly "packaged" pair of small LEDs; a three volt watch battery, with holder; a slide switch; and a 47 ohm resistor. The two LEDs are wired in parallel (instead of in series) so they're both drawing power directly from the battery (as if they were two circuits instead of one) ... with the resistor limiting current flow to a safe level. Anyway ....  I popped this little custom lighting system into the mails, earlier today. They tell me it'll probably arrive at Ira's place on Monday. |
|
|
|
Post by ira on Dec 2, 2011 21:27:09 GMT -6
[glow=red,2,300]The LEDs Look GREAT!!![/glow]
Looking forward to trying them out.
Thanks Ward!
|
|
|
|
Post by Wardster on Dec 3, 2011 3:32:58 GMT -6
[glow=red,2,300]The LEDs Look GREAT!!![/glow] Looking forward to trying them out. Thanks Ward! You're welcome, man! Holler back at me, when they arrive ... but for the most part, it'll probably pretty self-explanatory. The two things I imagine you'll notice right away are: you'll see, when you have them in person, that LEDs are very "directional". The brightest light output is when you're looking directly at one of them ... which means that if one's pointing a few degress "off" as compared to the other one, it'll appear like they're at two different light output levels. So, getting them into that skull may be a bit of a challenge ... and once you do, you'll have to (gently!) bend the metal wires that are going to each LED, to align things. I imagine that's gonna "be fun" ... especially considering the size of the innards of that skull. The tape that's on there, now, is not permanent. (As I'm sure you'd easily guess.) It's just there as a way to show which wires should not touch which other wires. If you want to just wrap a bit of tape around each separate wire, (instead of taping up two at once) that would work out fine, too. Might give you a bit of added flexibility, that way, for aligning 'em. The other big thing is that you may want to spray the lit-up parts of the LEDs with a bit of dullcote, or something, as a diffuser. My (brief) experiments with a different pair of LEDs that tiny told me that the "scuff the case up with a sanding stick" method may be a bit too course, and hard to control, as far as diffusing the light. I didn't try it, but I imagine that dullcote would diffuse them just enough to spread / even the light into less of a pin-point effect. Other than that ... holler at me in e-mail (or here) if you need to! |
|
Deleted
Deleted Member
Posts: 0
|
Post by Deleted on Dec 3, 2011 3:55:00 GMT -6
Awesome paint and decals!
|
|
|
|
Post by ira on Dec 3, 2011 12:13:50 GMT -6
[glow=red,2,300]The LEDs Look GREAT!!![/glow] Looking forward to trying them out. Thanks Ward! You're welcome, man! Holler back at me, when they arrive ... but for the most part, it'll probably pretty self-explanatory. The two things I imagine you'll notice right away are: you'll see, when you have them in person, that LEDs are very "directional". The brightest light output is when you're looking directly at one of them ... which means that if one's pointing a few degress "off" as compared to the other one, it'll appear like they're at two different light output levels. So, getting them into that skull may be a bit of a challenge ... and once you do, you'll have to (gently!) bend the metal wires that are going to each LED, to align things. I imagine that's gonna "be fun" ... especially considering the size of the innards of that skull. The tape that's on there, now, is not permanent. (As I'm sure you'd easily guess.) It's just there as a way to show which wires should not touch which other wires. If you want to just wrap a bit of tape around each separate wire, (instead of taping up two at once) that would work out fine, too. Might give you a bit of added flexibility, that way, for aligning 'em. The other big thing is that you may want to spray the lit-up parts of the LEDs with a bit of dullcote, or something, as a diffuser. My (brief) experiments with a different pair of LEDs that tiny told me that the "scuff the case up with a sanding stick" method may be a bit too course, and hard to control, as far as diffusing the light. I didn't try it, but I imagine that dullcote would diffuse them just enough to spread / even the light into less of a pin-point effect. Other than that ... holler at me in e-mail (or here) if you need to! Thanks Ward! I'll let you know when they arrive... |
|
|
|
Post by ira on Dec 5, 2011 18:51:08 GMT -6
Awesome paint and decals! Thanks Don! Glad you like it. |
|
|
|
Post by ira on Dec 5, 2011 21:05:03 GMT -6
[glow=red,2,300]GOT the LEDs!!![/glow]
Photos coming soon!
|
|

