|
|
Post by ira on Jun 3, 2012 13:14:22 GMT -6
Being a Johnny come lately, I'm assuming that means we have until midnight Monday to get entries posted? Yes, the Cut Off is Midnight Tomorrow...  |
|
|
|
Post by ira on Jun 3, 2012 15:08:29 GMT -6
[glow=red,2,300]BiG PIPES For HOG VETTE!!![/glow] I made the Headers for Hog Vette from Thin-Wall Plastic Tubing. I cut 8 pieces and cleaned up the ends with an X-Acto Knife and Sandpaper. I painted inside the tubes with Flat Black.  I made a Mounting Strip from Plastic and glued it in place. When I glue the Headers in place this will sepparate them from the body.  I cut a couple more strips to cover the backs of the tubes and glued them in place.  [glow=red,2,300]These are Ready To Go![/glow] |
|
|
|
Post by ira on Jun 3, 2012 16:10:32 GMT -6
[glow=red,2,300]HOG VETTE BELLY!!![/glow] I Cut a Belly Pan out of Sheet Plastic and Painted it Black. Then I Cut Strips of Plastic and Glued them to the Inside of the Body. These make Mounts for attaching the Belly Pan.  Here's what it looks like in place... 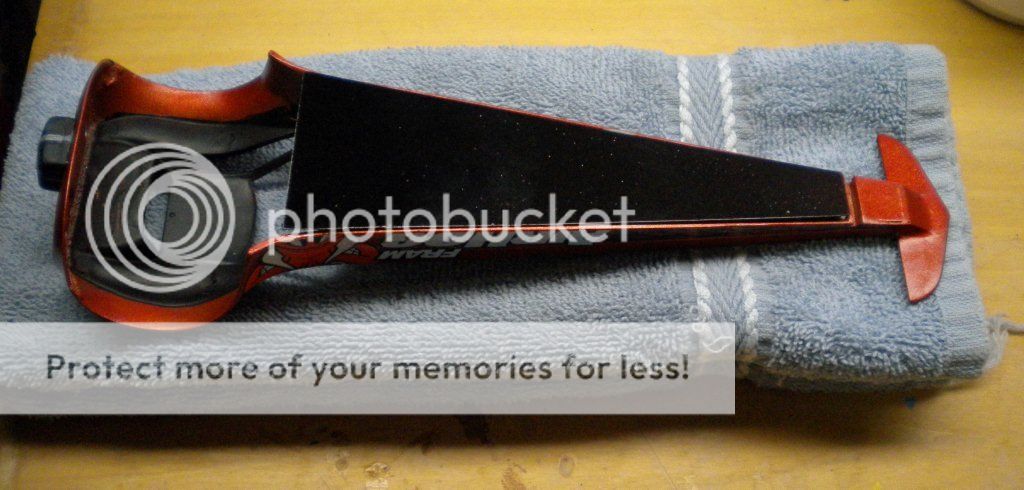 [glow=red,2,300]HOG BELLY PAN...[/glow] ;D |
|
|
|
Post by ira on Jun 3, 2012 16:47:29 GMT -6
|
|
|
|
Post by Mysterion on Jun 3, 2012 17:02:01 GMT -6
I'm just doing a little touch up and finishing a couple of minor details for Commander McBragg and the Big Man. I should have them done tomorrow.
I'm also trying to get a photo display thingy done too.
|
|
|
|
Post by ira on Jun 3, 2012 17:28:58 GMT -6
I'm just doing a little touch up and finishing a couple of minor details for Commander McBragg and the Big Man. I should have them done tomorrow. I'm also trying to get a photo display thingy done too. [glow=red,2,300]THAT'S GREAT DAVE!!![/glow] Really Looking Forward to Seeing the Finished Models! |
|
|
|
Post by Mysterion on Jun 3, 2012 20:25:53 GMT -6
Thanks Ira, the Hog Vette is coming along nicely and quick too. Here is the start of my photo "set". I started with a scrap piece of 1/8" hardboard, spayed a fast heavy coat of flat black and immediately dumped plaster powder on it and dragged it lengthwise to create the blacktop covered with rubber look. I repeated this process 2 more times. Then I mixed up a flat dark grey and shot it with that, followed up with flat black streaks where the tires would launch. For the guard rails I used 1/8" square tube for the uprights and the rails are .040x.188 strips. After assembling the guard rail, I transferred the uprights to the board along the edge, drilled holes for small nails to go up through the bottom and into the square tubing.  Viewed at the right angle with a proper background, it should look OK. I hope to make a christmas tree tomorrow for the final pics, I don't know if I'll find something to make the bulbs out of in time. |
|
|
|
Post by Pat Minarick on Jun 3, 2012 20:32:26 GMT -6
Thanks Ira, the Hog Vette is coming along nicely and quick too. Here is the start of my photo "set". I started with a scrap piece of 1/8" hardboard, spayed a fast heavy coat of flat black and immediately dumped plaster powder on it and dragged it lengthwise to create the blacktop covered with rubber look. I repeated this process 2 more times. Then I mixed up a flat dark grey and shot it with that, followed up with flat black streaks where the tires would launch. For the guard rails I used 1/8" square tube for the uprights and the rails are .040x.188 strips. After assembling the guard rail, I transferred the uprights to the board along the edge, drilled holes for small nails to go up through the bottom and into the square tubing. Viewed at the right angle with a proper background, it should look OK. I hope to make a christmas tree tomorrow for the final pics, I don't know if I'll find something to make the bulbs out of in time. That bike is AWESOME !!!!!!!!! |
|
|
|
Post by ira on Jun 3, 2012 21:35:30 GMT -6
Thanks Ira, the Hog Vette is coming along nicely and quick too. Here is the start of my photo "set". I started with a scrap piece of 1/8" hardboard, spayed a fast heavy coat of flat black and immediately dumped plaster powder on it and dragged it lengthwise to create the blacktop covered with rubber look. I repeated this process 2 more times. Then I mixed up a flat dark grey and shot it with that, followed up with flat black streaks where the tires would launch. For the guard rails I used 1/8" square tube for the uprights and the rails are .040x.188 strips. After assembling the guard rail, I transferred the uprights to the board along the edge, drilled holes for small nails to go up through the bottom and into the square tubing. Viewed at the right angle with a proper background, it should look OK. I hope to make a christmas tree tomorrow for the final pics, I don't know if I'll find something to make the bulbs out of in time. That bike is AWESOME !!!!!!!!! Thanks Dave! Hog Vette will be done by Tomorrow! Yep, That Bike is Awesome!!!  |
|
|
|
Post by ira on Jun 3, 2012 23:20:17 GMT -6
[glow=red,2,300]3 MORE PRIZES For The CAR-TOONS CONTEST!!! [/glow] 3 Vintage Car Model Magazines, Two from 1974 & One from 1971!  These will be autographed by Ira Dahm... |
|
|
|
Post by Wardster on Jun 4, 2012 1:38:43 GMT -6
Okay ... been weeks since I last posted anything, so I'm gonna try catching up on uploading some in-progress pics. I've been somewhat bad about not working on my 'toon project (too many other things going on! Couldn't be helped!) ... and even worse about uploading whatever pics I had been taking, whenever I did get some work in. So, here's a quick reminder of where my little project had left off (as far as these boards are concerned): 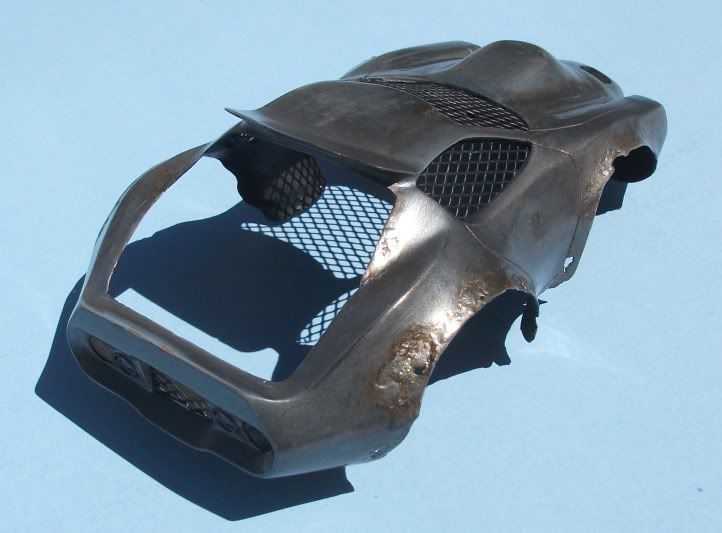 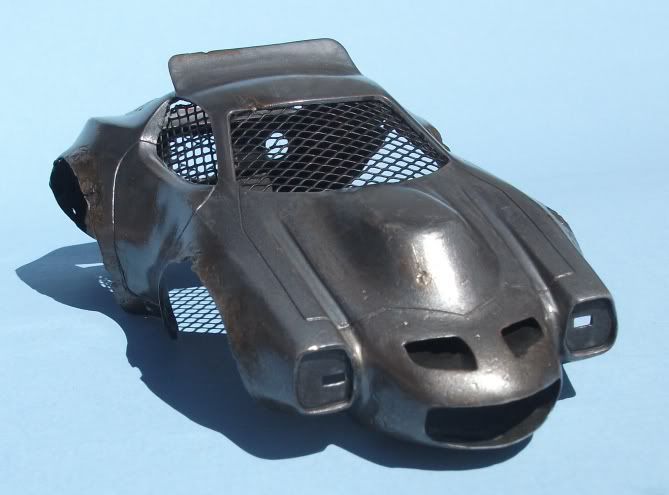 And since I'm catching up on older pics, here's what the "mold" looks like, for making up the shaped intake holes, up front: 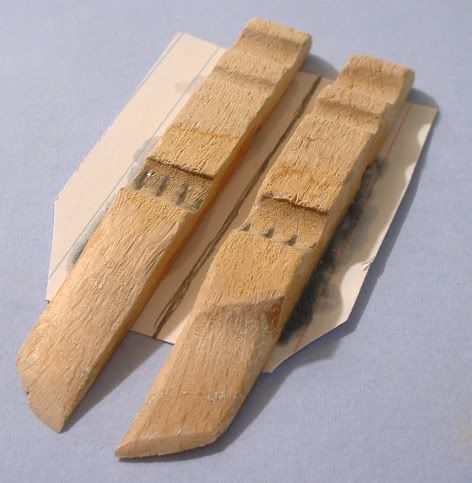 The idea there having been to shape those clothespins, so that I had a basically flat bottom on each of the final holes; but with the shape later shown, on the sides and tops of each new hole. The shaped clothespin got waxed up (Butcher's Bowling Alley Wax -- great stuff, for use as a mold release agent for certain tasks!) and were shoved into oversized holes in the kit; with the new walls or whatever you want to call them, being formed around these clothespins, when I put some Evercoat auto body icing around the visible part of all this. Anyway ... These next three shots show the steps after the two "reminder" shots, above ... which was to brush some pastel dust onto the model, to get a slight "rust patina" going, over an otherwise mostly-metal-looking surface: 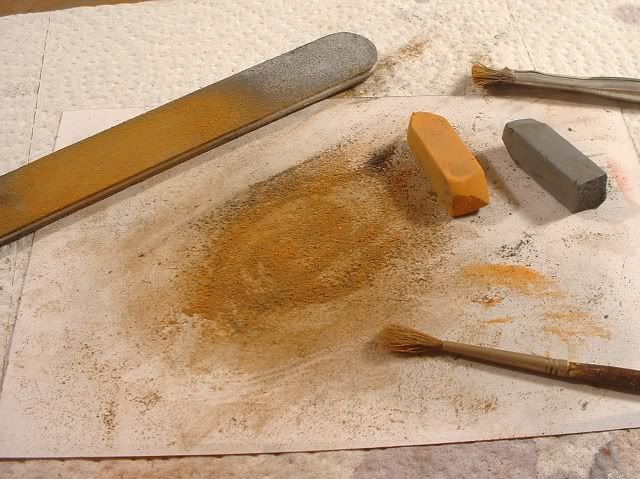 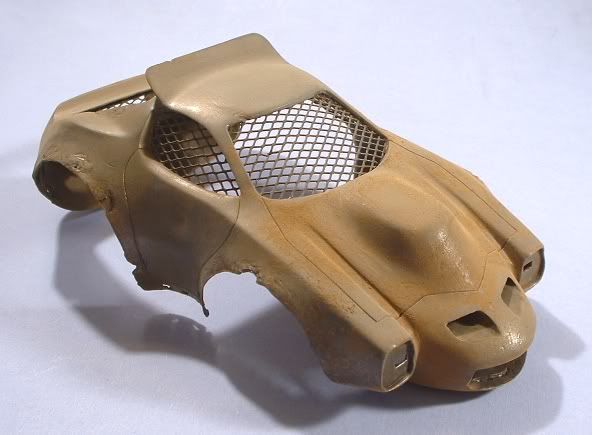 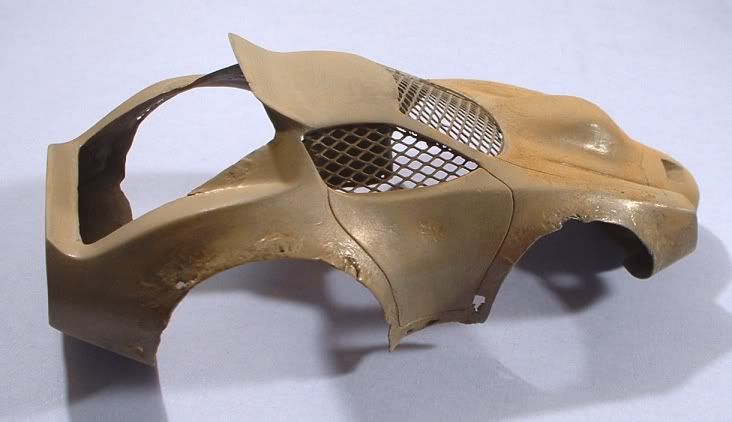 The bulk of the powder has been brushed on, then brushed off, in most places -- but I left it all on the hood, for these pics. Not long after the pics were taken, the hood got dusted off, too. These next two shots show the model after it has been hit with some (airbrushed-on) Metalizer Sealer, by Testors; which had been slightly tinted with a brownish-orange, so it would add (in theory, anyway) more subtle "rust patina" to everything. The idea being that the powders tend to collect in low spots; the sealer would cover everything, fairly evenly -- but since both are mostly transparent, at the same time, I was hoping at least some of the metallic sheen or luster would still show through ... even if, overall, both the darkness and the reflectivity were "cut way down". The intent being to have it look like metal, just beginning to barely rust -- but in a way that's still mostly metal; not rust all the way through. It's something I'll have to play with, before I feel I'm good at it... it worked better in some places than others. 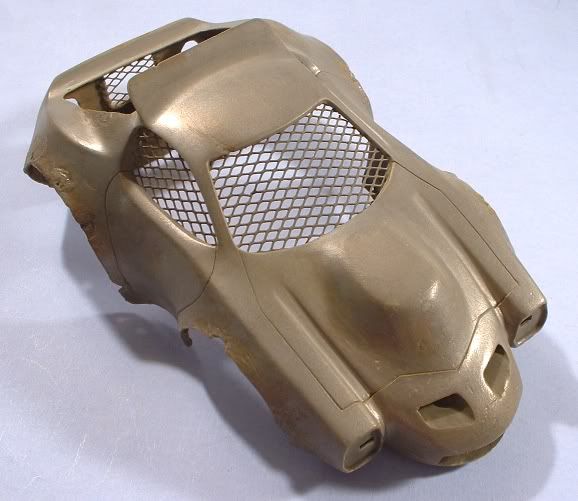 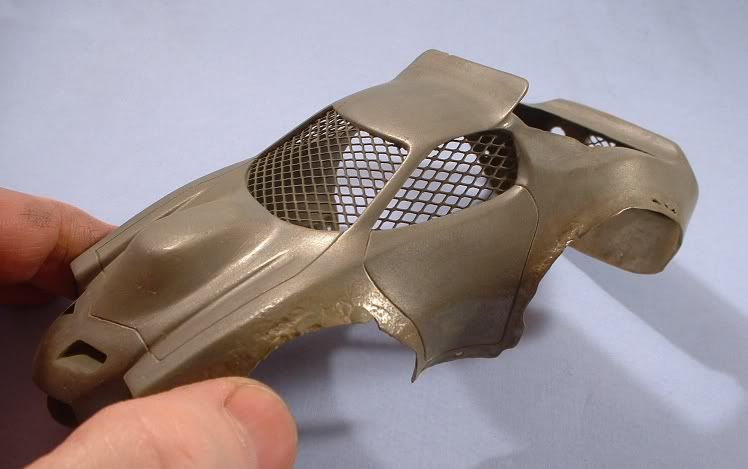 |
|
|
|
Post by Wardster on Jun 4, 2012 2:15:03 GMT -6
Not shown, step-wise: sealing in the work already done, using a specific type of hair spray -- I'll look up the exact name, if anyone wants to know, but it's one of the Tressemme products. The point of this step is to have a clear coat, after the initial metal steps / weathering steps ... but before the final paint job goes on. The hair spray product washes off ... so, you can use that to make the paint layers on top, fail; so that the paint layers / weathering / whatever you've sealed in, before the hair spray step, can selectively be revealed.... in a later step. So, it's metal layers; rusty and weathered stuff over that; a clear coat that won't fail; a clear coat that will fail; then, an acrylic-based paint job, over that. (Gotta be acrylic, or the future paint failure steps won't work!) I should have taken these pics, outside, in natural light ... as the colors are a bit harsh and "off" of what they really look like ... but something's something; so, here goes: 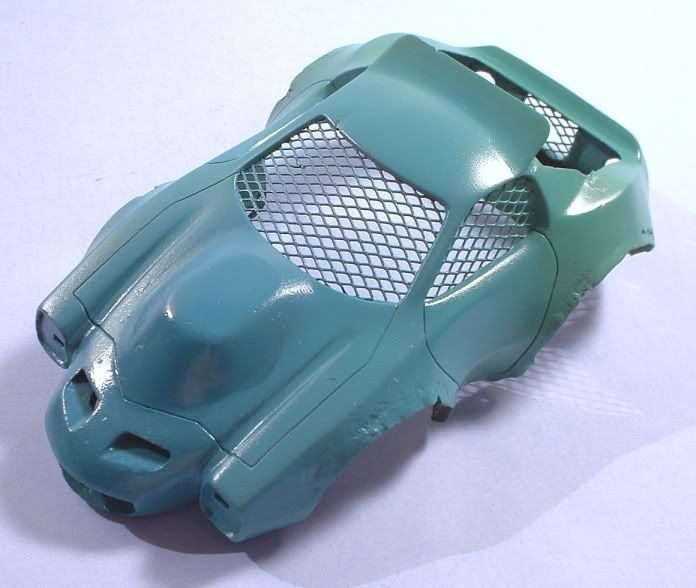 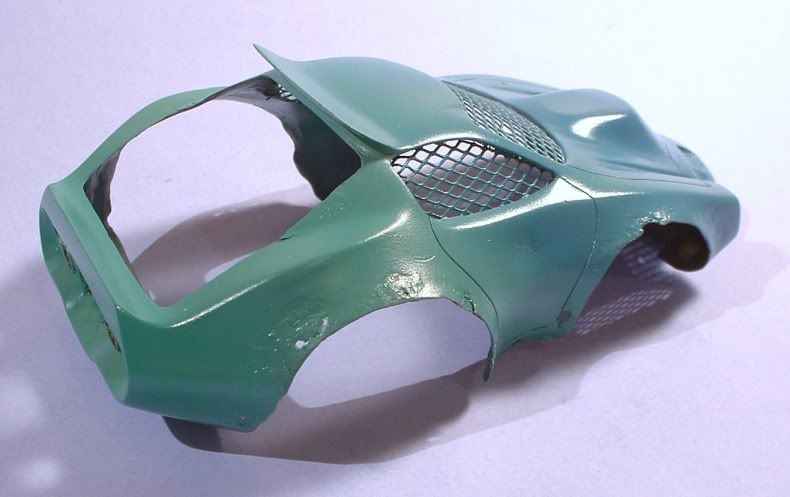 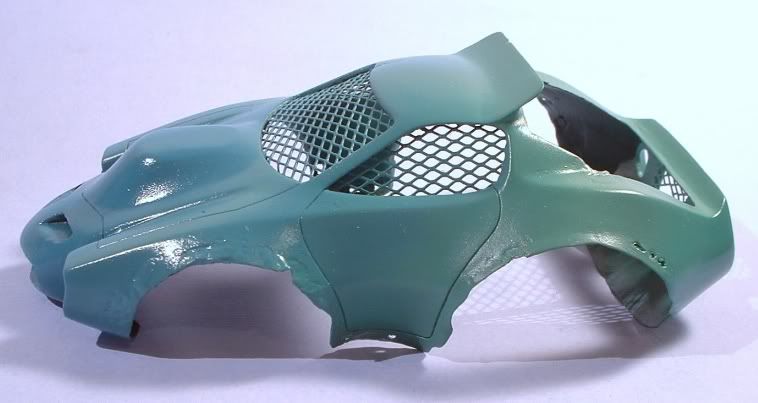 Anyway, for the longest time I couldn't come up with a paint scheme idea I liked ... but, Ira bugged me to do something, and I "did something ... even if it was wrong". (These contests and such are great, for pushing stalled projects along!) So, anyway, one night I decided "paint it, darn it!" and mixed up some random blues and greens, from the Tamiya acrylic line, until I had a tintable base color I could live with. Sort of a medium "not too blue and not too green color". Almost a pastel, it wasn't super dark. I poured that into two different jars. Added Tamiya "clear" blue to one jar, by eye; and the same with clear green, for the other. Airbrushed the blue-ish green towards the front. Used the more-obviously-green color towards the back. Got it halfway "fade-y" (for lack of a better word ...) towards the middle of the car. Decided where I wanted the next transitions to begin and end; and poured some of those custom colors into two other jars; adding more of the Tamiya clears to both. So I started with a base coat (which largely wasn't used, as-is); and that quickly became two slightly different colors; which were used. To keep "color harmony" going, I just added more "tint" to those two colors, and only sprayed that at the vehicle's very front and very back. After looking at it for a while, I added an even darker blue, to the tip of the vehicle's nose area. I let that all sit for a few days ... then ...! |
|
|
|
Post by Wardster on Jun 4, 2012 5:03:25 GMT -6
And, finally ... here's the fun bits: 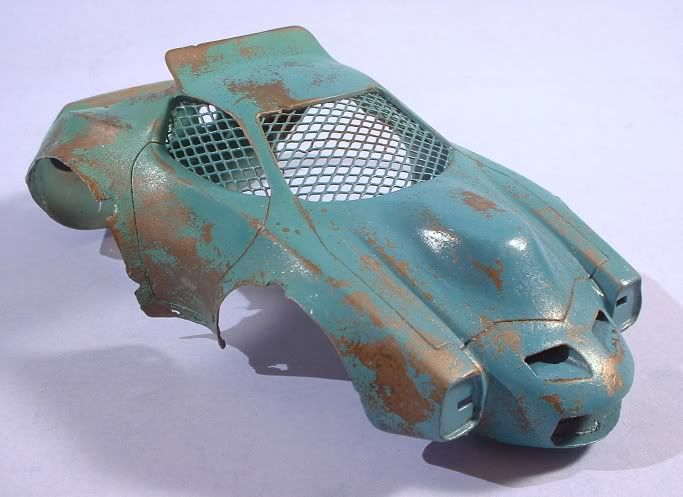 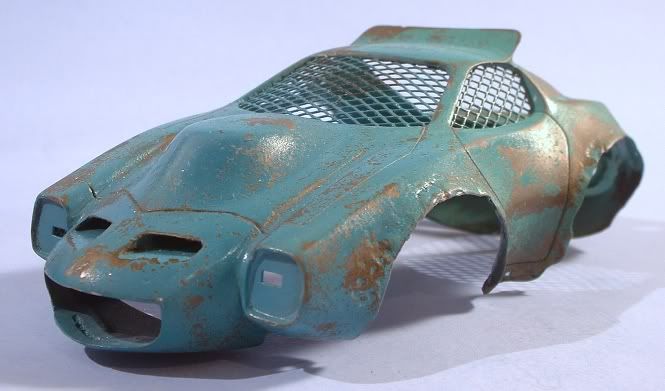 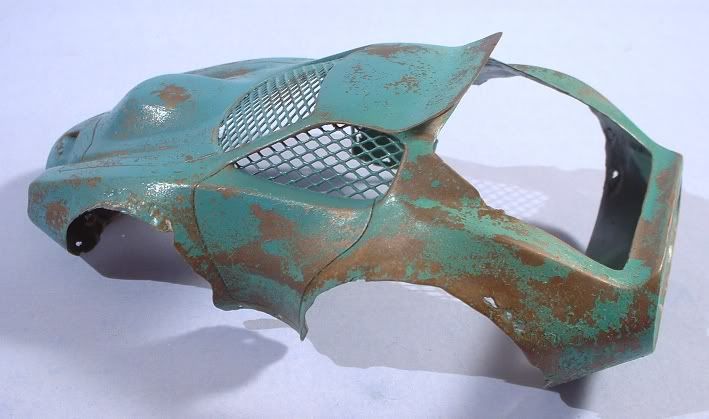 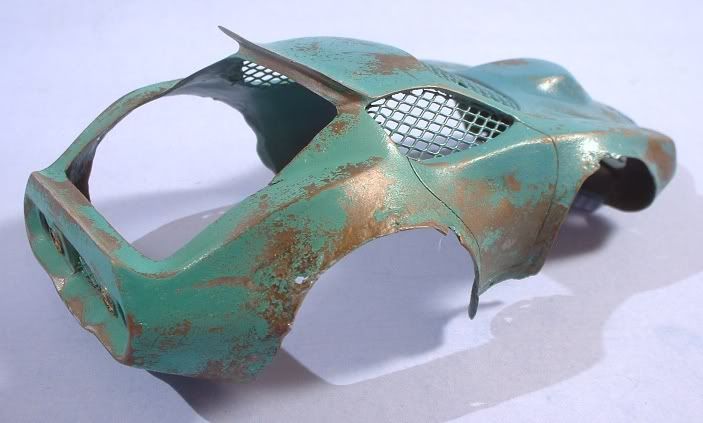 ... which was done via rubbing on the paint job, aggressively, using a cut-shorter "acid brush" and some 50% isopropyl alcohol. The chemical attack and the physical abrasion did what you see. I'm obviously not going to finish this model, any time soon ... but that's okay! I'll enjoy the next steps, when I get time to "play" a bit more. I'll have some "filters" to apply, in various places; etc. -- and of course it'll need wheels; some more detail parts, etc., etc. This next bit makes my day, since it opens up new possibilities, (at least "new to me") as far as decals go: 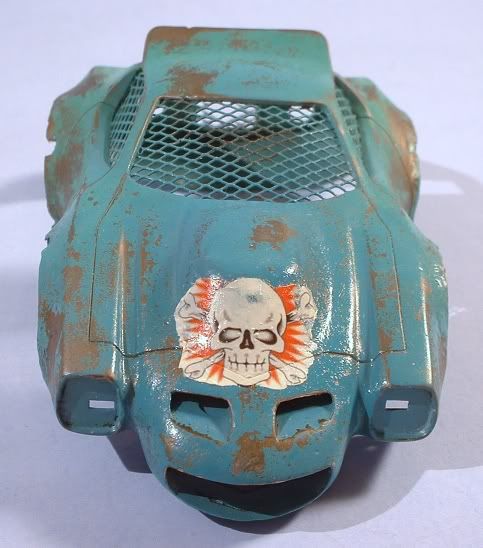 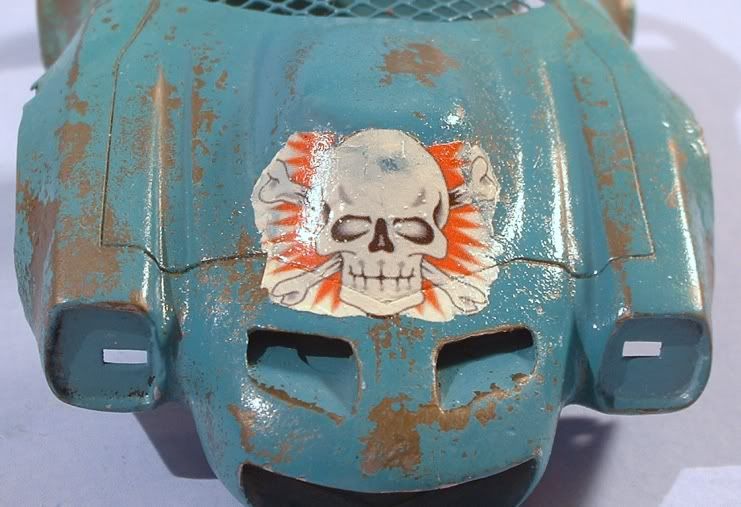 That skull isn't actually a decal. It's a kid's temporary tattoo! This came on a really cool sheet of "pirate" themed tattoo's, from my local Family Dollar store. Once I had experimented a bit, and saw that these things (with a bit of practice / getting used to) worked pretty well as "decals" I went and bought a bunch of back-ups, in various styles. (The kids are snapping them up, too!) I even used Micro-Sol on this one ... and it didn't do any damage to it. Earlier experiments indicated that going crazy with the #1 liquid may not be a great idea; but normal amounts seem to work fine. The #2 liquid I didn't have any problems using; even in large amounts. These are admittedly delicate ... probably because they're little if any carrier film, in the conventional sense / that we're used to ... so, don't try to slide them around a bunch: put it where you want it, and try not to tug on it, once it's trying to stick itself onto your kit. The extreme thinness of the film on these things could be a bit of a boon: I had experimented with laying the first ones over a small resin-casting-blob that had been made from a mold of the side of a "beaded" trailer model. In other words: it had hugged itself down very nicely, even on a torture-test surface! The main thing I'd have to point out, if anyone was trying to use these things as decals, is that I had to paint the white parts in by hand ... which wasn't all that hard, actually. I just laid on two thin coats of Linen White (by Reaper -- it's paint for "gaming mini's") and let each coat dry, for a few minutes ... then put it on like the instructions say. Because the top surface of a temporary tattoo is actually the back side, I didn't even have to "stay in the lines". I realize I'll have to do corrections / upgrades / whatever, later, by hand ... but that's fine! Beats having to freehand this design on! Anyway ... that's it for me, for now, on this project! I'm behind on checking out what all of you folks did ... but will soon fix that! ;D |
|
|
|
Post by ira on Jun 4, 2012 7:47:43 GMT -6
[glow=red,2,300]CAR-TOONS CONTEST COUNT DOWN: ONLY 1 DAY LEFT!!![/glow] Contest Deadline...End of the Day TODAY... [glow=red,2,300]BETTER HURRY UP & GET 'ER DONE!!![/glow] |
|
|
|
Post by ira on Jun 4, 2012 7:55:59 GMT -6
And, finally ... here's the fun bits: ... which was done via rubbing on the paint job, aggressively, using a cut-shorter "acid brush" and some 50% isopropyl alcohol. The chemical attack and the physical abrasion did what you see. I'm obviously not going to finish this model, any time soon ... but that's okay! I'll enjoy the next steps, when I get time to "play" a bit more. I'll have some "filters" to apply, in various places; etc. -- and of course it'll need wheels; some more detail parts, etc., etc. This next bit makes my day, since it opens up new possibilities, (at least "new to me") as far as decals go: That skull isn't actually a decal. It's a kid's temporary tattoo! This came on a really cool sheet of "pirate" themed tattoo's, from my local Family Dollar store. Once I had experimented a bit, and saw that these things (with a bit of practice / getting used to) worked pretty well as "decals" I went and bought a bunch of back-ups, in various styles. (The kids are snapping them up, too!) I even used Micro-Sol on this one ... and it didn't do any damage to it. Earlier experiments indicated that going crazy with the #1 liquid may not be a great idea; but normal amounts seem to work fine. The #2 liquid I didn't have any problems using; even in large amounts. These are admittedly delicate ... probably because they're little if any carrier film, in the conventional sense / that we're used to ... so, don't try to slide them around a bunch: put it where you want it, and try not to tug on it, once it's trying to stick itself onto your kit. The extreme thinness of the film on these things could be a bit of a boon: I had experimented with laying the first ones over a small resin-casting-blob that had been made from a mold of the side of a "beaded" trailer model. In other words: it had hugged itself down very nicely, even on a torture-test surface! The main thing I'd have to point out, if anyone was trying to use these things as decals, is that I had to paint the white parts in by hand ... which wasn't all that hard, actually. I just laid on two thin coats of Linen White (by Reaper -- it's paint for "gaming mini's") and let each coat dry, for a few minutes ... then put it on like the instructions say. Because the top surface of a temporary tattoo is actually the back side, I didn't even have to "stay in the lines". I realize I'll have to do corrections / upgrades / whatever, later, by hand ... but that's fine! Beats having to freehand this design on! Anyway ... that's it for me, for now, on this project! I'm behind on checking out what all of you folks did ... but will soon fix that! ;D [glow=red,2,300]AMAZING PAINT WARD!!![/glow] Thanks for sharing this Great Technique! Sure Looks Like Rusty Metal to me...I Have to Try this Technique! |
|
|
|
Post by ira on Jun 4, 2012 11:28:29 GMT -6
|
|
|
|
Post by ira on Jun 4, 2012 11:46:01 GMT -6
[glow=red,2,300]QUICK HOG MOCK-UP!!!![/glow] About 12 Hours left in the 2 Week Challenge! Here is the Hog Vette Progress so far...  [glow=red,2,300]I Better Get Busy, I Have to go Paint a PiG![/glow] ;D |
|
|
|
Post by ira on Jun 4, 2012 13:18:14 GMT -6
|
|
|
|
Post by ira on Jun 4, 2012 14:49:40 GMT -6
|
|
|
|
Post by ira on Jun 4, 2012 16:08:26 GMT -6
[glow=red,2,300]MORE PRIZES For The CAR-TOONS CONTEST!!![/glow] Ward Shrake, The Wardster, has Donated Two copies of AMAZING VEHICULAR MODELER Magazine!  Ward has Donated One each of Special Issue #1 and One Copy of Special Issue #2 of this Amazing Magazine. Check out the AMZ Magazine Details at this LINK: www.amazingmodeler.com/avm.html[glow=red,2,300]WOW!!![/glow] GREAT MAGAZINES... ;D |
|
|
|
Post by ira on Jun 4, 2012 17:34:09 GMT -6
[glow=red,2,300]STEVE H, YOU NEED TO JOIN TO ENTER!!![/glow] SORRY! Only Members can Enter the CAR-TOONS CONTEST! Nice Zinger, But You need to Join to Enter...  [glow=red,2,300]UPDATE!!![/glow] Steve joined the Corner, is Entered in the Contest and is our Newest Member! ;D Thanks Steve! |
|
|
|
Post by ira on Jun 4, 2012 18:22:03 GMT -6
|
|
|
|
Post by ira on Jun 4, 2012 20:48:41 GMT -6
|
|
|
|
Post by ira on Jun 4, 2012 23:18:51 GMT -6
|
|
|
|
Post by ira on Jun 4, 2012 23:40:07 GMT -6
[glow=red,2,300]PAINTIN' The PiG!!![/glow] I started with a coat of Dupli Color White Primer, then Brushed on some Tan Acrylic. A wash of "The Detailer - Black was then appllied. Next I painted all of the White Parts.  I used the Slixx "Air Hog" for a guide when I painted the Hogs Head. Using a small fine brush I painted the Black outlines on the Hog. 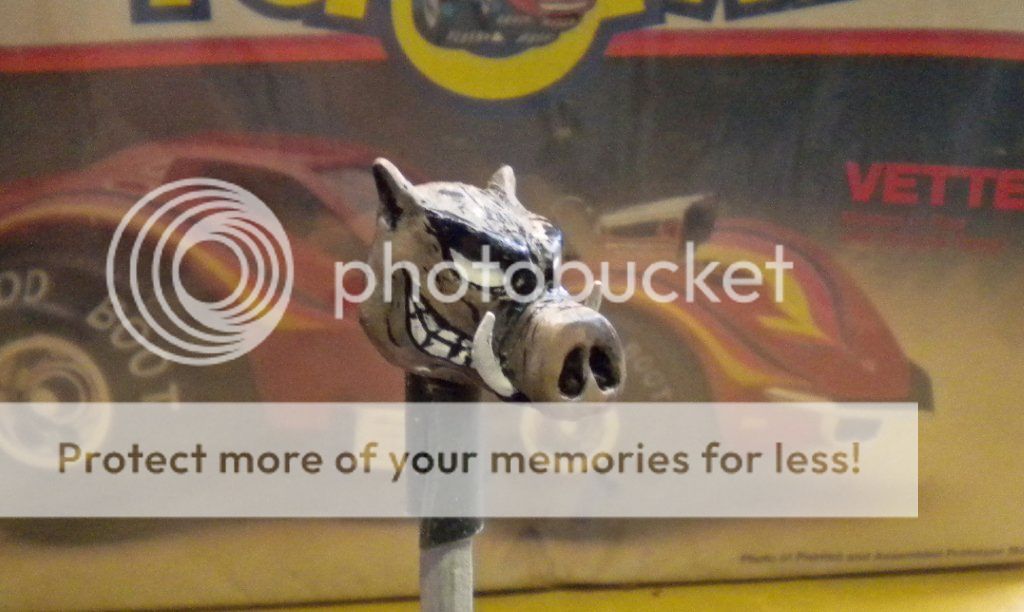 I found some little Red, Round Glass beads I can use for eyes!  Back to the Bench... |
|
|
|
Post by ira on Jun 4, 2012 23:44:49 GMT -6
|
|
|
|
Post by ira on Jun 5, 2012 9:22:18 GMT -6
[glow=red,2,300]THANK YOU EVERYONE!!![/glow] I just wanted to say Thank You for All of Your Contributions to the CAR-TOONS CONTEST! Thank you for Posting your Comments, Suggestions and Preview Photos, Praises for your Fellow Modelers Work, Donating Prizes, and Thank You for Your Entries in the Contest! This has already been one of the Most Rewarding Things I have done, its has made me very Happy and Proud to be a Member here at the Corner. [glow=red,2,300]THANKS EVERYBODY!!![/glow] P.S. I didn't Finish the Hog Vette by the Deadline but it should be done soon...  [glow=red,2,300]HAPPY MODELING!!![/glow] |
|
|
|
Post by ira on Jun 6, 2012 8:40:57 GMT -6
[glow=red,2,300]VOTING!!! CAR-TOONS CONTEST...VOTING STARTS NOW!!![/glow] It's Time To VOTE for Your Favorite CAR-TOONS! Vote for Your Top 5 Favorite CAR-TOONS Models from either or both of the Finished CAR-TOONS Sections! Members Only Please! [glow=red,2,300]VOTE![/glow] Just Click on The Blue " ira", above my Orange VW Van Photo (to the left) to send a "Private Message", with your 5 Votes! [glow=red,2,300]CONTEST ENTRANTS:[/glow] Be Sure to Include Your Name & Address if you Entered Finished Model the Contest, so we can send a Prize Package to You! If you need help , let me know! Take your time, Enjoy the Amazing Creativity our Fellow Modelers have displayed in these Incredible CAR-TOONS MODELS, and then send me your TOP 5 Picks! |
|
|
|
Post by modelmkr53 on Jun 8, 2012 18:47:58 GMT -6
tanks Ira ... will do!
|
|
|
|
Post by ira on Jun 10, 2012 8:29:43 GMT -6
[glow=red,2,300]ALL COFFIN CORNER MEMEBERS...VOTE NOW!!![/glow] LAST CHANCE!!! The Time to VOTE for your Favorite CAR-TOONS CONTEST MODELS is NOW!!! [glow=red,2,300]VOTE DEADLINE TONIGHT:[/glow] SUNDAY June 10, 2012 Midnight! Check out the Entries and then Pick your Favorites!!! Thank for Your Votes, Ira ;D |
|


