|
|
Post by hobbybobby on Feb 27, 2014 18:45:45 GMT -6
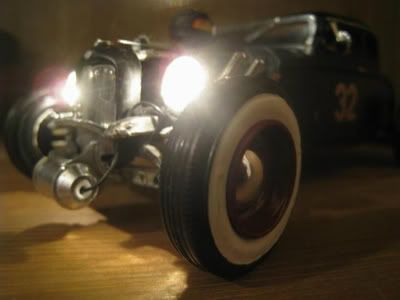
Great Progress, Mike, it gets better!  Here it is in red, sorry for the Quality... 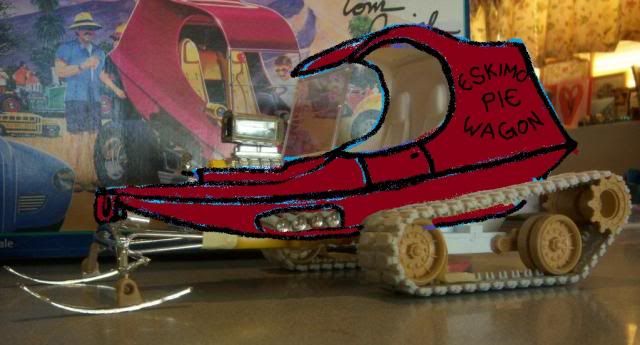 |
|
|
|
Post by hobbybobby on Feb 27, 2014 19:01:32 GMT -6
No idea about the decals rights, but look at the box cover... 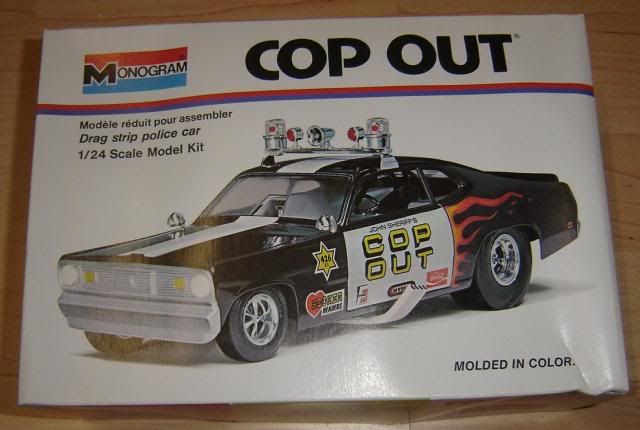 ... why is the star and the Hooker decal on a white surface? And the flames are also a little different... Hmm... I had a little too early, taped the body for the silver parts, the clear coat was still wet, so there has been a "frosting" in some places... ... everything had to be lightly sanded and varnished again...  But no matter, I do not change it more, here is my version ...  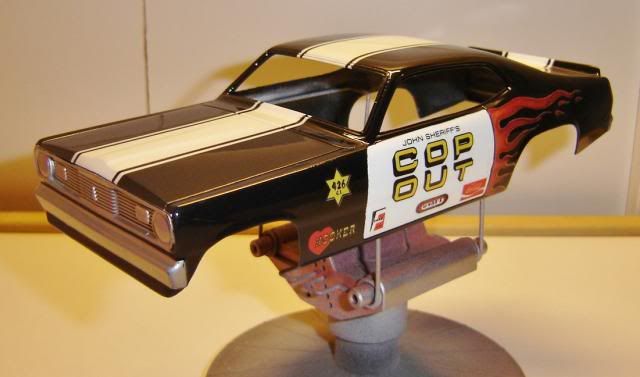 |
|
|
|
Post by minimagneto on Feb 27, 2014 19:24:39 GMT -6
The big challenge will be these decals: 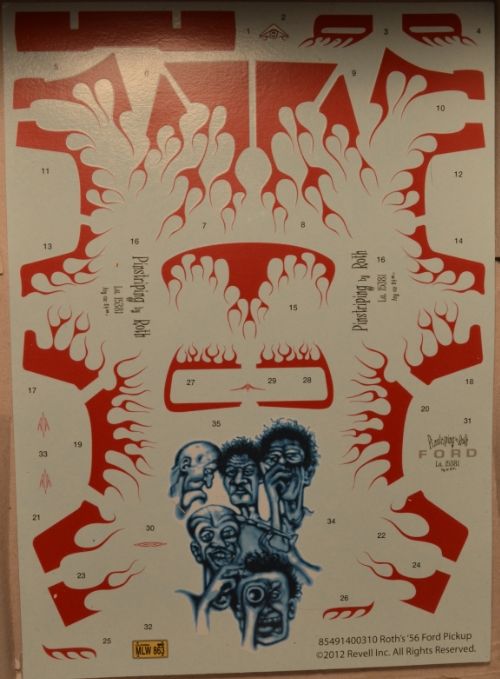 Blake, this is not only a challenge, this is more of something, for, hmm, masochistic assessed model-builders... Nevertheless, I wish you good luck!  Thanks for the good luck wishes Bobby. I've gotten pretty mad trying put decals on before, so this project will be mostly for my own sick self-tormenting pleasure  -Blake ps Cop-out is looking good, I see you've passed your own decal challenge? |
|
|
|
Post by Mysterion on Feb 27, 2014 21:12:15 GMT -6
Holy smokes is there some great ideas showing up in this contest, not to mention some fantastic craftsmanship. I've never seen a tracked vehicle I ever liked until now. Mike that is fantastic. As for colors, nothing says cold like white and blue.  Bobby, as much as I appreciate the tip on the wheels, you must have mistaken me for someone with much more patience. I could never in a million years trim down those spokes without losing my mind!  As for the Corvair, I bought it already built at a show last Sept. and the idea to do it as a widebody popped into my head last night. I think I know where the inspiration for the 1st gen Camaro came from, after I cut the area between the headlights out, it really resembles the nose of a Camaro. |
|
|
|
Post by Mysterion on Feb 27, 2014 21:18:37 GMT -6
... why is the star and the Hooker decal on a white surface? |
|
|
|
Post by hobbybobby on Feb 27, 2014 21:25:46 GMT -6
Thanks for the explanation, Dave... ... but I ask it again, a little different... ... why is the star and the Hooker decal on a white surface on the box cover, but not on my decal sheet?  |
|
|
|
Post by Mysterion on Feb 27, 2014 22:02:02 GMT -6
Because when Chuck found out you were building a Cop Out, he went into mad scientist mode and starting studying episodes of Family Guy to figure out how Stewie built his time machine. He then made his own time machine, went back in time to when this kit was in development and kidnapped the CEO of Monogram's wife and held her for ransom. Did he want money in exchange for her safe return? No, he demanded that the decals not match the box art. The CEO pleaded with Chuck to ask for anything but that, he offered him money, hookers, booze, drugs and even offered to find a way to have the Uncertain T reissued. He knew that mismatched art/decals could throw the earth of it's axis, dooming mankind forever. Chuck just Mwahahed the CEO while petting is equally diabolical kitty and stood his ground, not budging from his demand. Once his demands were met, Chuck then came back to present day knowing that this would drive you crazy, thus having you institutionalized and he would win due to forfeiture. I understand they allow you to build models at the insane asylum, but you aren't allowed to use exacto knives, razor saws or anything sharp. So it looks like a life of snap kits for you from now on. |
|
|
|
Post by hobbybobby on Feb 28, 2014 4:54:02 GMT -6
NNNNNnnnnnooooooooooooooooooooooooooooooooooooooooooooooooooooooooooooooooooooooooooooooooooooooooooooooooooooooooooooooooooo!!!!!!!!!! Chuuuuuuuuuuuuuuuuuuuuuuuuuuuuuuuuuuuuuuuuuuuuuuuuuuuuuuuuuuuuuuuuuuuuuuuuuuuuuuuuuuuuuuuuuuuuuuuuuuuuuuuuuuuuuuuuuuuuuuuuuuuck!!!!!!!!!! Dave, this is a better version, a plausible story, now I think that too! Mr. Darnell, you're exposed! What you say in your defense? |
|
|
|
Post by hobbybobby on Feb 28, 2014 6:01:34 GMT -6
I like to play around... ... and with my children, I have new opportunities... ... now we have a lot of parts, that are predestined to infuse them with a new Determination... ... and this is the latest result, the " Express Coach"... 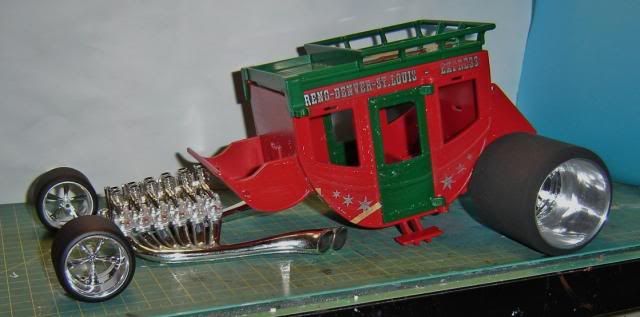 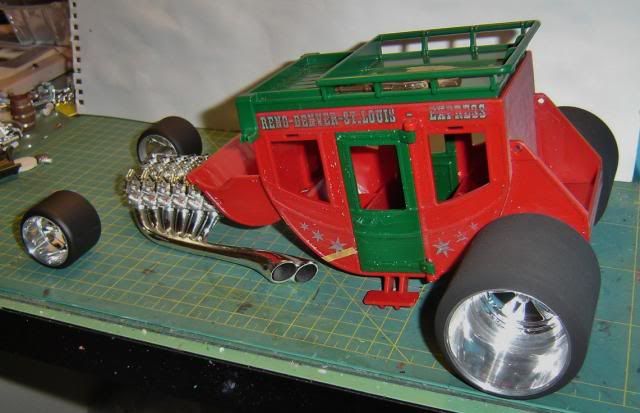 |
|
|
|
Post by Mysterion on Mar 1, 2014 21:04:32 GMT -6
I finally got to the LHS and picked up the brass tubing for the ends of the tie rod. I think I might stock up on brass and start using it to make my suspensions from now on. I think it's easier to work with and I can be more precise than with styrene.   |
|
|
|
Post by Mysterion on Mar 1, 2014 21:30:15 GMT -6
I finished doing the Alclad on the engine parts. I want to do a wash on the cylinders and then it's time to put it together.  It took 2 tries, and was a Royal PITA, but I was able to add injectors and fuel rails to the intake. I drilled the intake tubes to fit some thin beading wire, then Ca glued #1 crimp beads to the wire. I lined up the fuel rails, marked and drilled them, then trimmed then down the wire and glued the rails to the injectors. I also added flanges to the bottoms of the intake tubes.  With the blower and throttle body in place.  |
|
|
|
Post by TooOld on Mar 2, 2014 12:54:06 GMT -6
Been having issues linking photos but it seems to be working now . . . Here's the engine for the Roswell Rod .  This is a great engine, Bob, from which kit comes this one? Thanks Bobby ! The engine block and headers are from a Revell '69 Z28 but all of the chrome parts and the belts / pulleys came from about a dozen different kits . It took me days of going through kits to find everything ! |
|
|
|
Post by TooOld on Mar 2, 2014 12:59:21 GMT -6
And this is where I'm at today ! I'm going to start prepping the body for paint this week !   |
|
|
|
Post by mykturk on Mar 2, 2014 15:44:57 GMT -6
Looks like a nice place to be!
|
|
|
|
Post by hobbybobby on Mar 3, 2014 16:16:04 GMT -6
This looks very good, Bob, thumbs up! And, here is the stand with my Boxstock build... 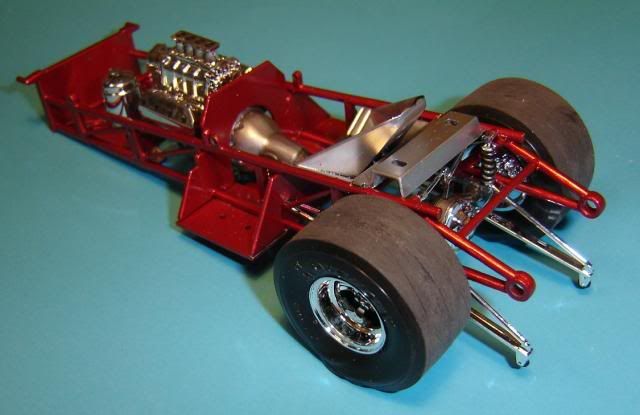 ... I just have to block this stuff here somewhere... 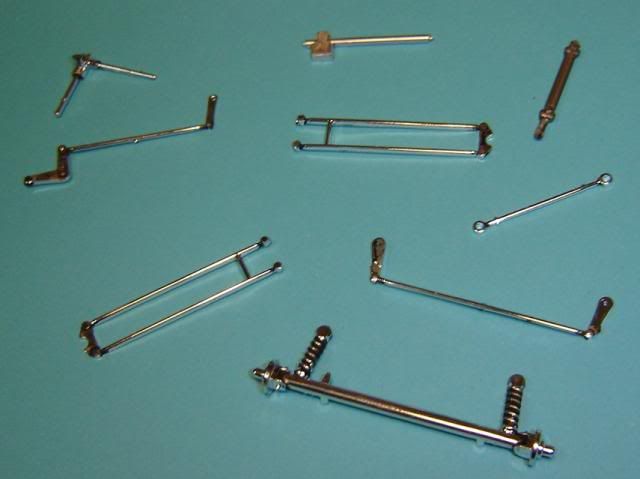 And, yes, it's happened again, I have lost the boxstock front wheels somewhere... |
|
|
|
Post by Mysterion on Mar 4, 2014 8:54:43 GMT -6
Nice work gentlemen. As for me, I screwed up pretty good wiring my distributor, Somehow I grabbed the coil wire for one of my plugs. Now this might not have been so bad, except the wire that now will go to the coil is the most visible one you see. I hope to mount the coil somehow where it might get lost when tracking where the wire goes. I also had to shave the bottom of the crank pulley. It fit in mock up and paint ain't that thick! Luckily once it's in you won't notice it. I made a custom engine cover for the fan and have moved on to the rear suspension. I had to cut the Corvair rear axle assembly into 9 pieces to change the angles. I replaced the center section with a scratchbuilt piece so now the rear axle is 12 pices not counting the connector pins. Here is the rear in mock up.    |
|
|
|
Post by AL on Mar 4, 2014 18:56:59 GMT -6
....... I MUST get to WORK, ... AAAAARRRRRGGGGG !!!!!
|
|
|
|
Post by Mysterion on Mar 4, 2014 19:36:37 GMT -6
|
|
|
|
Post by Mysterion on Mar 4, 2014 19:37:25 GMT -6
And, yes, it's happened again, I have lost the boxstock front wheels somewhere... Do you need a pair? |
|
|
|
Post by hobbybobby on Mar 4, 2014 23:33:38 GMT -6
Dave, this is a very stunning scratch built work that you are doing here, hats off! And, yes, it's happened again, I have lost the boxstock front wheels somewhere... Do you need a pair? This is very nice of you to ask, thank you! But I have rummaged through some boxes, and I have quite a lot of... 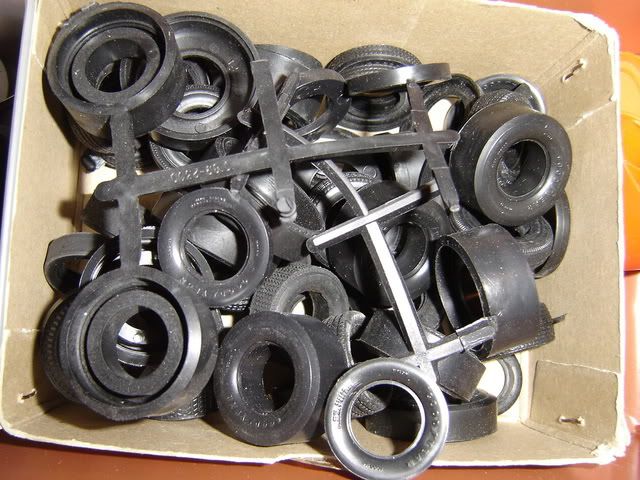 ... with my "superfluous" tires, and found again the matching "same"... |
|
|
|
Post by donculley on Mar 5, 2014 10:13:28 GMT -6
No pics, but I have just about finished my first box stock build, just some decals and small details and its finished. The second one is shaping up too, with any luck I'll have them both done in time ! '
|
|
|
|
Post by Dennis M on Mar 5, 2014 13:20:14 GMT -6
Wow' Great job guys. I am speechless. |
|
|
|
Post by Mysterion on Mar 5, 2014 20:36:15 GMT -6
Rear bag mounts are done.   |
|
|
|
Post by Mysterion on Mar 6, 2014 15:27:16 GMT -6
Front bags are done, along with some body mounts to the frame.  Next up was the shocks. Amazingly, I didn't lose a single one. It's almost guaranteed that as soon as one is finished it manages to get found by the elusive "Northeast Gulping Carpet Monster". Fronts.  And rears.  With the rolling chassis complete, it's time to clean up the body where the suspension comes through. |
|
|
|
Post by johnverkerk on Mar 6, 2014 17:24:21 GMT -6
NICE WORK!!!
|
|
|
|
Post by Dennis M on Mar 7, 2014 19:38:03 GMT -6
Great job Dave.
|
|
|
|
Post by mykturk on Mar 8, 2014 20:01:58 GMT -6
Finished working out the tracks by adding three smaller wheels to each side.  Also have the controls worked out...   Those are cut down shifter from the Pie Wagon. Rear end all worked out as well.  Front view...  Trying to decide if I should 'wing it' or not...   And just WHAT is going on here?  |
|
|
|
Post by Starry Eyes on Mar 8, 2014 21:40:55 GMT -6
top shelf coolness right there Dave..
|
|
|
|
Post by Mysterion on Mar 9, 2014 7:04:19 GMT -6
Thanks for the compliments guys. I had to widen the turtle deck with some .040 square stock. I was just going to add a skim coat of filler, but added a flair above the exhaust that would get lost in the mud.  I went to cast the air compressor and tank form the 39 Wagonrod, but my resin bottles are just about empty and I guess past their expiration date. By the time I got the 2 parts mixed it had started to set. I wound up making my own from styrene.  I tried to find some affordable PE wires for the front wheels, Herb Deeks doesn't have the Borranni's listed on ebay anymore. I thought about using his Dayton's, but according to the description they are too small. I scraped some of the flash from one of the Outlaw wheels and it's soaking in the pond to see what I can come up with. Keep your fingers crossed for me that I don't screw them up. |
|
|
|
Post by ira on Mar 9, 2014 9:51:08 GMT -6
Great Progress Guys!!!
|
|